
Amazon SageMaker Studio provides a single web-based visual interface where different personas like data scientists, machine learning (ML) engineers, and developers can build, train, debug, deploy, and monitor their ML models. These personas rely on access to data in Amazon Simple Storage Service (Amazon S3) for tasks such as extracting data for model training, logging model training metrics, and storing model artifacts after training. For example, data scientists need access to datasets stored in Amazon S3 for tasks like data exploration and model training. ML engineers require access to intermediate model artifacts stored in Amazon S3 from past training jobs.
Traditionally, access to data in Amazon S3 from SageMaker Studio for these personas is provided through roles configured in SageMaker Studio—either at the domain level or user profile level. The SageMaker Studio domain role grants permissions for the SageMaker Studio domain to interact with other AWS services, providing access to data in Amazon S3 for all users of that domain. If no specific user profile roles are created, this role will apply to all user profiles, granting uniform access privileges across the domain. However, if different users of the domain have different access restrictions, then configuring individual user roles allows for more granular control. These roles define the specific actions and access each user profile can have within the environment, providing granular permissions.
Although this approach offers a degree of flexibility, it also entails frequent updates to the policies attached to these roles whenever access requirements change, which can add maintenance overhead. This is where Amazon S3 Access Grants can significantly streamline the process. S3 Access Grants enables you to manage access to Amazon S3 data more dynamically, without the need to constantly update AWS Identity and Access Management (IAM) roles. S3 Access Grants allows data owners or permission administrators to set permissions, such as read-only, write-only, or read/write access, at various levels of Amazon S3, such as at the bucket, prefix, or object level. The permissions can be granted to IAM principals or to users and groups from their corporate directory through integration with AWS IAM Identity Center.
In this post, we demonstrate how to simplify data access to Amazon S3 from SageMaker Studio using S3 Access Grants, specifically for different user personas using IAM principals.
Solution overview
Now that we’ve discussed the benefits of S3 Access Grants, let’s look at how grants can be applied with SageMaker Studio user roles and domain roles for granular access control.
Consider a scenario involving a product team with two members: User A and User B. They use an S3 bucket where the following access requirements are implemented:
- All members of the team should have access to the folder named Product within the S3 bucket. The folder named
UserA should be accessible only by User A. The folder named UserB should be accessible only by User B. User A will be running an Amazon SageMaker Processing job that uses S3 Access Grants to get data from the S3 bucket. The processing job will access the required data from the S3 bucket using the temporary credentials provided by the access grants. The following diagram illustrates the solution architecture and workflow.

Let’s start by creating a SageMaker Studio environment as needed for our scenario. This includes establishing a SageMaker Studio domain, setting up user profiles for User A and User B, configuring an S3 bucket with the necessary folders, configuring S3 Access Grants.
Prerequisites
To set up the SageMaker Studio environment and configure S3 Access Grants as described in this post, you need administrative privileges for the AWS account you’ll be working with. If you don’t have administrative access, request assistance from someone who does. Throughout this post, we assume that you have the necessary permissions to create SageMaker Studio domains, create S3 buckets, and configure S3 Access Grants. If you don’t have these permissions, consult with your AWS administrator or account owner for guidance.
Deploy the solution resources using AWS CloudFormation
To provision the necessary resources and streamline the deployment process, we’ve provided an AWS CloudFormation template that automates the provisioning of required services. Deploying the CloudFormation stack in your account incurs AWS usage charges.
The CloudFormation stack creates the following resources:
Virtual private cloud (VPC) with private subnets with relevant route tables, NAT gateway, internet gateway, and security groups
- IAM execution roles S3 Access Grants instance AWS Lambda function to load the Abalone dataset into Amazon S3 SageMaker domain SageMaker Studio user profiles
Complete the following steps to deploy the stack:
- Choose Launch Stack to launch the CloudFormation stack.
 On the Create stack page, leave the default options and choose Next. On the Specify stack details page, for Stack name, enter a name (for example,
 blog-sagemaker-s3-access-grants). Under Parameters, provide the following information: - For PrivateSubnetCIDR, enter the IP address range in CIDR notation that should be allocated for the private subnet. For ProjectName, enter
sagemaker-blog. For VpcCIDR, enter the desired IP address range in CIDR notation for the VPC being created.  On the Configure stack options page, leave the default options and choose Next. On the Review and create page, select I acknowledge that AWS CloudFormation might create IAM resources with custom names. Review the template and choose Create stack.
 After the successful deployment of stack, you can view the resources created on the stack’s Outputs tab on the AWS CloudFormation console.

Validate data in the S3 bucket
To validate access to the S3 bucket, we use the Abalone dataset. As part of the CloudFormation stack deployment process, a Lambda function is invoked to load the data into Amazon S3. After the Lambda function is complete, you should find the abalone.csv file in all three folders (Product, UserA, and UserB) within the S3 bucket.

Validate the SageMaker domain and associated user profiles
Complete the following steps to validate the SageMaker resources:
- On the SageMaker console, choose Domains in the navigation pane. Choose
Product-Domain to be directed to the domain details page.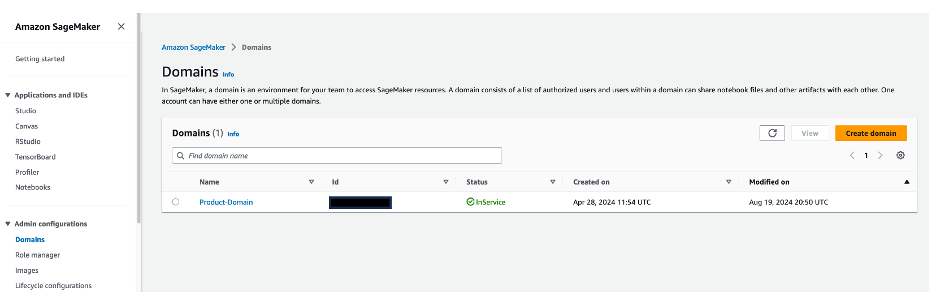 In the User profiles section, verify that the
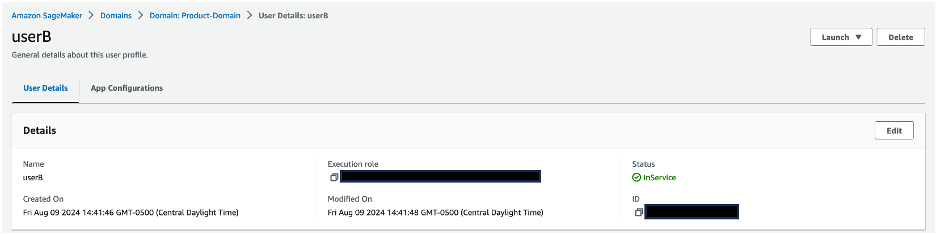
 userA and userB profiles are present.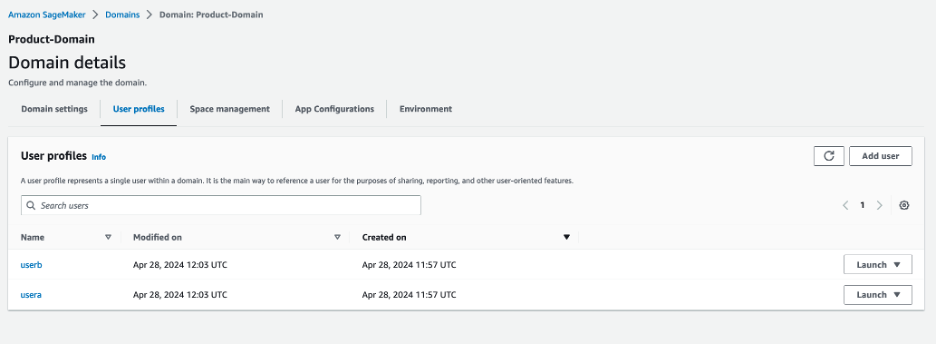 Choose a user profile name to be directed to the user profile details. Validate that each user profile is associated with its corresponding IAM role:
 userA is associated with sagemaker-usera-role, and userB is associated with sagemaker-userb-role.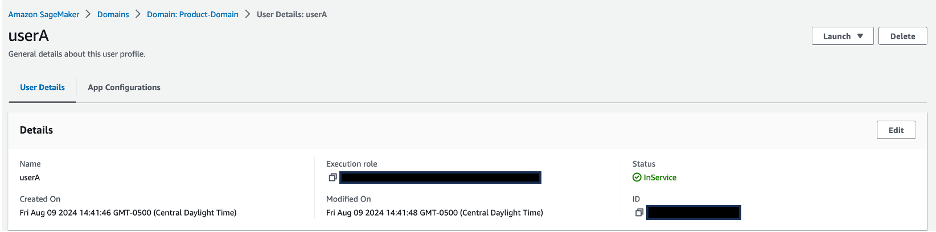
Validate S3 Access Grants setup
Complete the following steps to validate your configuration of S3 Access Grants:
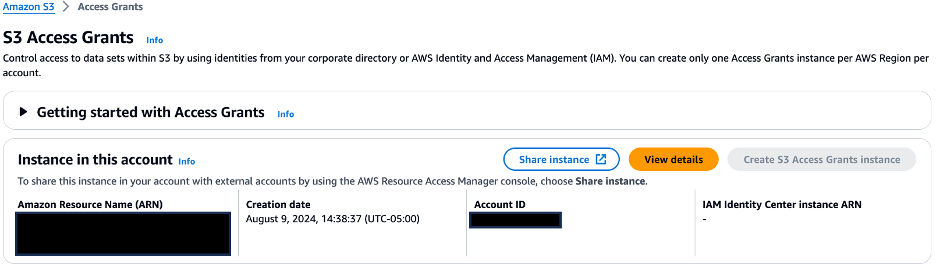
- On the Amazon S3 console, choose Access Grants in the navigation pane. Choose View details to be directed to the details page of S3 Access Grants.
 On the Locations tab, confirm that the URI of S3 bucket created is registered with the S3 Access Grants instance for the location scope.
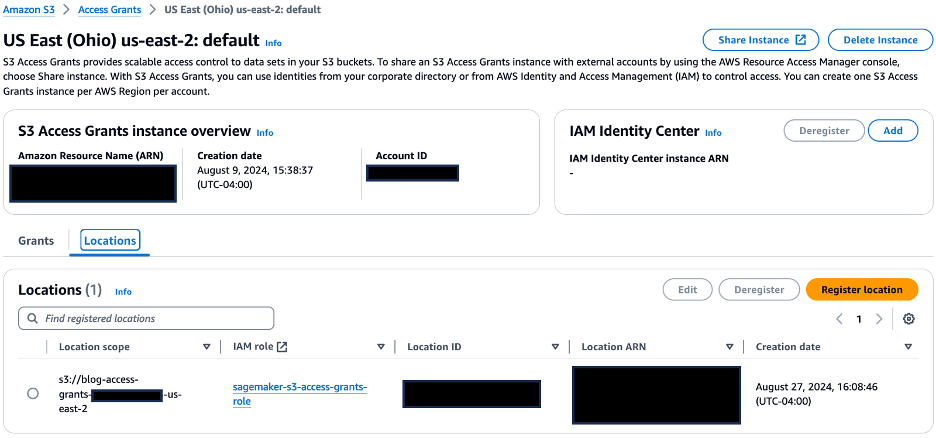 On the Grants tab, confirm the following:
 sagemaker-usera-role has been given read/write permissions on the S3 prefix Product/* and UserA/* sagemaker-userb-role has been given read/write permissions on the S3 prefix Product/* and UserB/*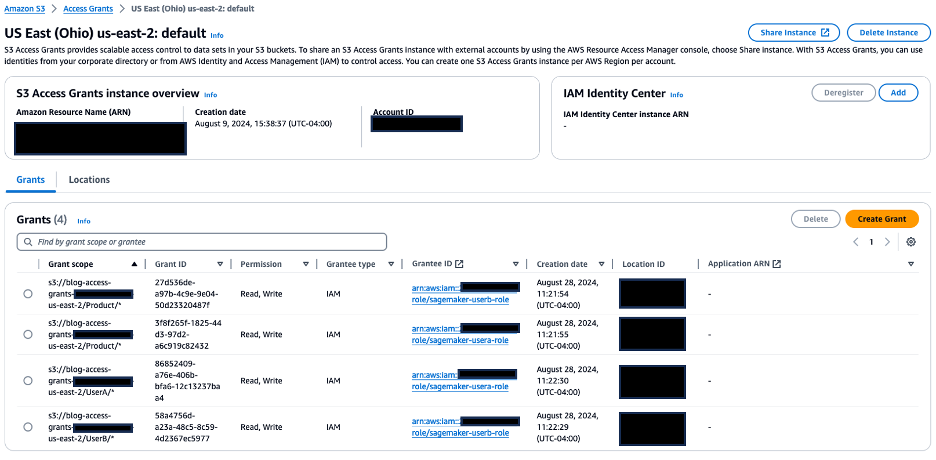
Validate access from your SageMaker Studio environment
To validate the access grants we set up, we run a distributed data processing job on the Abalone dataset using SageMaker Processing jobs and PySpark.
To get started, complete the following steps:
- On the SageMaker console, choose Domains in the navigation pane. Choose the domain
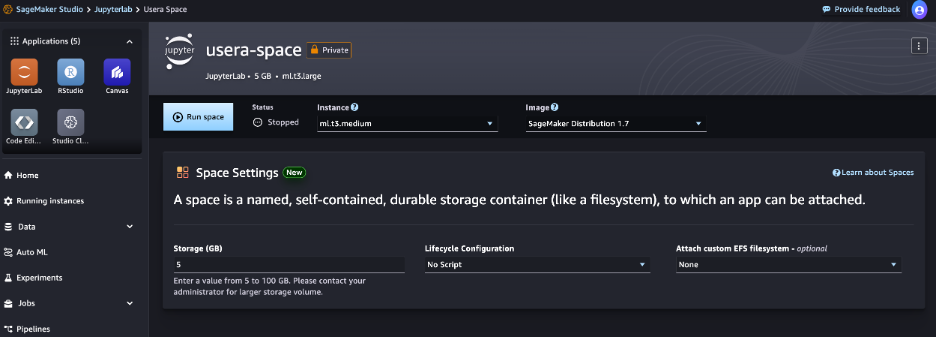
Product-Domain to be directed to the domain details page. Choose userA under User profiles. On the User Details page, choose Launch and choose Studio. On the SageMaker Studio console, choose JupyterLab in the navigation pane. Choose Create JupyterLab space.
For Name, enter usera-space.
For Sharing, select Private.
Choose Create space.
 When the status shows as Running, choose Open JupyterLab, which will redirect you to the SageMaker JupyterLab experience.
 On the Launcher page, choose Python 3 under Notebook.
This will open a new Python notebook, which we use to run the PySpark script.

Let’s validate the access grants by running a distributed job using SageMaker Processing jobs to process data, because we often need to process data before it can be used for training ML models. SageMaker Processing jobs allow you to run distributed data processing workloads while using the access grants you set up earlier. Copy the following PySpark script into a cell in your SageMaker Studio notebook.
The
%%writefile directive is used to save the script locally. The script is used to generate temporary credentials using the access grant and configures Spark to use these credentials for accessing data in Amazon S3. It performs some basic feature engineering on the Abalone dataset, including string indexing, one-hot encoding, and vector assembly, and combines them into a pipeline. It then does an 80/20 split to produce training and validation datasets as outputs, and saves these datasets in Amazon S3.Make sure to replace
region_name with the AWS Region you’re using in the script.%%writefile ./preprocess.pyfrom pyspark.sql import SparkSessionfrom pyspark.sql.types import StructType, StructField, StringType, DoubleTypefrom pyspark.ml import Pipelinefrom pyspark.ml.feature import StringIndexer, OneHotEncoder, VectorAssemblerimport argparseimport subprocessimport sysdef install_packages(): subprocess.check_call([sys.executable, "-m", "pip", "install", "boto3==1.35.1", "botocore>=1.35.0"])install_packages()import boto3print(f"logs: boto3 version in the processing job: {boto3.__version__}")import botocoreprint(f"logs: botocore version in the processing job: {botocore.__version__}")def get_temporary_credentials(account_id, bucket_name, object_key_prefix): region_name = '<region>' s3control_client = boto3.client('s3control', region_name=region_name) response = s3control_client.get_data_access( AccountId=account_id, Target=f's3://{bucket_name}/{object_key_prefix}/', Permission='READWRITE' ) return response['Credentials']def configure_spark_with_s3a(credentials): spark = SparkSession.builder \ .appName("PySparkApp") \ .config("spark.hadoop.fs.s3a.access.key", credentials['AccessKeyId']) \ .config("spark.hadoop.fs.s3a.secret.key", credentials['SecretAccessKey']) \ .config("spark.hadoop.fs.s3a.session.token", credentials['SessionToken']) \ .config("spark.hadoop.fs.s3a.impl", "org.apache.hadoop.fs.s3a.S3AFileSystem") \ .config("spark.hadoop.fs.s3a.aws.credentials.provider", "org.apache.hadoop.fs.s3a.TemporaryAWSCredentialsProvider") \ .getOrCreate() spark.sparkContext._jsc.hadoopConfiguration().set( "mapred.output.committer.class", "org.apache.hadoop.mapred.FileOutputCommitter" ) return sparkdef csv_line(data): r = ",".join(str(d) for d in data[1]) return str(data[0]) + "," + rdef main(): parser = argparse.ArgumentParser(description="app inputs and outputs") parser.add_argument("--account_id", type=str, help="AWS account ID") parser.add_argument("--s3_input_bucket", type=str, help="s3 input bucket") parser.add_argument("--s3_input_key_prefix", type=str, help="s3 input key prefix") parser.add_argument("--s3_output_bucket", type=str, help="s3 output bucket") parser.add_argument("--s3_output_key_prefix", type=str, help="s3 output key prefix") args = parser.parse_args() # Get temporary credentials for both reading and writing credentials = get_temporary_credentials(args.account_id, args.s3_input_bucket, args.s3_input_key_prefix) spark = configure_spark_with_s3a(credentials) # Defining the schema corresponding to the input data schema = StructType([ StructField("sex", StringType(), True), StructField("length", DoubleType(), True), StructField("diameter", DoubleType(), True), StructField("height", DoubleType(), True), StructField("whole_weight", DoubleType(), True), StructField("shucked_weight", DoubleType(), True), StructField("viscera_weight", DoubleType(), True), StructField("shell_weight", DoubleType(), True), StructField("rings", DoubleType(), True), ]) # Reading data directly from S3 using s3a protocol total_df = spark.read.csv( f"s3a://{args.s3_input_bucket}/{args.s3_input_key_prefix}/abalone.csv", header=False, schema=schema ) # Transformations and data processing sex_indexer = StringIndexer(inputCol="sex", outputCol="indexed_sex") sex_encoder = OneHotEncoder(inputCol="indexed_sex", outputCol="sex_vec") assembler = VectorAssembler( inputCols=[ "sex_vec", "length", "diameter", "height", "whole_weight", "shucked_weight", "viscera_weight", "shell_weight", ], outputCol="features" ) pipeline = Pipeline(stages=[sex_indexer, sex_encoder, assembler]) model = pipeline.fit(total_df) transformed_total_df = model.transform(total_df) (train_df, validation_df) = transformed_total_df.randomSplit([0.8, 0.2]) # Saving transformed datasets to S3 using RDDs and s3a protocol train_rdd = train_df.rdd.map(lambda x: (x.rings, x.features)) train_lines = train_rdd.map(csv_line) train_lines.saveAsTextFile( f"s3a://{args.s3_output_bucket}/{args.s3_output_key_prefix}/train" ) validation_rdd = validation_df.rdd.map(lambda x: (x.rings, x.features)) validation_lines = validation_rdd.map(csv_line) validation_lines.saveAsTextFile( f"s3a://{args.s3_output_bucket}/{args.s3_output_key_prefix}/validation" )if __name__ == "__main__": main()preprocess.py file locally. Next, you use the PySparkProcessor class to define a Spark job and run it using SageMaker Processing. Copy the following code into a new cell in your SageMaker Studio notebook, and run the cell to invoke the SageMaker Processing job:from sagemaker.spark.processing import PySparkProcessorfrom time import gmtime, strftimeimport boto3import sagemakerimport logging# Get regionregion = boto3.Session().region_name# Initialize Boto3 and SageMaker sessionsboto_session = boto3.Session(region_name=region)sagemaker_session = sagemaker.Session(boto_session=boto_session)# Get account iddef get_account_id(): client = boto3.client("sts") return client.get_caller_identity()["Account"]account_id = get_account_id()bucket = sagemaker_session.default_bucket()role = sagemaker.get_execution_role()sagemaker_logger = logging.getLogger("sagemaker")sagemaker_logger.setLevel(logging.INFO)sagemaker_logger.addHandler(logging.StreamHandler())# Set up S3 bucket and pathstimestamp_prefix = strftime("%Y-%m-%d-%H-%M-%S", gmtime())prefix = "Product/sagemaker/spark-preprocess-demo/{}".format(timestamp_prefix)# Define the account ID and S3 bucket detailsinput_bucket = f'blog-access-grants-{account_id}-{region}'input_key_prefix = 'UserA'output_bucket = f'blog-access-grants-{account_id}-{region}'output_key_prefix = 'UserA/output'# Define the Spark processor using the custom Docker imagespark_processor = PySparkProcessor( framework_version="3.3", role=role, instance_count=2, instance_type="ml.m5.2xlarge", base_job_name="spark-preprocess-job", sagemaker_session=sagemaker_session )# Run the Spark processing jobspark_processor.run( submit_app="./preprocess.py", arguments=[ "--account_id", account_id, "--s3_input_bucket", input_bucket, "--s3_input_key_prefix", input_key_prefix, "--s3_output_bucket", output_bucket, "--s3_output_key_prefix", output_key_prefix, ], spark_event_logs_s3_uri=f"s3://{output_bucket}/{prefix}/spark_event_logs", logs=False)PySparkProcessor: - This is a multi-node job with two ml.m5.2xlarge instances (specified in the
instance_count and instance_type parameters) The Spark framework version is set to 3.3 using the framework_version parameter The PySpark script is passed using the submit_app parameter Command line arguments to the PySpark script (such as the account ID, input/output bucket names, and input/output key prefixes) are passed through the arguments parameter Spark event logs will be offloaded to the Amazon S3 location specified in spark_event_logs_s3_uri and can be used to view the Spark UI while the job is in progress or after it’s complete. import boto3import pandas as pdimport io# Initialize S3 clients3 = boto3.client('s3')# Get regionregion = boto3.Session().region_name# Get account iddef get_account_id(): client = boto3.client("sts") return client.get_caller_identity()["Account"]account_id = get_account_id()
# Replace with your bucket name and output key prefixbucket_name = f'blog-access-grants-{account_id}-{region}'output_key_prefix = 'UserA/output/train'# Get temporary credentials for accessing S3 data using user profile role s3control_client = boto3.client('s3control')response = s3control_client.get_data_access( AccountId=account_id, Target=f's3://{bucket_name}/{output_key_prefix}', Permission='READ')credentials = response['Credentials']# Create an S3 client with the temporary credentialss3_client = boto3.client( 's3', aws_access_key_id=credentials['AccessKeyId'], aws_secret_access_key=credentials['SecretAccessKey'], aws_session_token=credentials['SessionToken'])objects = s3_client.list_objects(Bucket=bucket_name, Prefix=output_key_prefix)# Read the first part file into a pandas DataFramefirst_part_key = f"{output_key_prefix}/part-00000"obj = s3_client.get_object(Bucket=bucket_name, Key=first_part_key)data = obj['Body'].read().decode('utf-8')df = pd.read_csv(io.StringIO(data), header=None)# Print the top 5 rowsprint(f"Top 5 rows from s3://{bucket_name}/{first_part_key}")print(df.head())part-00000) from the output location into a pandas DataFrame, and prints the top five rows of the DataFrame.Because the User A role has access to the
userA folder, the user can read the contents of the file part-00000, as shown in the following screenshot.
Now, let’s validate access to the
userA folder from the User B profile. Repeat the earlier steps to launch a Python notebook under the User B profile.
Use the validation script to read the contents of the file part-00000, which is in the userA folder.
If User B tries to read the contents of the file part-00000, which is in the userA folder, their access will be denied, as shown in the following screenshot, because User B doesn’t have access to the userA folder.

Clean up
To avoid incurring future charges, delete the CloudFormation stack. This will delete resources such as the SageMaker Studio domain, S3 Access Grants instance, and S3 bucket you created.
Conclusion
In this post, you learned how to control data access to Amazon S3 from SageMaker Studio with S3 Access Grants. S3 Access Grants provides a more flexible and scalable mechanism to define access patterns at scale than IAM based techniques. These grants not only support IAM principals but also allow direct granting of access to users and groups from a corporate directory that is synchronized with IAM Identity Center.
Take the next step in optimizing your data management workflow by integrating S3 Access Grants into your AWS environment alongside SageMaker Studio, a web-based visual interface for building, training, debugging, deploying, and monitoring ML models. Take advantage of the granular access control and scalability offered by S3 Access Grants to enable efficient collaboration, secure data access, and simplified access management for your team working in the SageMaker Studio environment. For more details, refer to Managing access with S3 Access Grants and Amazon SageMaker Studio.
About the authors
 Koushik Konjeti is a Senior Solutions Architect at Amazon Web Services. He has a passion for aligning architectural guidance with customer goals, ensuring solutions are tailored to their unique requirements. Outside of work, he enjoys playing cricket and tennis.
 Vijay Velpula is a Data Architect with AWS Professional Services. He helps customers implement Big Data and Analytics Solutions. Outside of work, he enjoys spending time with family, traveling, hiking and biking.
 Ram Vittal is a Principal ML Solutions Architect at AWS. He has over 3 decades of experience architecting and building distributed, hybrid, and cloud applications. He is passionate about building secure, scalable, reliable AI/ML and big data solutions to help enterprise customers with their cloud adoption and optimization journey. In his spare time, he rides motorcycle and enjoys the nature with his family.
