
The general workflow is:

Facts to know:
- Available server types: http, https, imaps, pop3s, smtps, ssl, tcp, udp, ipServer types ssl, https and all the SSL based ones are available in Proxy inspection mode of the Fortigate only.Only starting with FortiOS 6.2.1 https load balancing supports HTTP to HTTPS redirection inside the VIP configuration. Available load balancing algorithms (depends on the chosen server type), starting 6.0.x, earlier versions have less:
static - Distribute to server based on source IP.
round-robin - Distribute to server based on round robin order.
weighted - Distribute to server based on weight. You have to assign different weights to real servers for this to be useful.
least-session - Distribute to server with lowest session count.
least-rtt - Distribute to server with lowest Round-Trip-Time.
first-alive - Distribute to the first server that is alive. Also means no load balancing is done - just redundancy. As long as the 1st available server is up, all connections will go to it. If it fails, only then the next server will get the incoming connections.
http-host - Distribute to server based on host field in HTTP header. You cannot have 2 different VIPs listening for the same port and the same external IP. Persistence is available for HTTP and SSL virtual server types only. The best close-by is to use
static algorithm for source IP based balancing. If Central NAT is enabled, VIP cannot be added to firewal policy, this is by design and the way Central NAT works. The VIP with load balance will function as expected though.Case 1: Load balance incoming UDP port 53 DNS requests to IP 192.168.13.55 between 2 servers 10.10.10.13 & 10.10.10.14. Use weighted load balancing algorithm, assign 1st server twice as many connections.
Step 1. Health checking monitor.
I configure all the needed for the next examples monitors here, but will use ping ICMP monitor only.
config firewall ldb-monitor edit "PING_MNTR" set type ping set timeout 1 next edit "HTTP_MNTR" set type http set http-get "/monitor.txt" set http-match "Success" <-- Case sensitive! Looks at the CONTENTS of the page returned, no regexes, exact string match. <-- You don't have to set http-match, in such <-- a case, Fortigate will verify to get 200 Ok when asking for the <-- URL "/monitor.txt" next edit "TCP_MNTR" set type tcp nextendStep 2. Create the VIP for incoming to 192.168.13.55 connections. Create real servers inside the VIP.
config firewall vip edit "LDC_UDP_PORT_53" set type server-load-balance set extip 192.168.13.55 set extintf "port1" set server-type udp set monitor "PING_MNTR" <-- I don't set individual monitors in each server, so this one will be used by default set ldb-method weighted set extport 53 config realservers edit 1 set ip 10.10.10.13 set port 53 set weight 2 next edit 2 set ip 10.10.10.14 set port 53 <-- no weight shown here as left the default = 1 next end nextend Step 3. Use the VIP in security rule.
config firewall policy edit 1 set srcintf "port1" set dstintf "port2" set srcaddr "all" set dstaddr "LDC_UDP_PORT_53" set action accept set schedule "always" set service "DNS" set logtraffic all nextendGUI: Feature visibility -> Load Balancing.
Policy & Objects -> Health Check.
Policy & Objects -> Virtual Servers.

Verification and debug
- Status of the real servers:
diagnose firewall vip realserver list
alloc=3------------------------------vf=0 name=LDC_UDP_PORT_53/2 class=4 type=2 192.168.13.55:(53-53), protocol=17total=2 alive=2 power=3 ptr=1013716ip=10.10.10.13-10.10.10.13/53 adm_status=0 holddown_interval=300 max_connections=0 weight=2 option=01 alive=1 total=1 enable=00000001 alive=00000001 power=2 src_sz=0 id=0 status=up ks=9 us=0 events=1 bytes=720 rtt=0ip=10.10.10.14-10.10.10.14/53 adm_status=0 holddown_interval=300 max_connections=0 weight=1 option=01 alive=1 total=1 enable=00000001 alive=00000001 power=1 src_sz=0 id=0 status=up ks=5 us=0 events=1 bytes=374 rtt=0GUI:
Monitoring -> Load Balance Monitor.

I block incoming ICMP packets on 1st server 10.10.10.13. Status of the monitor/server changes to down:
# diagnose firewall vip realserver listalloc=3------------------------------vf=0 name=LDC_UDP_PORT_53/2 class=4 type=2 192.168.13.55:(53-53), protocol=17total=2 alive=1 power=1 ptr=1013716ip=10.10.10.13-10.10.10.13/53 adm_status=0 holddown_interval=300 max_connections=0 weight=2 option=01 alive=0 total=1 enable=00000001 alive=00000000 power=0 src_sz=0 id=0 status=down ks=0 us=0 events=2 bytes=720 rtt=0ip=10.10.10.14-10.10.10.14/53 adm_status=0 holddown_interval=300 max_connections=0 weight=1 option=01 alive=1 total=1 enable=00000001 alive=00000001 power=1 src_sz=0 id=0 status=up ks=0 us=0 events=1 bytes=374 rtt=0General stats:
# get test ipldb 2num of vf=1--------dump ipldb vf=0----------num of vips=1num of registered monitor types=4num of ping monitors=0num of ping monitors=2num of tcp monitors=0num of http monitors=0Best verification is packet sniffer. In this sniffer on Fortigate we can see that packets distribution follows (roughly) weights I assignedeach server:
# diagnose sniffer pa port2 ' port 53' 4 interfaces=[port2]filters=[ port 53]15.257112 port2 -- 192.168.13.17.2785 -> 10.10.10.13.53: udp 016.258720 port2 -- 192.168.13.17.2786 -> 10.10.10.13.53: udp 017.259267 port2 -- 192.168.13.17.2787 -> 10.10.10.14.53: udp 018.259394 port2 -- 192.168.13.17.2788 -> 10.10.10.13.53: udp 019.259734 port2 -- 192.168.13.17.2789 -> 10.10.10.13.53: udp 020.260002 port2 -- 192.168.13.17.2790 -> 10.10.10.14.53: udp 021.260136 port2 -- 192.168.13.17.2791 -> 10.10.10.13.53: udp 022.260786 port2 -- 192.168.13.17.2792 -> 10.10.10.13.53: udp 023.261635 port2 -- 192.168.13.17.2793 -> 10.10.10.14.53: udp 024.261417 port2 -- 192.168.13.17.2794 -> 10.10.10.13.53: udp 07 packets out of 10 are sent to 10.10.10.13 and 3 packets to 10.10.10.14, almost the desired 2 to 1 ratio.
- VIP display filter. Helpful on Fortigate with many VIPs:
diagnose firewall vip virtual-server filter
diagnose firewall vip virtual-server filter ?list Display the current filter.clear Erase the current filter.name VIP name to filter by.src Source address range to filter by.dst Destination address range to filter by.src-port Source port range to filter by.dst-port Destination port range to filter by.vd Index of virtual domain. -1 matches all.negate Negate the specified filter parameter.Case 1.1: To the configuration above also ensure to hide clients' IPs from the servers behind the Fortigate
I haven't enabled NAT in the security rule, so servers can see real source IP of the connecting client. It is easy to fix - just enable NAT in security rule.
config firewall policy edit 1 set srcintf "port1" set dstintf "port2" set srcaddr "all" set dstaddr "LDC_UDP_PORT_53" set action accept set schedule "always" set service "DNS" set logtraffic all set nat enable <--- Enable interface based NAT nextendBEFORE (sniffer on server 2):
root@ubuntu2:~# tcpdump -n -i ens34 port 53 and host 10.10.10.14listening on ens34, link-type EN10MB (Ethernet), capture size 262144 bytes09:52:10.405443 IP 192.168.13.17.1362 > 10.10.10.14.53: domain [length 0 < 12] (invalid)09:52:11.407252 IP 192.168.13.17.1363 > 10.10.10.14.53: domain [length 0 < 12] (invalid)AFTER:
root@ubuntu2:~# tcpdump -n -i ens34 port 53 and host 10.10.10.14listening on ens34, link-type EN10MB (Ethernet), capture size 262144 bytes09:53:07.391346 IP 10.10.10.91.63343 > 10.10.10.14.53: domain [length 0 < 12] (invalid)09:53:08.391830 IP 10.10.10.91.63344 > 10.10.10.14.53: domain [length 0 < 12] (invalid)Case 2: Load balance HTTPS for the web site, making servers to see Fortigate as source IP of requests, but sending the real client's IP in X-Forwarded-For header
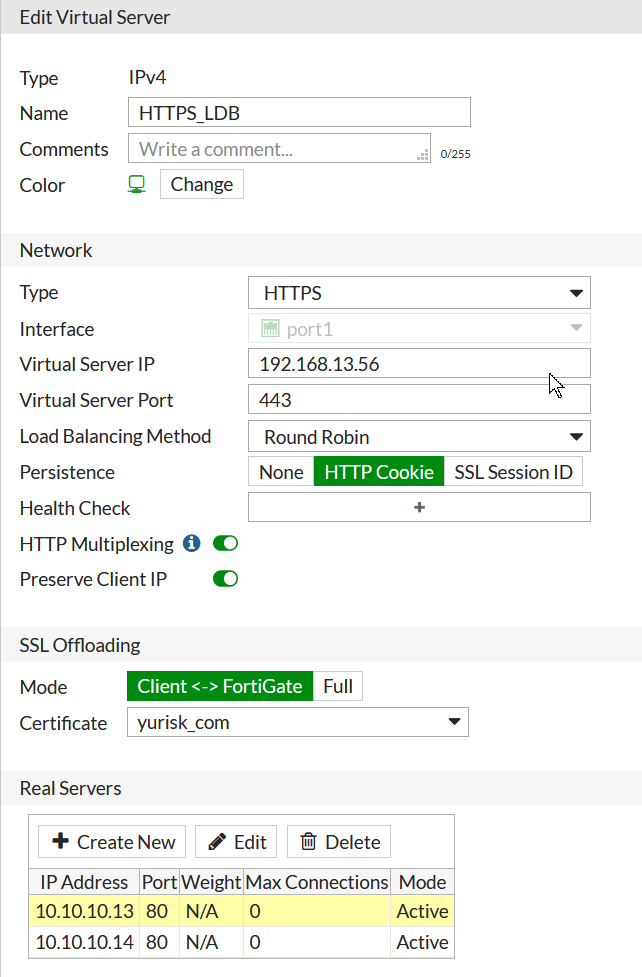
I will configure Fortigate to serve the domain yurisk.com via HTTPS on port 443 and IP of 192.168.13.56 to clients. At the same time, from Fortigate to the real servers the connections will be un-encrypted to the port 80 of the servers.
I will use SSL certificate issued by trusted CA provider to prevent browser error messages.
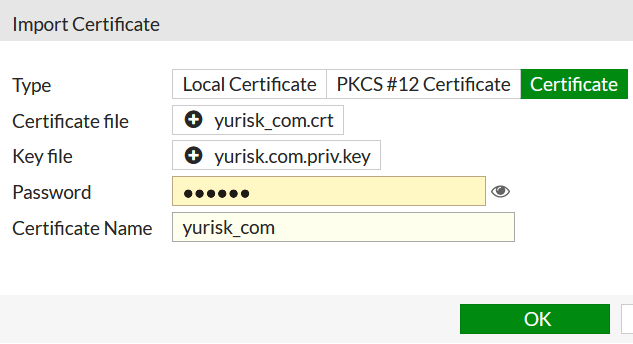
Step 1: Import SSL certificate for the yurisk.com domain to Fortigate.
System -> Certificates -> Import -> Local Certificate -> Certificate -> Upload ....
In this case the certificate is named yurisk_com.crt.
Step 2: Switch (if not already) to Proxy mode from Flow mode.
config system setting set inspection-mode proxy endStep 3: Create VIP as the load balancer setting HTTPS as server type. Monitor I created earlier, see above.
config firewall vip edit "HTTPS_LDB" set type server-load-balance set extip 192.168.13.56 set extintf "port1" set server-type https set http-ip-header enable <-- Causes Fortigate to send X-Forwarded-For header with the real IP of client set color 3 set ldb-method round-robin set persistence http-cookie <-- enables persistence by inserting own cookie set extport 443 config realservers edit 1 set ip 10.10.10.13 set port 80 set healthcheck enable set monitor "HTTP_MNTR" next edit 2 set ip 10.10.10.14 set port 80 set healthcheck enable set monitor "HTTP_MNTR" next end set http-multiplex enable <-- prerequisite for X-Forwarded-For header sending set ssl-certificate "yurisk_com" <-- Sets certificate to present clients set ssl-mode half <-- encrypt only client-to-Fortigate connection, leave Fortigate-to-server in clear text nextendIn GUI the final result looks (not all options are available in GUI, e.g. health monitor for each server we can only set in CLI):
Step 4: Use the VIP in the security rule:
config firewall policy edit 2 set name "HTTPS_LDB" set uuid 8d77d4dc-a62f-51ea-27ab-61a3f99fe71b set srcintf "port1" set dstintf "port2" set srcaddr "all" set dstaddr "HTTPS_LDB" set action accept set schedule "always" set service "ALL" set fsso disable set nat enable nextendVerification
Sniffer on real server 10.10.10.14, the client 192.168.13.17 is browsing to https://yurisk.com:
02:01:07.132439 IP 10.10.10.91.22815 > 10.10.10.14.80: <-- As NAT is enabled, Fortigate sends <-- requests with its own IP as sourceGET / HTTP/1.1 Host:yurisk.com User-Agent: Mozilla/5 0 (X11; Linux x86_64; rv: 77.0) Gecko/20100101 Firefox/77.0 Accept: image /webp,*/* Accept-Language: en-US,en;q=05 Accept-Encoding: gzip, deflate, br DNT: 1 Connection: keep-alive Cookie: FGTServer=F541F452FE3E1121DC3229A7362B3680731BE80C73AEAD68701A70FEDC4152D55F Pragma: no-cache Cache-Control: no-cache X-Forwarded-For : 192.168.13.17 <-- This is the real IP of the client browsing to the websiteThe monitoring HTTP service looks on the server side like that:
GET /monitor.txt HTTP/1.0 User-Agent: FortiGate (FortiOS 4.0)In diagnose debug flow session it looks like:
# id=20085 trace_id=6 func=print_pkt_detail line=5517 msg="vd-root:0 received a packet(proto=6, 192.168.13.17:60904->192.168.13.56:443) from port1. flag [S], seq 2924331034, ack 0, win 64240"id=20085 trace_id=6 func=init_ip_session_common line=5682 msg="allocate a new session-000054d0"id=20085 trace_id=6 func=fw_pre_route_handler line=183 msg="VIP-10.10.10.14:80, outdev-port1"id=20085 trace_id=6 func=__ip_session_run_tuple line=3359 msg="DNAT 192.168.13.56:443->10.10.10.14:80"id=20085 trace_id=6 func=vf_ip_route_input_common line=2591 msg="find a route: flag=04000000 gw-10.10.10.14 via port2"id=20085 trace_id=6 func=fw_forward_handler line=753 msg="Allowed by Policy-2: AV"id=20085 trace_id=6 func=av_receive line=305 msg="send to application layer"Case 3: Load balancing SSH connections
FG3-AS1680 # config firewall ldb-monitor edit "PING_MNTR" set type ping nextendconfig firewall vip edit "LOAD_BALANCE_IN" set type server-load-balance set extip 192.168.13.55 set extintf "port2" set server-type tcp set ldb-method round-robin set extport 22 config realservers edit 1 set ip 10.10.10.13 set port 22 set healthcheck enable set monitor "PING_MNTR" next edit 2 set ip 10.10.10.14 set port 22 set healthcheck enable set monitor "PING_MNTR" next end nextend Verification.
port2 in 13.13.13.6.2625 -> 192.168.13.55.22: port1 out 13.13.13.6.2625 -> 10.10.10.13.22: port2 in 13.13.13.6.2626 -> 192.168.13.55.22: port1 out 13.13.13.6.2626 -> 10.10.10.14.22: Resources
- Debug commands: https://help.fortinet.com/fos50hlp/54/Content/FortiOS/fortigate-load-balancing-52/ldb-diagnose.htm HTTP to HTTPS redirect feature: https://docs.fortinet.com/document/fortigate/6.2.0/cookbook/304594/http-to-https-redirect-for-load-balancing
Follow me on https://www.linkedin.com/in/yurislobodyanyuk/ not to miss what I publish on Linkedin, Github, blog, and more.
