
Task: publish website yurisk.com, hosted on 2 physical servers: server1 (10.10.10.13) and server2 (10.10.10.14). The site should be available on HTTP only, no HTTPS. Apply preconfigured protection Inline Alert Only. The website's IP address visible to clients is 192.168.13.92.
Solution.
Configuration flow:

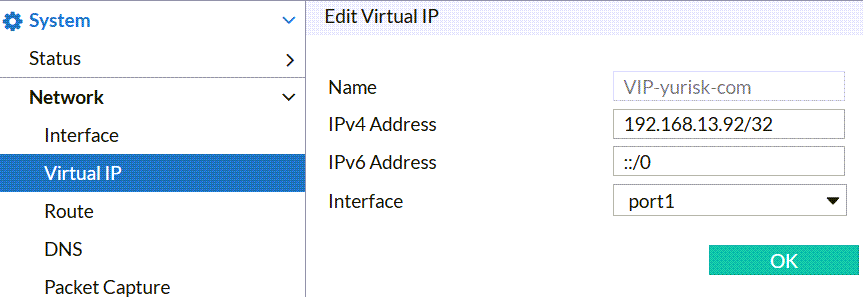
Step 1: Create Virtual IP on which Fortiweb will listen for incoming HTTP connections.Network -> Virtual IP -> Create .... For the name I use VIP-yurisk-com, IP is 192.168.13.92, and the interface via which this IP is reachable is port1.
NOTE: some objects in Fortiweb do not allow dots in their names, so, to be consistent, I am using dashes where a dot would normally go. Also, you cannot change the name of any created object later - to change the name, you have to delete this object and re-create from scratch.
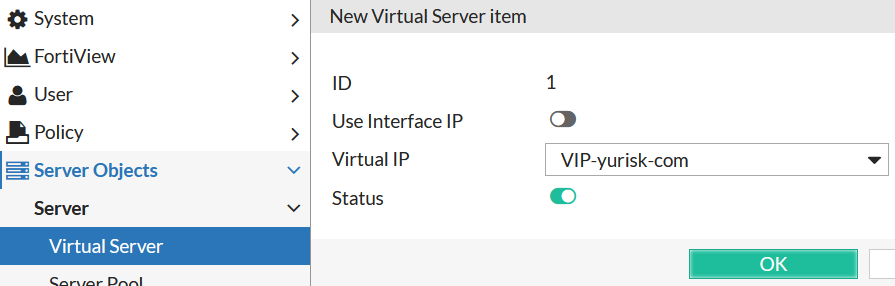
Step 2: Use the VIP in creating new Virtual Server.
Server Objects -> Server -> Virtual Server -> New ..
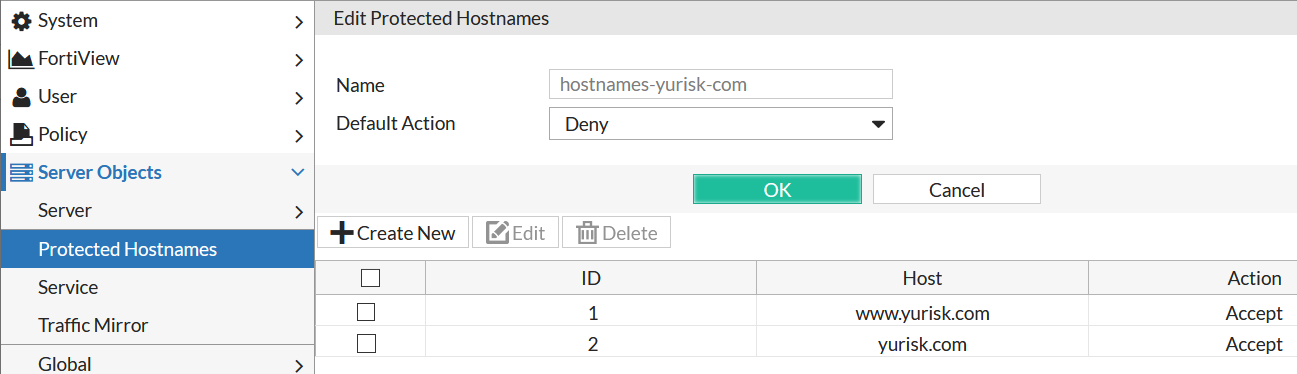
Step 3: (Optional, but recommended) Create Protected Hostnames so to apply all the protections for HTTP requests with valid Host headers only, namely yurisk.com and www.yurisk.com. Any other (and therefore invalid) requests will be dropped. This configuration is optional but recommended as saves Fortiweb resources. All the protections/checks are applied in order, and checking the Host: header is done very early in the processing. This way many requests done by bots/crawlers/scanners which try to brute force available virtual hosts on the web servers will be blocked before Fortiweb applies additional protections to them.
Server Objects -> Protected Hostnames -> Create New .... Default Action: Deny. This means for all NON-matching Host: headers listed below drop the requests. If, on the other hand, we wanted to block some hosts but allow other, we would set Default Action to Accept, and then would set Accept or Deny in each hostname configured.
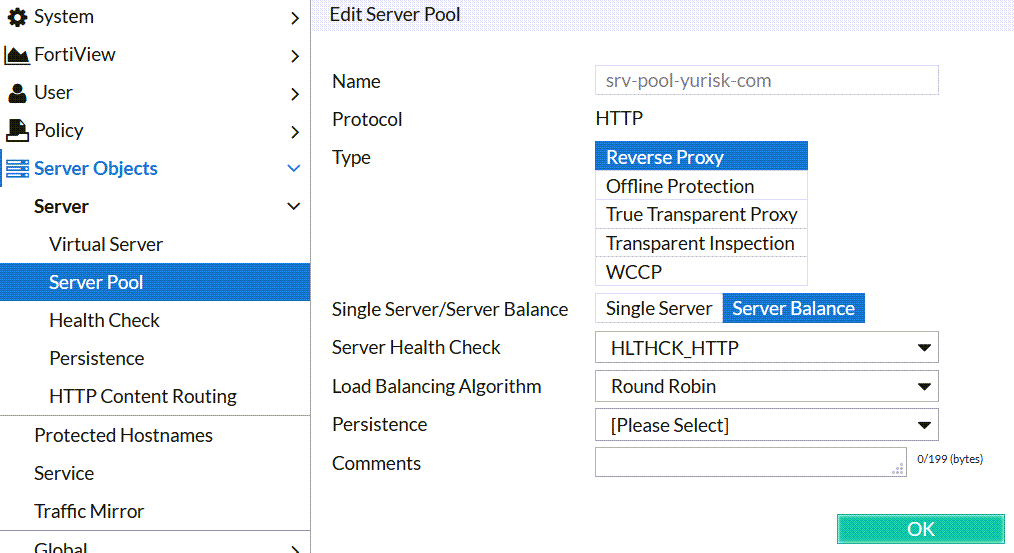
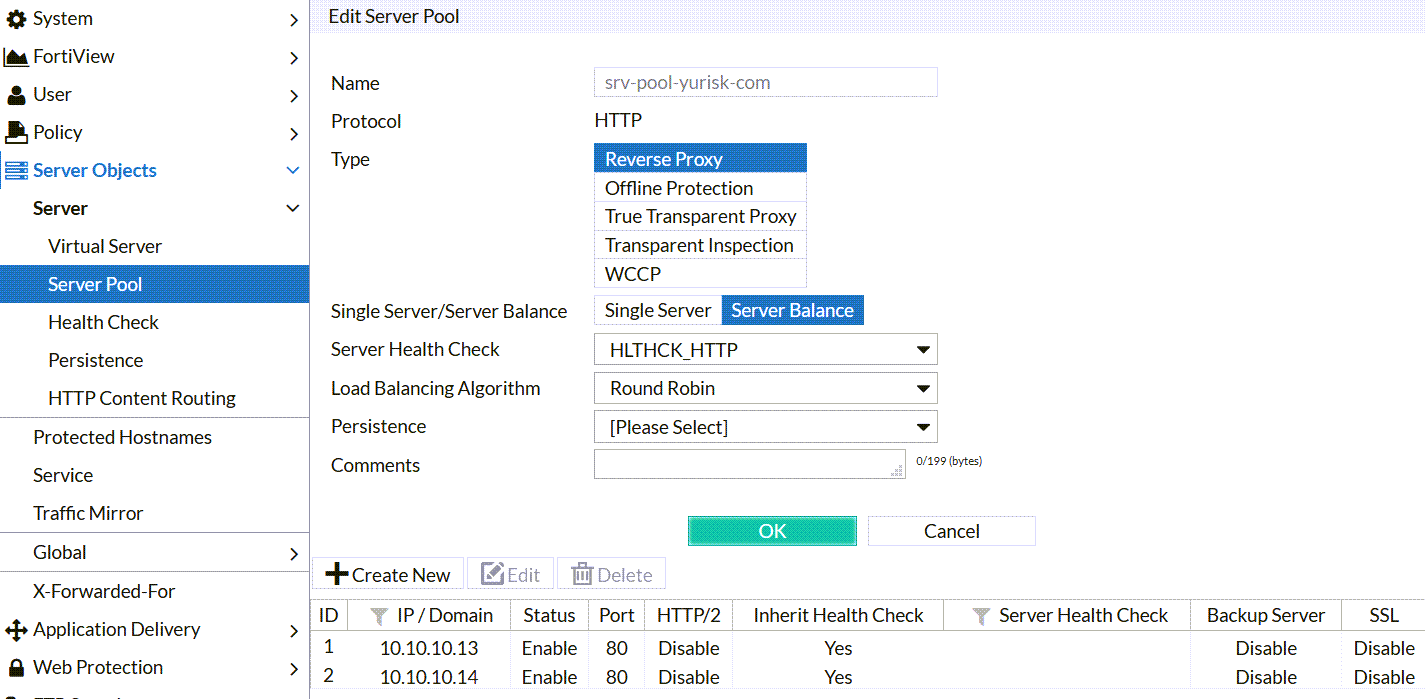
Step 4: Create Server Pool to represent our 2 physical servers: Server Objects -> Server Pool -> Create New.... For this type of set up (HTTP servers), we'll use Create HTTP Server Pool as oppsed to ADFS or FTP. Regarding the Type - as this Fortiweb is operating in the Reverse Proxy Mode (used probably in 90% of all the installations and is most feature-rich), the server pool has to be Reverse Type as well.
Single Server vs Server Balance: I prefer to use Server Balance even if the pool actually has just one member server. This is for the case additional servers are added later.
Server Health Check: I'll be using preconfigured one HLTHCK_HTTP which checks that the physical server is responding for the website requests.
Load Balancing Algorithm: Round Robin.
Persistence: None, as I haven't created Persistence Policy.
NOTE: If the object configuration is multi-step, as here, you have to do the 1st step, click on OK, and only then it will allow to continue to step 2.
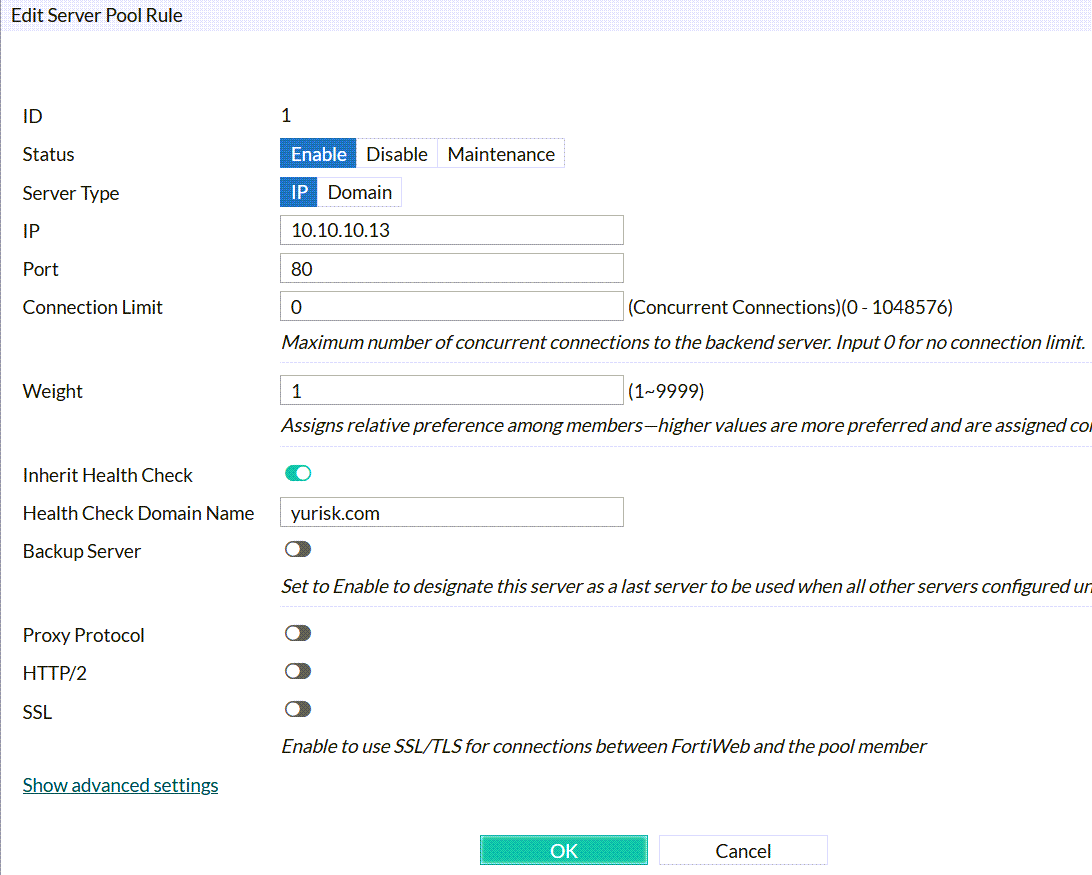
Create New: After saving the work done above, we can create 2 physical servers with their real IP addresses (10.10.10.13 and 10.10.10.14), state (Enabled/Disabled/Maintenance), listening port (80), Health Check Domain Name - I set it to yurisk.com, and leave the rest with defaults.
Create physical server:
Final result should look like that:
Step 5: Use all the created so far to create a Server Policy.
Policy -> Server Policy -> Create New -> Create HTTP Policy...
Deployment Mode: Single Server/Server Pool (Content Routing is used to route clients based on any of the HTTP multiple parameters, you can look at an example here: Fortiweb Cookbook: content routing based on URL configuration example).
Virtual Server: vsrv-yurisk-com
Server Pool: srv-pool-yurisk-com
Protected Hostnames: hostnames-yurisk-com
HTTP Service: HTTP (If we wanted the Fortiweb to listen ona custom port, say 3123, we would first create such custom service and then would put it instead of built-in HTTP).
Web Protection Profile: Inline Alert Only

NOTE: In Reverse Proxy mode of operation, which is our case, without a Server Policy allowing the traffic, all requests to the physical web servers would be blocked.
Verification
Let's browse to the website yurisk.com to see if it works. Pay attention as I press F5 to refresh, I reach each time the other server in the server pool due to the Round Robin balancing method we set earlier:
Note: This video has no sound.
Now let's try to reach some non-existent on those servers domain. I will try to reach some web site by IP only - 192.168.13.92. Without Protected Hostnames setting it would work, as default Apache install listens for all unknown domains as well. But Fortiweb blocks this attempt:
Note: This video has no sound.
Regarding Health checks of the servers in a pool - here is tcpdump on the physical server side how such checks look:
root@ubuntu1:~# tcpdump -n -c 5 -vv -i any port 80 10.10.10.74.33230 > 10.10.10.13.80: Flags [P.], cksum 0x8f39 (correct), seq 1:175, ack 1, win 8030, length 174: HTTP, length: 174 HEAD / HTTP/1.1 Accept: */* Accept-Language: en Content-Type: text/html Host: yurisk.com User-Agent: HealthCheck Server-pool: srv-pool-yurisk-com Connection: closeIn the next episodes I will add local and LDAP user authentication to access the website, and HTTPS as one of the protocols.
Add web site authentication with local and remote (LDAP) users
Add HTTPS protocol support for SSL offloading.
CLI configuration of all the above
config system vip edit "VIP-yurisk-com" set vip 192.168.13.92/32 set interface port1 set index 1 nextendconfig server-policy vserver edit "vsrv-yurisk-com" config vip-list edit 1 set vip VIP-yurisk-com next end next end config server-policy allow-hosts edit "hostnames-yurisk-com" set default-action deny config host-list edit 1 set host www.yurisk.com next edit 2 set host yurisk.com next end next end config server-policy server-pool edit "srv-pool-yurisk-com" set server-balance enable set health HLTHCK_HTTP set server-pool-id 15152185382089931844 config pserver-list edit 1 set ip 10.10.10.13 set server-id 14833377406792437432 set hlck-domain yurisk.com next edit 2 set ip 10.10.10.14 set server-id 13115127060638259350 set hlck-domain yurisk.com next end next end config server-policy policy edit "srv-policy-yurisk-com" set vserver vsrv-yurisk-com set service HTTP set web-protection-profile "Inline Alert Only" set replacemsg Predefined set server-pool srv-pool-yurisk-com set allow-hosts hostnames-yurisk-com set policy-id 16091469981553709465 config http-content-routing-list end next endFollow me on https://www.linkedin.com/in/yurislobodyanyuk/ not to miss what I publish on Linkedin, Github, blog, and more.
