
Harnessing the power of big data has become increasingly critical for businesses looking to gain a competitive edge. From deriving insights to powering generative artificial intelligence (AI)-driven applications, the ability to efficiently process and analyze large datasets is a vital capability. However, managing the complex infrastructure required for big data workloads has traditionally been a significant challenge, often requiring specialized expertise. That’s where the new Amazon EMR Serverless application integration in Amazon SageMaker Studio can help.
With the introduction of EMR Serverless support for Apache Livy endpoints, SageMaker Studio users can now seamlessly integrate their Jupyter notebooks running sparkmagic kernels with the powerful data processing capabilities of EMR Serverless. This allows SageMaker Studio users to perform petabyte-scale interactive data preparation, exploration, and machine learning (ML) directly within their familiar Studio notebooks, without the need to manage the underlying compute infrastructure. By using the Livy REST APIs, SageMaker Studio users can also extend their interactive analytics workflows beyond just notebook-based scenarios, enabling a more comprehensive and streamlined data science experience within the Amazon SageMaker ecosystem.
In this post, we demonstrate how to leverage the new EMR Serverless integration with SageMaker Studio to streamline your data processing and machine learning workflows.
Benefits of integrating EMR Serverless with SageMaker Studio
The EMR Serverless application integration in SageMaker Studio offers several key benefits that can transform the way your organization approaches big data:
- Simplified infrastructure management – By abstracting away the complexities of setting up and managing Spark clusters, the EMR Serverless integration allows you to quickly spin up the compute resources needed for your big data workloads, without the work of provisioning and configuring the underlying infrastructure. Seamless integration with SageMaker – As a built-in feature of the SageMaker platform, the EMR Serverless integration provides a unified and intuitive experience for data scientists and engineers. You can access and utilize this functionality directly within the SageMaker Studio environment, allowing for a more streamlined and efficient development workflow. Cost optimization – The serverless nature of the integration means you only pay for the compute resources you use, rather than having to provision and maintain a persistent cluster. This can lead to significant cost savings, especially for workloads with variable or intermittent usage patterns. Scalability and performance – The EMR Serverless integration automatically scales the compute resources up or down based on your workload’s demands, making sure you always have the necessary processing power to handle your big data tasks. This flexibility helps optimize performance and minimize the risk of bottlenecks or resource constraints. Reduced operational overhead – The EMR Serverless integration with AWS streamlines big data processing by managing the underlying infrastructure, freeing up your team’s time and resources. This feature in SageMaker Studio empowers data scientists, engineers, and analysts to focus on developing data-driven applications, simplifying infrastructure management, reducing costs, and enhancing scalability. By unlocking the potential of your data, this powerful integration drives tangible business results.
Solution overview
SageMaker Studio is a fully integrated development environment (IDE) for ML that enables data scientists and developers to build, train, debug, deploy, and monitor models within a single web-based interface. SageMaker Studio runs inside an AWS managed virtual private cloud (VPC), with network access for SageMaker Studio domains, in this setup configured as VPC-only. SageMaker Studio automatically creates an elastic network interface within your VPC’s private subnet, which connects to the required AWS services through VPC endpoints. This same interface is also used for provisioning EMR clusters. The following diagram illustrates this solution.

An ML platform administrator can manage permissioning for the EMR Serverless integration in SageMaker Studio. The administrator can configure the appropriate privileges by updating the runtime role with an inline policy, allowing SageMaker Studio users to interactively create, update, list, start, stop, and delete EMR Serverless clusters. SageMaker Studio users are presented with built-in forms within the SageMaker Studio UI that don’t require additional configuration to interact with both EMR Serverless and Amazon Elastic Compute Cloud (Amazon EC2) based clusters.

Apache Spark and its Python API, PySpark, empower users to process massive datasets effortlessly by using distributed computing across multiple nodes. These powerful frameworks simplify the complexities of parallel processing, enabling you to write code in a familiar syntax while the underlying engine manages data partitioning, task distribution, and fault tolerance. With scalability as a core strength, Spark and PySpark allow you to handle datasets of virtually any size, eliminating the constraints of a single machine.
Empowering knowledge retrieval and generation with scalable Retrieval Augmented Generation (RAG) architecture is increasingly important in today’s era of ever-growing information. Effectively using data to provide contextual and informative responses has become a crucial challenge. This is where RAG systems excel, combining the strengths of information retrieval and text generation to deliver comprehensive and accurate results. In this post, we explore how to build a scalable and efficient RAG system using the new EMR Serverless integration, Spark’s distributed processing, and an Amazon OpenSearch Service vector database powered by the LangChain orchestration framework. This solution enables you to process massive volumes of textual data, generate relevant embeddings, and store them in a powerful vector database for seamless retrieval and generation.
Authentication mechanism
When integrating EMR Serverless in SageMaker Studio, you can use runtime roles. Runtime roles are AWS Identity and Access Management (IAM) roles that you can specify when submitting a job or query to an EMR Serverless application. These runtime roles provide the necessary permissions for your workloads to access AWS resources, such as Amazon Simple Storage Service (Amazon S3) buckets. When integrating EMR Serverless in SageMaker Studio, you can configure the IAM role to be used by SageMaker Studio. By using EMR runtime roles, you can make sure your workloads have the minimum set of permissions required to access the necessary resources, following the principle of least privilege. This enhances the overall security of your data processing pipelines and helps you maintain better control over the access to your AWS resources.
Cost attribution of EMR Serverless clusters
EMR Serverless clusters created within SageMaker Studio are automatically tagged with system default tags, specifically the domain-arn and user-profile-arn tags. These system-generated tags simplify cost allocation and attribution of Amazon EMR resources. See the following code:
To learn more about enterprise-level cost allocation for ML environments, refer to Set up enterprise-level cost allocation for ML environments and workloads using resource tagging in Amazon SageMaker.
Prerequisites
Before you get started, complete the prerequisite steps in this section.
Create a SageMaker Studio domain
This post walks you through the integration between SageMaker Studio and EMR Serverless using an interactive SageMaker Studio notebook. We assume you already have a SageMaker Studio domain provisioned with a UserProfile and an ExecutionRole. If you don’t have a SageMaker Studio domain available, refer to Quick setup to Amazon SageMaker to provision one.
Create an EMR Serverless job runtime role
EMR Serverless allows you to specify IAM role permissions that an EMR Serverless job run can assume when calling other services on your behalf. This includes access to Amazon S3 for data sources and targets, as well as other AWS resources like Amazon Redshift clusters and Amazon DynamoDB tables. To learn more about creating a role, refer to Create a job runtime role.
The sample following IAM inline policy attached to a runtime role allows EMR Serverless to assume a runtime role that provides access to an S3 bucket and AWS Glue. You can modify the role to include any additional services that EMR Serverless needs to access at runtime. Additionally, make sure you scope down the resources in the runtime policies to adhere to the principle of least privilege.
Lastly, make sure your role has a trust relationship with EMR Serverless:

Optionally, you can create a runtime role and policy using infrastructure as code (IaC), such as with AWS CloudFormation or Terraform, or using the AWS Command Line Interface (AWS CLI).
Update the SageMaker role to allow EMR Serverless access
This one-time task enables SageMaker Studio users to create, update, list, start, stop, and delete EMR Serverless clusters. We begin by creating an inline policy that grants the necessary permissions for these actions on EMR Serverless clusters, then attach the policy to the Studio domain or user profile role:
Update the domain with EMR Serverless runtime roles
SageMaker Studio supports access to EMR Serverless clusters in two ways: in the same account as the SageMaker Studio domain or across accounts.
To interact with EMR Serverless clusters created in the same account as the SageMaker Studio domain, create a file named same-account-update-domain.json:
Then run an update-domain command to allow all users inside a domain to allow users to use the runtime role:
For EMR Serverless clusters created in a different account, create a file named cross-account-update-domain.json:
Then run an update-domain command to allow all users inside a domain to allow users to use the runtime role:
Update the user profile with EMR Serverless runtime roles
Optionally, this update can be applied more granularly at the user profile level instead of the domain level. Similar to domain update, to interact with EMR Serverless clusters created in the same account as the SageMaker Studio domain, create a file named same-account-update-user-profile.json:
Then run an update-user-profile command to allow this user profile use this run time role:
For EMR Serverless clusters created in a different account, create a file named cross-account-update-user-profile.json:
Then run an update-user-profile command to allow all users inside a domain to allow users to use the runtime role:
Grant access to the Amazon ECR repository
The recommended way to customize environments within EMR Serverless clusters is by using custom Docker images.
Make sure you have an Amazon ECR repository in the same AWS Region where you launch EMR Serverless applications. To create an ECR private repository, refer to Creating an Amazon ECR private repository to store images.
To grant users access to your ECR repository, add the following policies to the users and roles that create or update EMR Serverless applications using images from this repository:
Customize the runtime environment in EMR Serverless clusters
Customizing cluster runtimes in advance is crucial for a seamless experience. As mentioned earlier, we use custom-built Docker images from an ECR repository to optimize our cluster environment, including the necessary packages and binaries. The simplest way to build these images is by using the SageMaker Studio built-in Docker functionality, as discussed in Accelerate ML workflows with Amazon SageMaker Studio Local Mode and Docker support. In this post, we build a Docker image that includes the Python 3.11 runtime and essential packages for a typical RAG workflow, such as langchain, sagemaker, opensearch-py, PyPDF2, and more.
Complete the following steps:
- Start by launching a SageMaker Studio JupyterLab notebook. Install Docker in your JupyterLab environment. For instructions, refer to Accelerate ML workflows with Amazon SageMaker Studio Local Mode and Docker support. Open a new terminal within your JupyterLab environment and verify the Docker installation by running the following:

Use the EMR Serverless integration with SageMaker Studio
In this section, we demonstrate the integration of EMR Serverless into SageMaker Studio and how you can effortlessly interact with your clusters, whether they are in the same account or across different accounts. To access SageMaker Studio, complete the following steps:
- On the SageMaker console, open SageMaker Studio. Depending on your organization’s setup, you can log in to Studio either through the IAM console or using AWS IAM Identity Center.
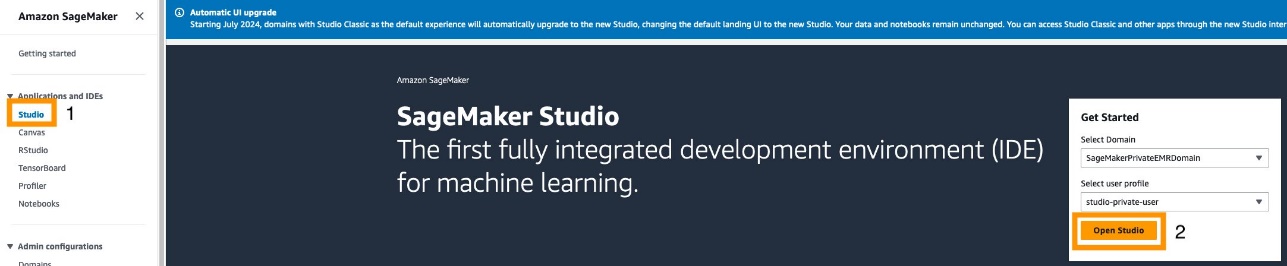
The new Studio experience is a serverless web UI, which makes sure any updates occur seamlessly and asynchronously, without interrupting your development experience.
- Under Data in the navigation pane, choose EMR Clusters.
You can navigate to two different tabs: EMR Serverless Applications or EMR Clusters (on Amazon EC2). For this post, we focus on EMR Serverless.

Create an EMR Serverless cluster
To create a new EMR Serverless cluster, complete the following steps:
- On the EMR Serverless Applications tab, choose Create.
 In the Network connections section, you can optionally select Connect to your VPC and nest your EMR Serverless cluster within a VPC and private subnet. To customize your cluster runtime, choose a compatible custom image from your ECR repository and make sure your user profile role has the necessary permissions to pull from this repository.
Interact with EMR Serverless clusters
EMR Serverless clusters can automatically scale down to zero when not in use, eliminating costs associated with idling resources. This feature makes EMR Serverless clusters highly flexible and cost-effective. You can list, view, create, start, stop, and delete all your EMR Serverless clusters directly within SageMaker Studio.

You can also interactively attach an existing cluster to a notebook by choosing Attach to new notebook.

Build a RAG document processing engine using PySpark
In this section, we use the SageMaker Studio cluster integration to parallelize data processing at a massive scale. A typical RAG framework consists of two main components:
- Offline document embedding generation – This process involves extracting data (text, images, tables, and metadata) from various sources and generating embeddings using a large language embeddings model. These embeddings are then stored in a vector database, such as OpenSearch Service. Online text generation with context – During this process, a user’s query is searched against the vector database, and the documents most similar to the query are retrieved. The retrieved documents, along with the user’s query, are combined into an augmented prompt and sent to a large language model (LLM), such as Meta Llama 3 or Anthropic Claude on Amazon Bedrock, for text generation.
In the following sections, we focus on the offline document embedding generation process and explore how to use PySpark on EMR Serverless using an interactive SageMaker Studio JupyterLab notebook to efficiently parallel process PDF documents.
Deploy an embeddings model
For this use case, we use the Hugging Face All MiniLM L6 v2 embeddings model from Amazon SageMaker JumpStart. To quickly deploy this embedding model, complete the following steps:
- In SageMaker Studio, choose JumpStart in the navigation pane. Search for and choose All MiniLM L6 v2. On the model card, choose Deploy.
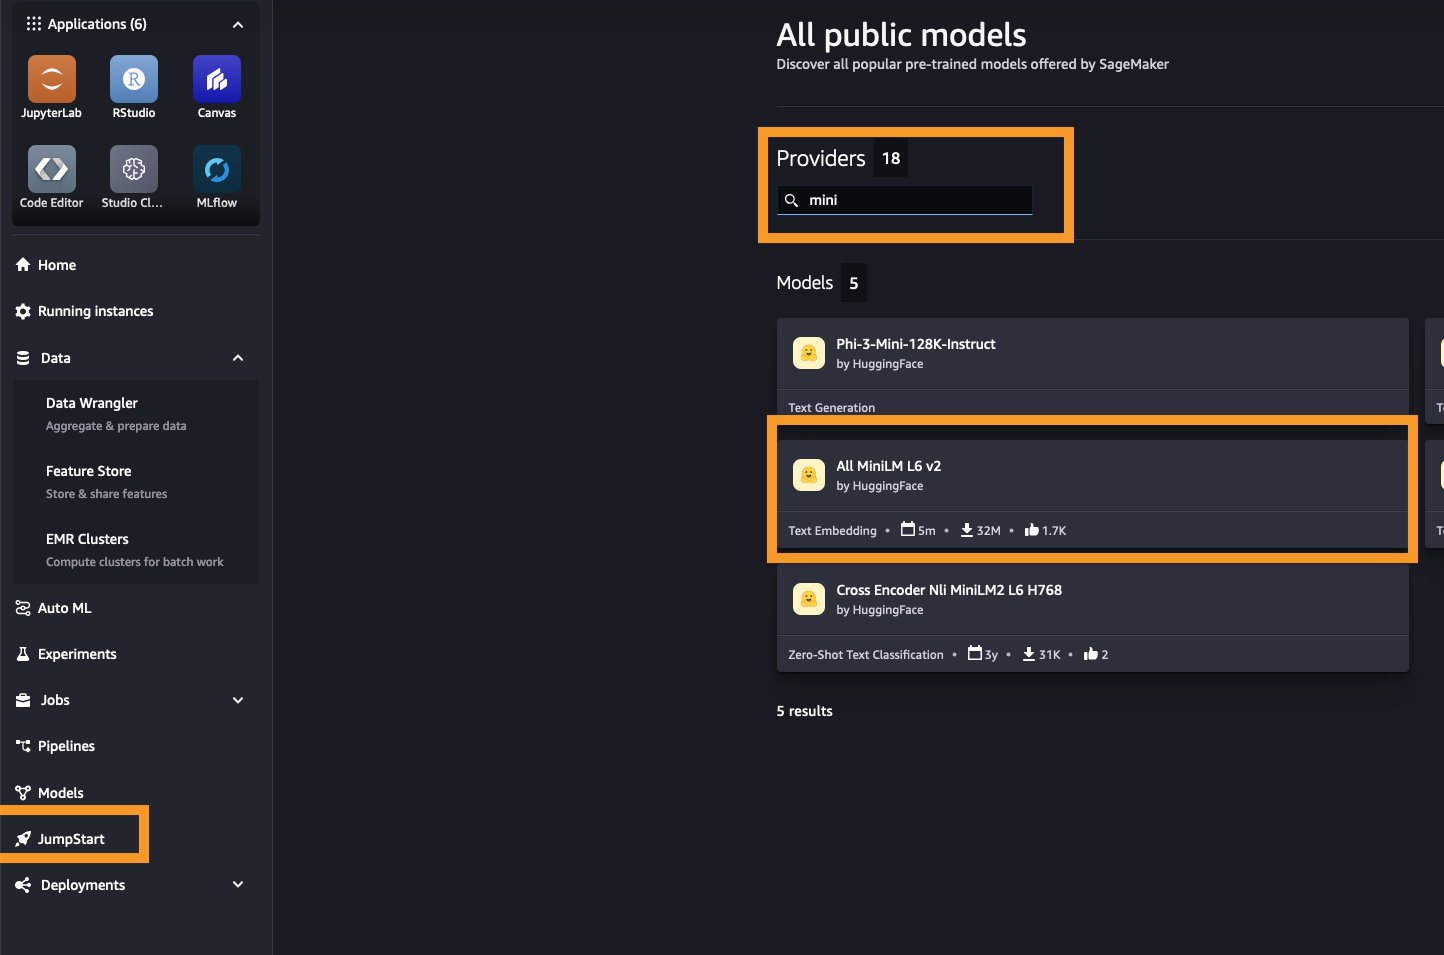
Your model will be ready within a few minutes. Alternatively, you can choose any other embedding models from SageMaker JumpStart by filtering Task type to Text embedding.
Interactively build an offline document embedding generator
In this section, we use code from the following GitHub repo and interactively build a document processing engine using LangChain and PySpark. Complete the following steps:
- Create a SageMaker Studio JupyterLab development environment. For more details, see Boost productivity on Amazon SageMaker Studio: Introducing JupyterLab Spaces and generative AI tools. Choose an appropriate instance type and EBS storage volume for your development environment.
You can change the instance type at any time by stopping and restarting the space.

- Clone the sample code from the following GitHub repository and use the notebook available under
use-cases/pyspark-langchain-rag-processor/Offline_RAG_Processor_on_SageMaker_Studio_using_EMR-Serverless.ipynb In SageMaker Studio, under Data in the navigation pane, choose EMR Clusters. On the EMR Serverless Applications tab, choose Create to create a cluster. Select your cluster and choose Attach to new notebook.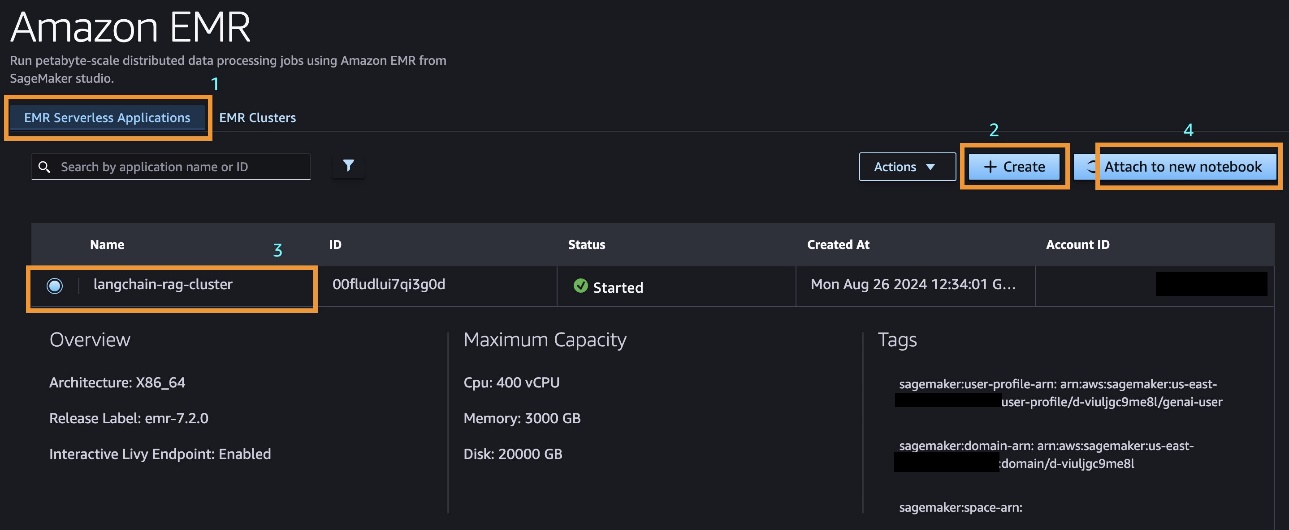 Attach this cluster to a JupyterLab notebook running inside a space.
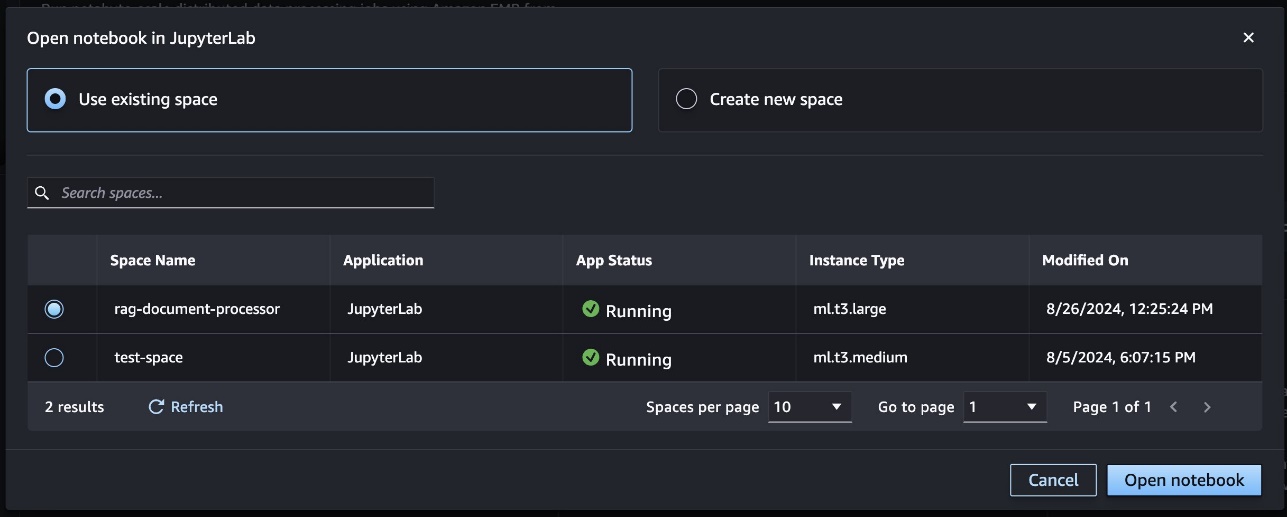
Alternatively, you can attach your cluster to any notebook within your JupyterLab space by choosing Cluster and selecting the EMR Serverless cluster you want to attach to the notebook.

Make sure you choose the SparkMagic PySpark kernel when interactively running PySpark workloads.

A successful cluster connection to a notebook should result in a useable Spark session and links to the Spark UI and driver logs.

When a notebook cell is run within a SparkMagic PySpark kernel, the operations are, by default, run inside a Spark cluster. However, if you decorate the cell with %%local, it allows the code to be run on the local compute where the JupyterLab notebook is hosted. We begin by reading a list of PDF documents from Amazon S3 directly into the cluster memory, as illustrated in the following diagram.

- Use the following code to read the documents:
Next, you can visualize the size of each document to understand the volume of data you’re processing.
- You can generate charts and visualize your data within your PySpark notebook cell using static visualization tools like matplotlib and seaborn. See the following code:

Every PDF document contains multiple pages to process, and this task can be run in parallel using Spark. Each document is split page by page, with each page referencing the global in-memory PDFs. We achieve parallelism at the page level by creating a list of pages and processing each one in parallel. The following diagram provides a visual representation of this process.

The extracted text from each page of multiple documents is converted into a LangChain-friendly Document class.
- The
CustomDocument class, shown in the following code, is a custom implementation of the Document class that allows you to convert custom text blobs into a format recognized by LangChain. After conversion, the documents are split into chunks and prepared for embedding. Next, you can use LangChain’s built-in OpenSearchVectorSearch to create text embeddings. However, we use a custom EmbeddingsGenerator class that parallelizes (using PySpark) the embeddings generation process using a load-balanced SageMaker hosted embeddings model endpoint: The custom EmbeddingsGenerator class can generate embeddings for approximately 2,500 pages (12,000 chunks) of documents in under 180 seconds using just two concurrent load-balanced SageMaker embedding model endpoints and 10 PySpark worker nodes. This process can be further accelerated by increasing the number of load-balanced embedding endpoints and worker nodes in the cluster.
Conclusion
The integration of EMR Serverless with SageMaker Studio represents a significant leap forward in simplifying and enhancing big data processing and ML workflows. By eliminating the complexities of infrastructure management, enabling seamless scalability, and optimizing costs, this powerful combination empowers organizations to use petabyte-scale data processing without the overhead typically associated with managing Spark clusters. The streamlined experience within SageMaker Studio enables data scientists and engineers to focus on what truly matters—driving insights and innovation from their data. Whether you’re processing massive datasets, building RAG systems, or exploring other advanced analytics, this integration opens up new possibilities for efficiency and scale, all within the familiar and user-friendly environment of SageMaker Studio.
As data continues to grow in volume and complexity, adopting tools like EMR Serverless and SageMaker Studio will be key to maintaining a competitive edge in the ever-evolving landscape of data-driven decision-making. We encourage you to try this feature today by setting up SageMaker Studio using the SageMaker quick setup guide. To learn more about the EMR Serverless integration with SageMaker Studio, refer to Prepare data using EMR Serverless. You can explore more generative AI samples and use cases in the GitHub repository.
About the authors
 Raj Ramasubbu is a Senior Analytics Specialist Solutions Architect focused on big data and analytics and AI/ML with Amazon Web Services. He helps customers architect and build highly scalable, performant, and secure cloud-based solutions on AWS. Raj provided technical expertise and leadership in building data engineering, big data analytics, business intelligence, and data science solutions for over 18 years prior to joining AWS. He helped customers in various industry verticals like healthcare, medical devices, life science, retail, asset management, car insurance, residential REIT, agriculture, title insurance, supply chain, document management, and real estate.
 Pranav Murthy is an AI/ML Specialist Solutions Architect at AWS. He focuses on helping customers build, train, deploy and migrate machine learning (ML) workloads to SageMaker. He previously worked in the semiconductor industry developing large computer vision (CV) and natural language processing (NLP) models to improve semiconductor processes using state of the art ML techniques. In his free time, he enjoys playing chess and traveling. You can find Pranav on LinkedIn.
 Naufal Mir is an Senior GenAI/ML Specialist Solutions Architect at AWS. He focuses on helping customers build, train, deploy and migrate machine learning (ML) workloads to SageMaker. He previously worked at financial services institutes developing and operating systems at scale. He enjoys ultra endurance running and cycling.
 Kunal Jha is a Senior Product Manager at AWS. He is focused on building Amazon SageMaker Studio as the best-in-class choice for end-to-end ML development. In his spare time, Kunal enjoys skiing and exploring the Pacific Northwest. You can find him on LinkedIn.
 Ashwin Krishna is a Senior SDE working for SageMaker Studio at Amazon Web Services. He is focused on building interactive ML solutions for AWS enterprise customers to achieve their business needs. He is a big supporter of Arsenal football club and spends spare time playing and watching soccer.
 Harini Narayanan is a software engineer at AWS, where she’s excited to build cutting-edge data preparation technology for machine learning at SageMaker Studio. With a keen interest in sustainability, interior design, and a love for all things green, Harini brings a thoughtful approach to innovation, blending technology with her diverse passions.
