
We made it open-source here: https://github.com/CognitionAI/blockdiff
Usually, I’m a researcher working on areas like RL for coding agents – but one day I became annoyed by our slow VM startup times. So I took the plunge into systems engineering and built the first version of our VM hypervisor called otterlink. It now powers both our research & all of Devin production workloads.
Devin writes and runs code in a VM environment. Why VMs instead of Docker? For untrusted user workloads we require full isolation for security purposes. Moreover, many realistic dev environments require using Docker (e.g. to spin up a backend service or database). Good luck running Docker inside Docker, so we needed VMs.
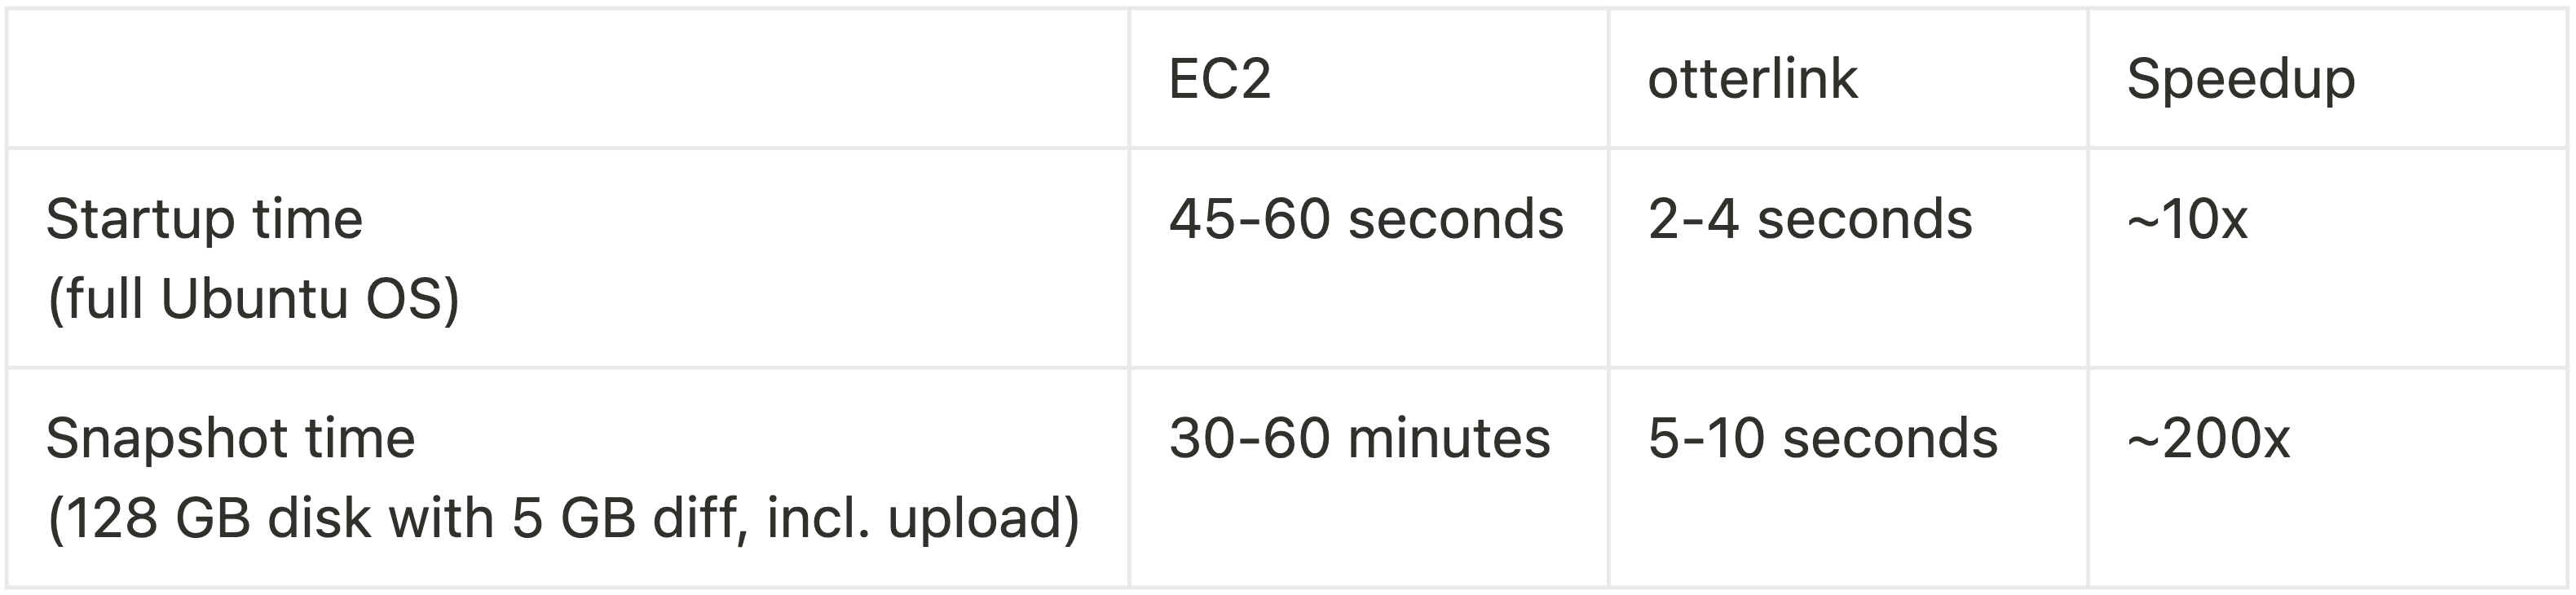
Compared to EC2, otterlink was able to bring down VM startup times by about 10x. The real pain point, however, were EC2’s long snapshot times. We want a lot of flexibility (e.g. forking, rollback and suspending VMs) that all require taking disk snapshots. On EC2 taking disk snapshots usually took a whopping 30+ minutes, which would be a terrible experience for our users. With otterlink we were able to bring this down to just a couple of seconds – a 200x speed-up.
To achieve this, we built our own file format blockdiff for instant block-level diffs of VM disks. Creating block-level diffs of two files is a much broader problem that goes beyond VM disks. We assumed there must be an existing open-source solution. To our surprise we couldn’t find such a tool, so we’re open-sourcing our implementation today.
Why incremental VM snapshots?
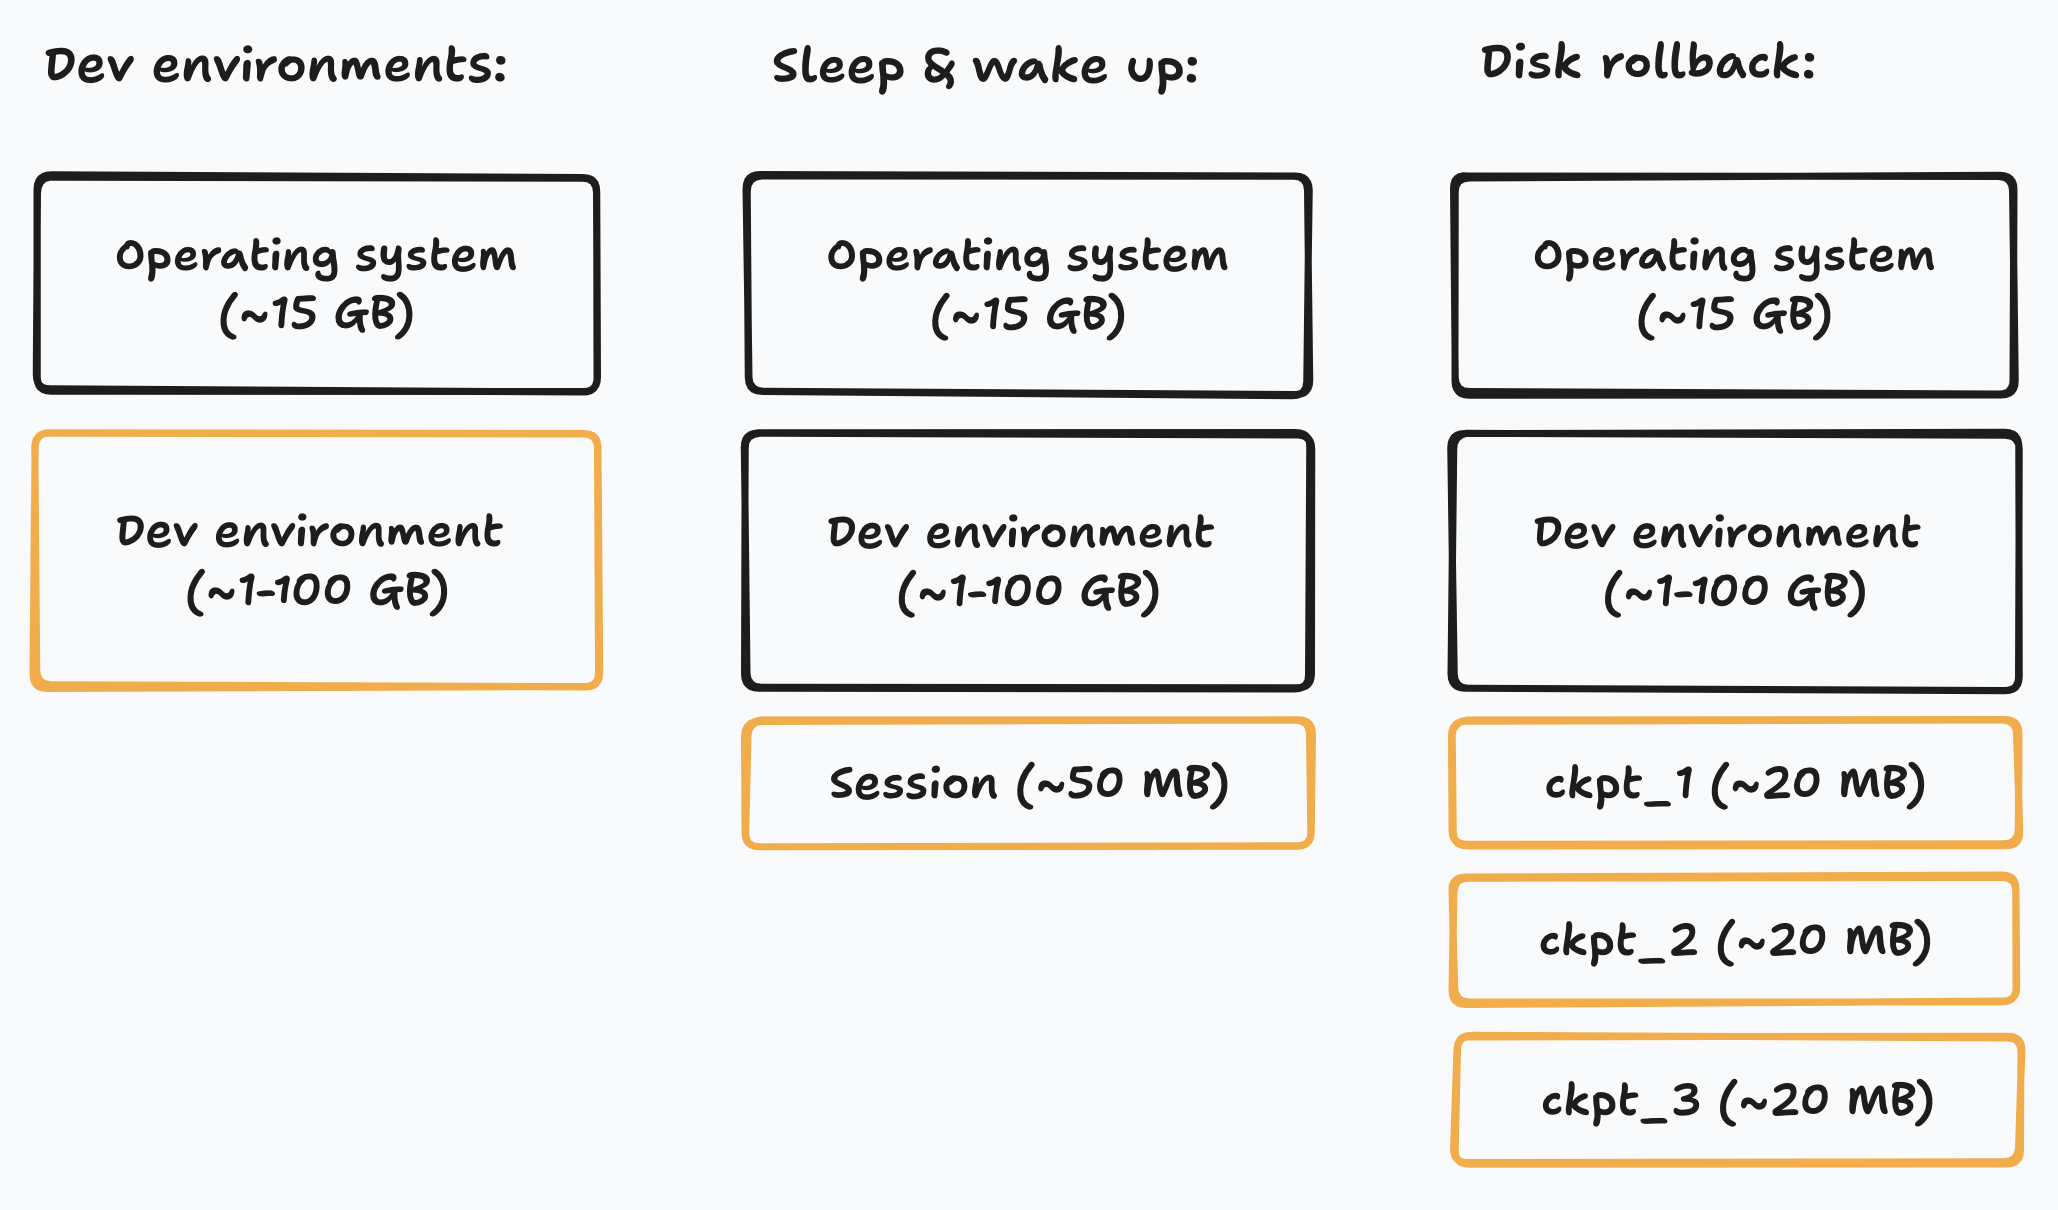
There are three reasons why we want incremental snapshots of VM disks:
- Dev environments
Our customers set up their dev environment in Devin’s VM, which we save to reuse via a disk snapshot. If most customers use just 1GB of additional disk space, we don’t want all the snapshots to redundantly store the entire 15GB operating system.
- Sleep & wake up
When Devin sleeps, we want to store the current session state without making another copy of the dev environment. The limiting factor isn’t even storage cost – it’s wake up time. Transferring a 50 MB snapshot of session state is much faster than a multi-GB snapshot of the entire dev environment.
- Disk rollback
To enable rolling back the disk during a session, we want to stack many of these incremental snapshots on top of each other.
Design goals
We tried very hard to find a way to implement disk snapshotting while satisfying all these criteria:
- Compact
The snapshot file should grow proportional to the difference between the base image and the VM disk. It’s too expensive to snapshot the entire disk.
- Instantaneous
Taking a snapshot should be instant and should not require significant disk I/O. We design our file format so that creating snapshot operates mostly on file metadata.
- Zero overhead
The VM should not experience any overhead, e.g. slower reads or writes.
- Simplicity
Things like this can easily break and have thousands of edge cases, so we want a solution that’s as simple as possible, to spare ourselves lots of debugging time.
The implementation of the file format is a single, few-hundred line Rust file. It stands on the shoulders of giants: most of the complexity is handled by the Linux kernel’s excellent CoW implementation in the XFS filesystem. The core idea is simple: For two files A & B, blockdiff stores only the blocks in B that are different from blocks in A.
Why is this hard?
To explain the difficulty of achieving all these design goals, let’s first explain the limitations of other solutions we considered:
- Why not just read the files and compute a binary diff?
Trying to compute a binary diff directly based on file content would be quite slow. Even on the fastest SSDs, scanning an entire 128 GB disk image can take 30-60 seconds.
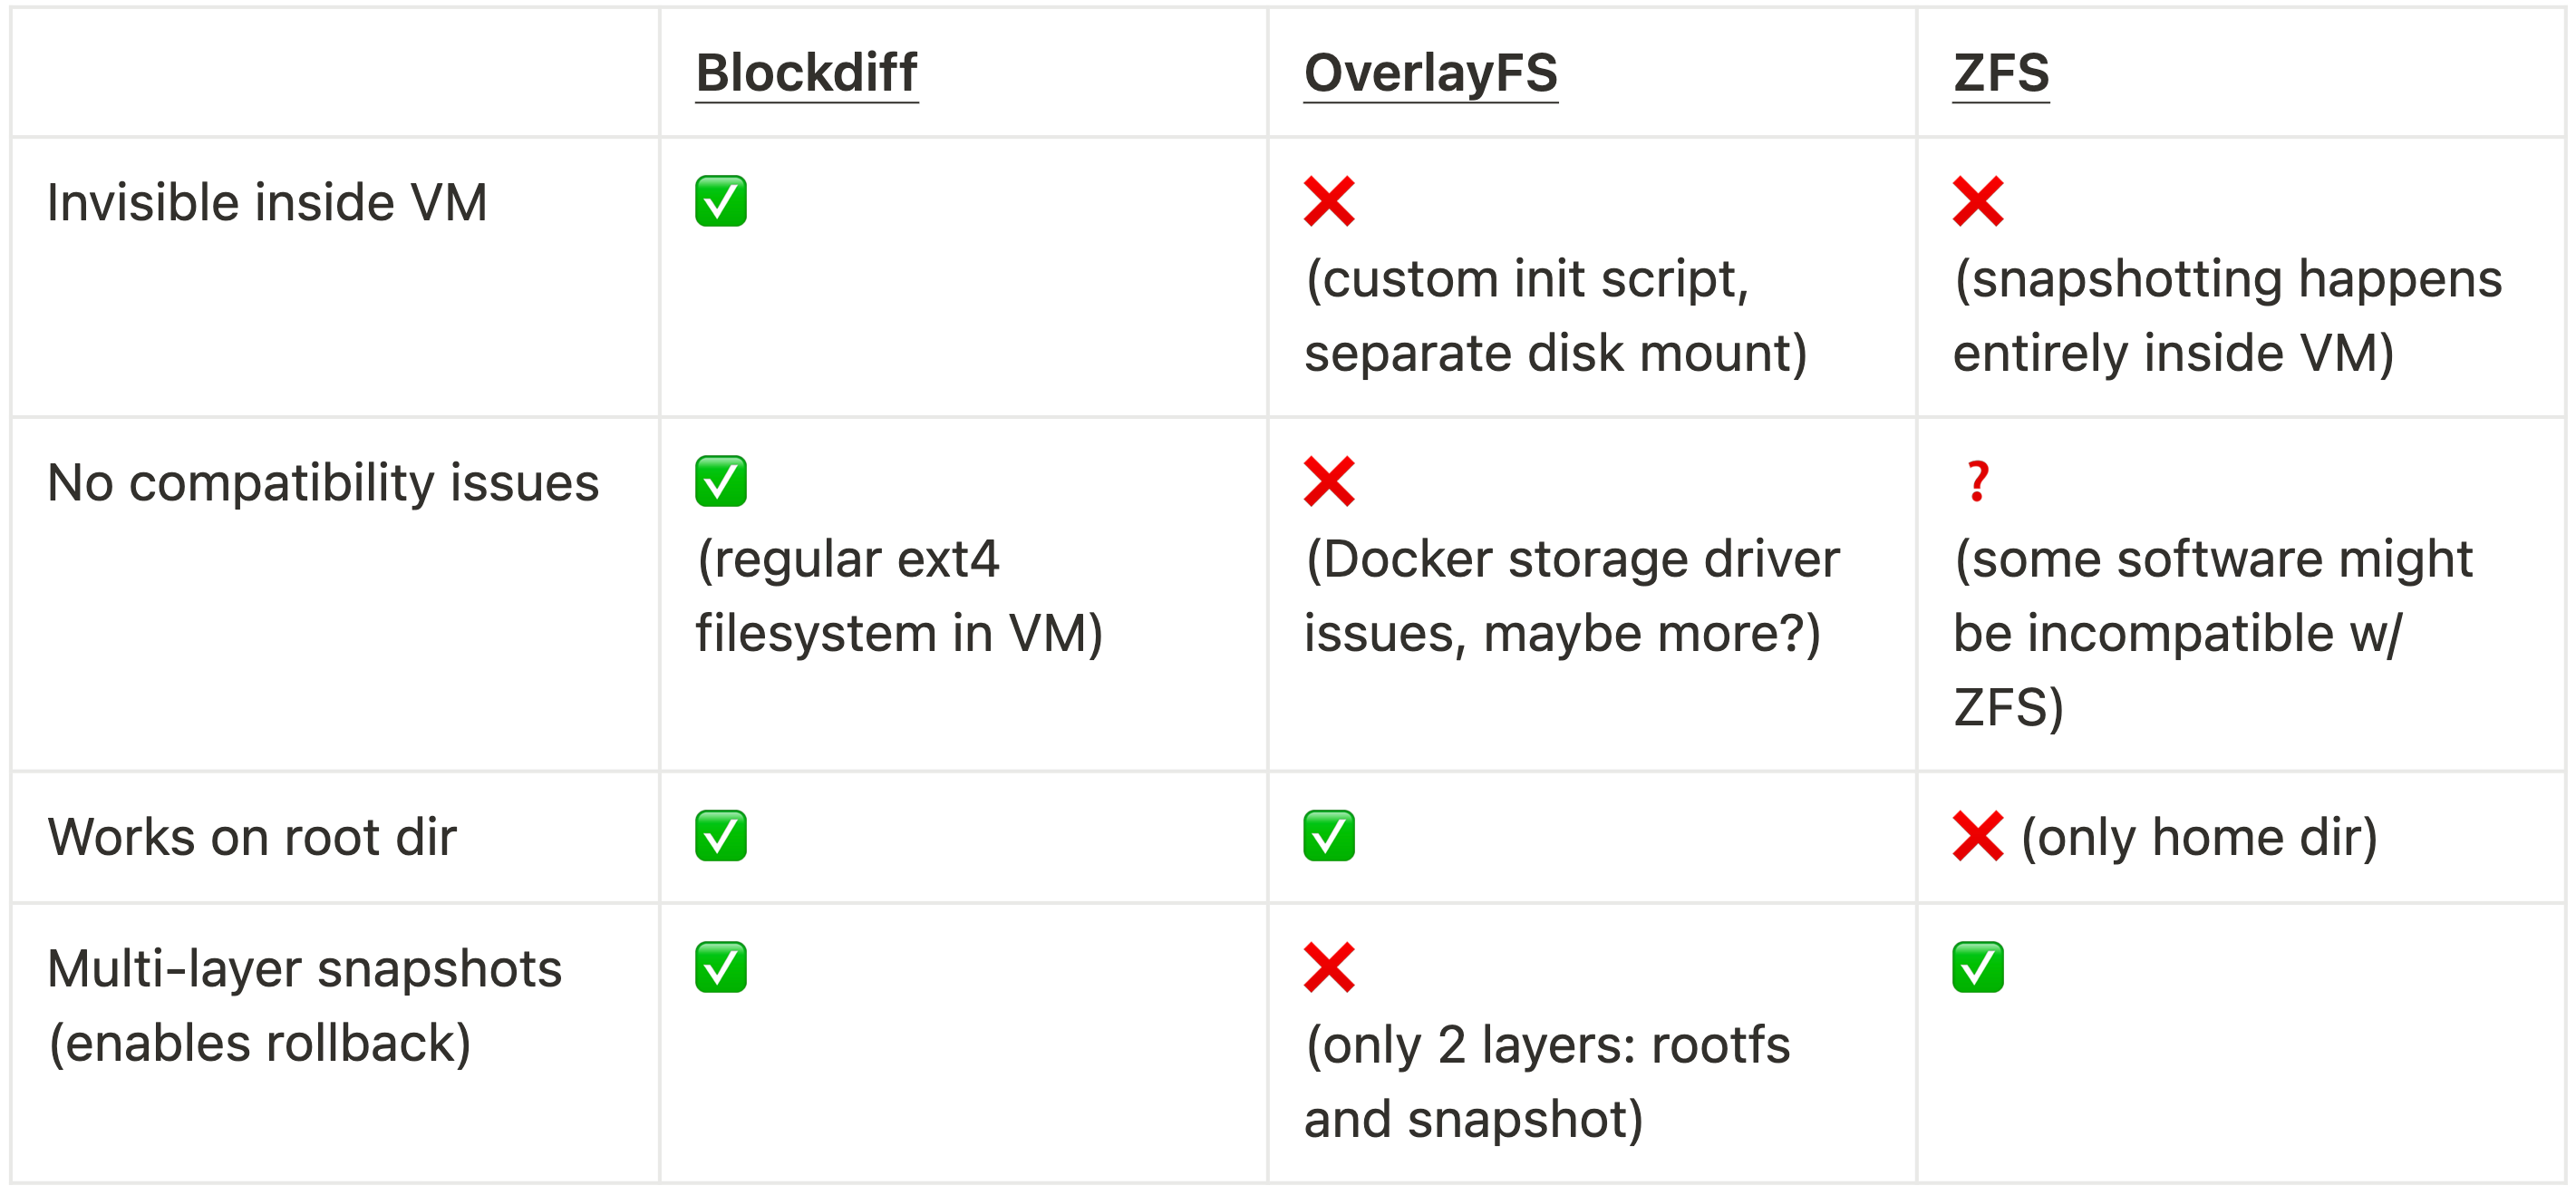
For the first few weeks of otterlink’s existence we used OverlayFS. However, it had two issues: It didn’t have clean support for incremental snapshots without remounting. Moreover, it created big issues when users wanted to use Docker – which would fall back to the vfs storage driver, consume 17x more storage and be 6x slower.
Before we started using otterlink, we had implemented a version of rollback using ZFS inside of the VM. It had multiple limitations: For reliability reasons, we mounted ZFS only on the home dir, so it wasn’t possible to roll back system-level changes like package installs. Moreover, the snapshot logic had to live inside of the VM, visible to the user. We also briefly considered using ZFS outside of the VM on the hypervisor. However, we concluded that the end-to-end performance of creating & transferring ZFS snapshots (send/recv) seemed to most likely be lower than what we can achieve with blockdiff.
- What about the qcow2 file format?
We didn’t deeply consider qcow2 because our hypervisor only supports raw disk images. Further below in the bonus section, we show a performance comparison that shows an example of qemu-img convert becoming quite slow for large files. Evidently, qcow2 doesn’t operate on metadata only (unlike blockdiff).
Primer: Linux filesystem concepts
Let’s first explain two Linux concepts that are necessary to understand the rest.
Sparse files
Sparse files only allocate disk space for non-zero data. This is particularly helpful for VM disk images that have mostly unused space. For a sparse file, the logical size of the file is different from the actual disk usage. In this example, ls -hl disk.img shows the logical size which is 32GB. However, it only uses 261 MB of actual disk space – which you can see with du -h.
ubuntu@devin-box:~$ ls -hl disk.img-rw-r--r-- 1 ubuntu ubuntu 32G Jan 9 07:57 disk.imgubuntu@devin-box:~$ du -h disk.img261M disk.imgYou can create an empty sparse file with truncate -s and then format it as an ext4 disk image using mkfs.ext4:
ubuntu@devin-box:~$ truncate -s 32G disk.imgubuntu@devin-box:~$ mkfs.ext4 disk.imgmke2fs 1.46.5 (30-Dec-2021)Discarding device blocks: done Creating filesystem with 8388608 4k blocks and 2097152 inodesFilesystem UUID: e2fdd2d5-a1a7-4be1-a9d7-6fecdb57096cSuperblock backups stored on blocks: 32768, 98304, 163840, 229376, 294912, 819200, 884736, 1605632, 2654208, 4096000, 7962624Allocating group tables: done Writing inode tables: done Creating journal (65536 blocks): doneWriting superblocks and filesystem accounting information: doneCopy-on-write (CoW)
Copy-on-write is a feature supported by many modern Linux filesystems (XFS, ZFS, btrfs). Instead of immediately copying data when requested, the system shares the original data and only creates a separate copy when modifications are made to either the original or the copy. This bookkeeping happens on a block-by-block basis: blocks are the fundamental unit of storage of modern file systems and typically 4KB in size.
See the difference between copying a file with & without “reflink” (another name for copy-on-write) for a 128GB disk image on a very fast NVMe SSD:
ubuntu@devin-box:~$ time cp --reflink=never base.img vm1.imgreal 0m24.532suser 0m0.142ssys 0m18.785subuntu@devin-box:~$ time cp --reflink=always base.img vm2.imgreal 0m0.008suser 0m0.001ssys 0m0.004sDisk images as files
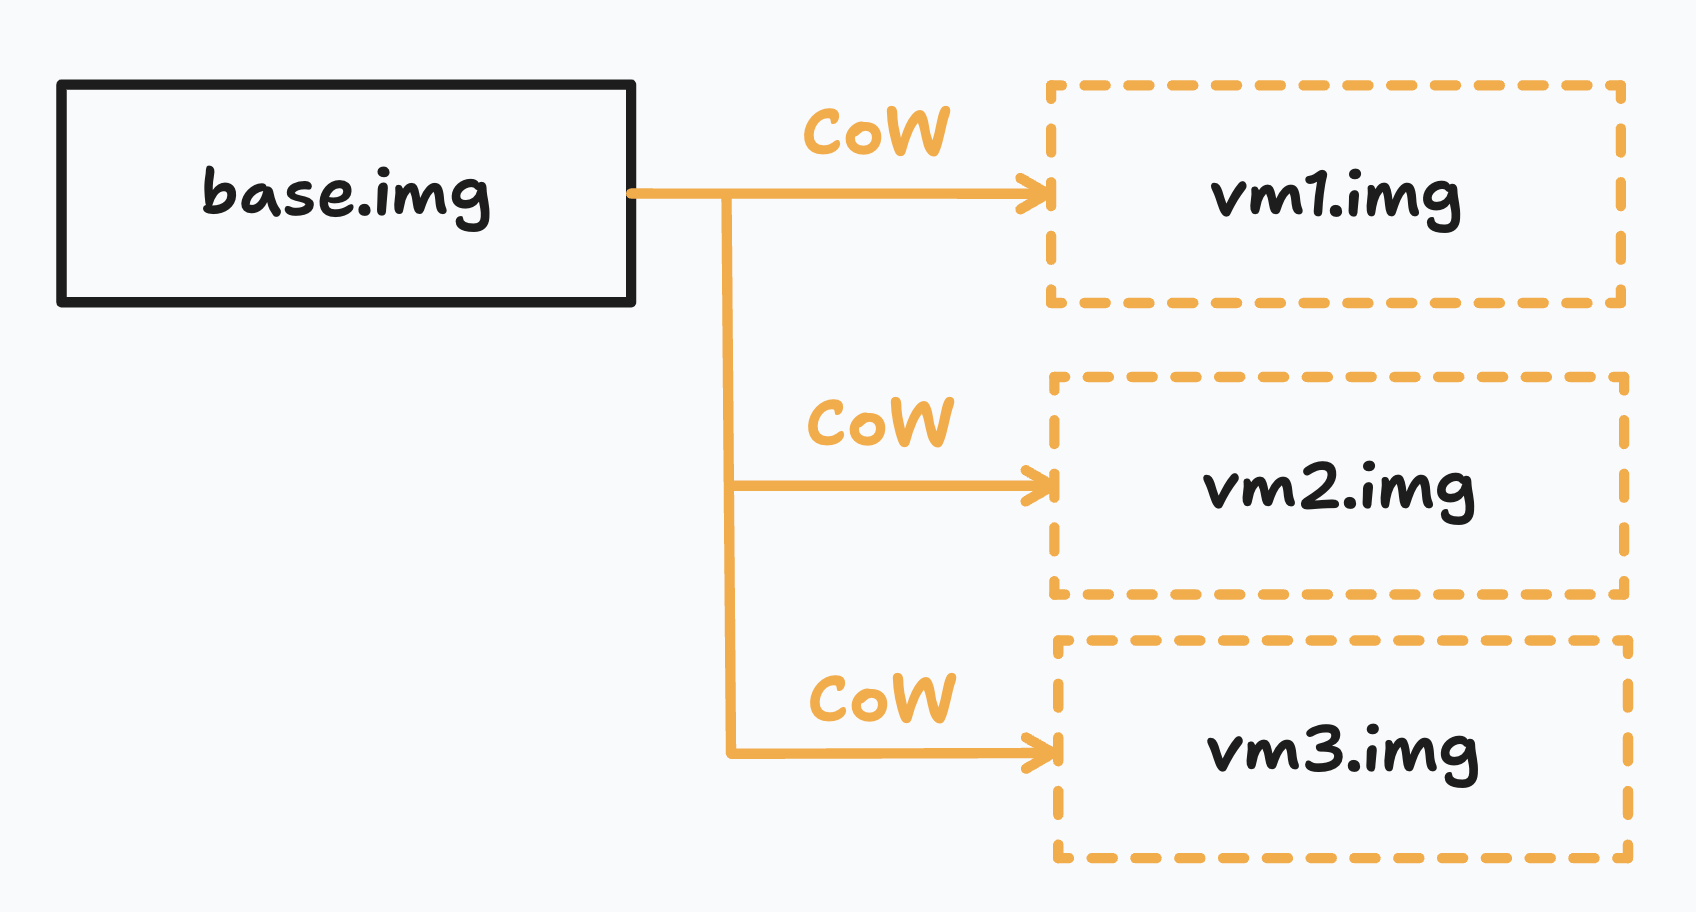
For our hypervisor otterlink, VM disks are just files on its filesystem. Each VM disk is a CoW copy of the base disk image (e.g. the operating system) – which means that it shares all blocks by default and greedily allocates new blocks on write.
It’s important to differentiate between the filesystem inside & outside of the VMs: Inside our VMs we use ext4 as the filesystem because it’s most widespread and the default on Ubuntu. Outside, the hypervisor uses XFS as its filesystem – crucially with reflink (= copy-on-write) enabled.
Serializing the diff between two files
Let’s say we have two files: base.img is a disk image of our operating system and vm.img is a CoW copy of base.img. The VM is reading & writing from vm.img. Our goal is to create a separate file snapshot.bdiff that stores only the blocks from vm.img that are different from base.img.
File extent maps
Our objective is to only operate on the filesystem metadata and to never touch the actual contents of the files. To be precise, the key lies in the file extent maps which you can get using the FIEMAP syscall. The blockdiff tool can be used to view the syscall outputs in a nicely formatted way (or alternatively use the Linux utility filefrag -v disk.img):
blockdiff view disk.imgThe file extent map represents the mapping from logical blocks in the file to physical blocks on the hard drive. This mapping is grouped in extents which are sequences of blocks that are allocated contiguously. You might’ve heard of the word (de)fragmentation before: In an ideal world, every file would just be a single extent, stored as one contiguous chunk on the hard drive. However, due to fragmentation files usually end up split across multiple extents scattered throughout the disk.
Reading file extent maps from Rust
Using the fiemap crate in Rust we have a clean wrapper around the underlying Linux syscall FIEMAP IOCTL. Getting the extents of the target file is as easy as:
let mut target_extents: Vec<_> = fiemap::fiemap(target_file)?.collect::, _>>()?; Each extent looks as follows:
pub struct FiemapExtent { pub fe_logical: u64, // logical offset (in bytes) pub fe_physical: u64, // physical offset (in bytes) pub fe_length: u64, // length of extent (in bytes) pub fe_flags: FiemapExtentFlags,}The logical block addresses are the location of data in the file (i.e. in our VM disk). The physical block addresses are where the data is stored on the hypervisor disk. An extent is a sequence of contiguous logical blocks with contiguous physical addresses. If two logical blocks from different files, point to the same physical blocks, then they are the same.
Exercise for the reader: Write an algorithm that takes in file extent map A & B and returns a list of extents from B that are different from A. Be careful that extent boundaries are in general not aligned between A & B.
Defining a file format (.bdiff)
Now the last step is to serialize this into a file:
/// - Header:/// - 8 bytes: magic string ("BDIFFv1\0")/// - 8 bytes: target file size (little-endian)/// - 8 bytes: base file size (little-endian)/// - 8 bytes: number of ranges (little-endian)/// - Ranges array, each range containing:/// - 8 bytes: logical offset (little-endian)/// - 8 bytes: length (little-endian)/// - Padding to next block boundary (4 KiB)/// - Range data (contiguous blocks of data)A small header contains information about which logical block ranges the file contains. After that, it stores all differing blocks contiguously. When creating (or applying) blockdiffs, writing the small header is the only disk I/O that needs to happen. All the actual data can share the same physical blocks with vm.img, i.e. creating the rest of the file is purely a “rewiring” of file metadata.
Exercise for the reader: What piece in the blockdiff codebase is responsible for the fact that the range data shares the same physical blocks as vm.img?
How the tool works
Install and build the binary:
git clone https://github.com/cognitionai/blockdiff && cd blockdiffcargo installReminder that we need to be on a filesystem with reflink enabled (e.g. XFS). Now, let’s create a snapshot of vm1.img against the base image base.img
blockdiff create snapshot.bdiff vm1.img --base base.imgWe can use that snapshot, to create a new disk image vm2.img:
blockdiff apply snapshot.bdiff vm2.img --base base.imgThis file should be identical to vm1.img. We can verify this with hashes:
xxhsum vm1.imgxxhsum vm2.imgSince this is only a file metadata operation, creating and applying snapshots is effectively instant – no matter how large the disk images. After creating the snapshot file locally, the file still needs to be transferred to storage which happens with about 2 GB/s.
On our hypervisor machines:Reading/writing 20 GB of data: ~6.5 sCreating 20 GB snapshot with blockdiff: ~200 msBonus: Compactifying sparse files using blockdiff
A fun little challenge that we faced while building otterlink is “compactifying” sparse files. If you try to upload a sparse disk image to blob storage, it will upload the entire logical size since blob storage doesn’t natively understand sparse files. So we were looking for a way to turn a sparse file of logical size X = disk usage Y into a “compact” file with logical size Y = disk usage Y.
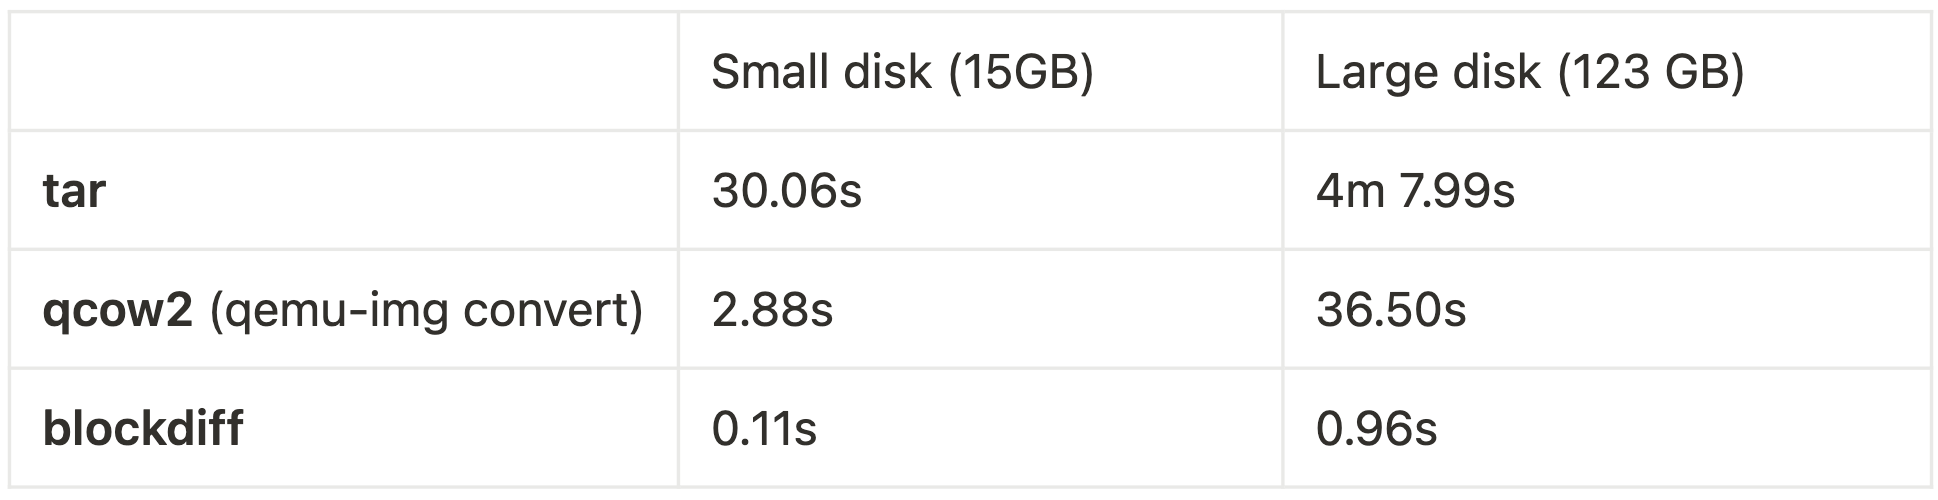
Most online sources seemed to recommend using tar which ended up being extremely slow. You would usually expect network latency to be the main bottleneck but it turned out tar would be 5x slower than the network transfer.
Despite not using qcow2 in our hypervisor itself, it turned out that qemu-img convert gave us exactly what we wanted: converting a raw, sparse disk image into a compact one. Moreover, it did it 5x faster than tar. To be clear, this was a random hack of ours and it isn’t what qemu-img convert is intended to be used for. However, with larger disks it becomes clear that even qcow2 starts being slow – it clearly isn’t a metadata-only operation. Fortunately, blockdiff is super fast at all sizes!
Open Questions
Working on VM hypervisors was a fun foray into systems programming. Hopefully, this gave you a glimpse of the work we do at Cognition. Of course, there are many more open questions:
- How to roll back (= swap out) the disk while the VM is running?How to implement intelligent caching of dev environment disks on hypervisors?How to perform memory snapshots & rollback in an incremental & space-efficient way?
If you’d like to work on these problems, reach out to us or apply here!
