


What is an Agent?
An agent is a Large Language Model (LLM)-powered system that can decide its own workflow. Unlike traditional chatbots, which operate on a fixed path (ask → answer), agents are capable of:
- Choosing between different actions based on context.Using external tools such as web search, databases, or APIs.Looping between steps for better problem-solving.
This flexibility makes agents powerful for complex tasks like conducting research, analyzing data, or executing multi-step workflows.
Key Components of Agents
Understanding the building blocks of agents is crucial before diving into implementation. These components work together to create intelligent, adaptable workflows:
Agent (LLM Core)
At the heart of every agent lies the “brain” of the system—the LLM. It is responsible for:
- Interpreting user inputs and understanding intent.Making decisions about the next steps based on pre-defined prompts and available tools.
For example, when a user asks a question, the LLM analyzes the input and decides whether it can answer directly or if additional steps (like a web search) are needed.
Memory
Memory enhances an agent’s ability to maintain context and learn over time:
- Short-term memory: Keeps track of the current interaction or task’s progress. For instance, it remembers the user’s last question during a session.Long-term memory: Stores information from past interactions to personalize responses or improve performance over time.
This dual memory system allows agents to provide context-aware and consistent interactions.
Tools
Tools extend the agent’s functionality beyond simple text generation. These are external functions or APIs that the agent can call to perform specific tasks, such as:
- Web search tools: Fetch the latest information from the internet.Calculators: Solve complex mathematical problems.APIs: Access services like search web, weather updates or stock data.
Together, these components enable agents to operate dynamically and handle complex, multi-step workflows.
What is LangGraph?
LangGraph is a Python library designed to create stateful, multi-step AI workflows. It acts as a bridge between the agent’s components, allowing developers to orchestrate their interactions efficiently.
What Does LangGraph Offer?
LangGraph simplifies the process of building intelligent agents by providing tools to:
- Build decision-making loops that guide the agent’s workflow.Seamlessly connect LLMs to external tools for enhanced capabilities.Manage shared memory and state, ensuring smooth transitions between steps.
Key Concepts
LangGraph relies on three main concepts to structure workflows:
- Nodes: These are the fundamental units of work, such as calling an LLM or performing a web search.Edges: Connections between nodes that define the sequence of operations. These can be linear (step-by-step) or conditional (based on specific criteria).State: Shared data that flows through the workflow, keeping track of progress and context.
By combining these elements, LangGraph provides a structured and flexible framework for designing complex AI workflows.
Let’s Build a Simple Agent
Step 1: Setup
Start by installing the required packages:
pip install langgraph langchain-community langchain-core langchain-groqNext, obtain free API keys for the tools we’ll use:
Set your environment variables to store the API keys securely:
import osos.environ['TAVILY_API_KEY'] = "your_tavily_key"os.environ['GROQ_API_KEY'] = "your_groq_key"Step 2: Basic Chatbot
We’ll begin by creating a simple chatbot that uses Groq’s LLM to respond to user inputs.
1. Import Dependencies :
from langgraph.graph import StateGraph, START, END, MessagesStatefrom typing import TypedDict, Annotatedimport operatorfrom langchain_groq import ChatGroqfrom langchain_core.messages import AnyMessage, SystemMessage, HumanMessage, ToolMessagefrom langgraph.prebuilt import ToolNode2. Initialize LLM: We first need to initialize a LLM model which supports tools (e.g., Llama 3 series, GPT-4o etc). Then we need to create a function which will act as a node for invoking the LLM.
llm = ChatGroq(temperature=0, model="Llama-3.3-70b-Specdec")system_prompt = """You are a helpful chatbot. You can help users with their questions.You can also ask questions to clarify the user's intent. You can also provide information to the user."""def call_llm(state: AgentState): messages = state["messages"] messages = [SystemMessage(content=system_prompt)] + messages message = llm.invoke(messages) return {"messages" : [message]}3. Define AgentState: The Agent State will keep a list of all the messages so far. It will be updated at each node.
class AgentState(TypedDict): messages: Annotated[list[AnyMessage], operator.add]4. Define workflow and create agent: Finally, we define the workflow of our agent using StateGraph.
# Build graphgraph = StateGraph(AgentState)graph.add_node("llm", call_llm)graph.add_edge(START, "llm")graph.add_edge("llm", END)agent = graph.compile()# Visualize the graphfrom IPython.display import Image, displaydisplay(Image(agent.get_graph().draw_mermaid_png()))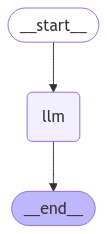
# Test itresponse = agent.invoke({"messages": [HumanMessage(content="What is the capital of France?")]})print(response["messages"][-1].content)Output: The capital of France is Paris.
Explanation:
- LLM Initialization: We configure Groq’s LLM to process user inputs. The temperature parameter controls response randomness.StateGraph: Tracks the flow of data (“state”) through the workflow.Chatbot Node: A single step that processes messages with the LLM.Invoke: Runs the workflow, taking the user’s input and returning the LLM’s response.
Step 3: Add Web Search Tool
Let’s enhance the agent by integrating a web search tool. We will use Tavily for this purpose.1. Define the Tool: The Tavily search tool will enable the agent to fetch real-time information from the internet given a query.
from langchain_community.tools.tavily_search import TavilySearchResultstool = TavilySearchResults(max_results=4) #increased number of resultsprint(type(tool))print(tool.name)tools = [tool]2. Binding the tool with LLM: Binding tools to LLM simply means, we are letting the LLM know that it has access to the given tools and how it can use them.
model = llm.bind_tools(tools)tools_map = {tool.name: tool for tool in tools}def call_llm(state: AgentState): messages = state['messages'] messages = [SystemMessage(content=prompt)] + messages message = model.invoke(messages) return {'messages': [message]}3. Enhanced Workflow: We’ll add a new node to handle tool usage. This node will check if the LLM has asked to use which tool with which arguments. The function take_action will then use those tools to get the answer and will revert back to LLM.
def take_action(state: AgentState): tool_calls = state['messages'][-1].tool_calls results = [] for tool_call in tool_calls: print(f"Calling {tool_call['name']} with {tool_call['args']}") if not tool_call['name'] in tools_map: print("n....bad tool name....") result = "bad tool name, retry" else: result = tools_map[tool_call['name']].invoke(tool_call['args']) results.append(ToolMessage(tool_call_id=tool_call['id'], name=tool_call['name'], content=str(result))) print("Back to model!") return {"messages": results}graph = StateGraph(AgentState)graph.add_node("llm", call_llm)graph.add_node("action", take_action)4. Adding the Conditional Edge: This is one of the most crucial parts of the workflow. The conditional edge determines whether to use a tool or escape from an LLM response.
def route_action(state: AgentState): result = state['messages'][-1] return len(result.tool_calls) > 0graph.add_conditional_edges( "llm", route_action, {True: "action", False: END})graph.add_edge("action", "llm")graph.set_entry_point("llm")graph = graph.compile()# Visualize the workflowfrom IPython.display import Image, displaydisplay(Image(graph.get_graph().draw_mermaid_png()))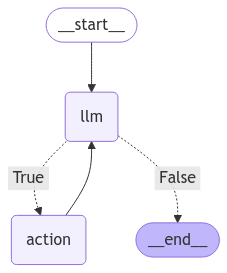
Explanation:
- Tool Binding: The LLM is connected to the Tavily search tool. This allows the LLM to perform web searches as part of its workflow.Conditional Routing: The workflow decides whether to use the tool based on the LLM’s response.Looping: After fetching results, the tool node sends the data back to the LLM for further processing.
3. Test with Web Access Run the enhanced agent to see it in action:
messages = [HumanMessage(content="What is the weather in sf?")]result = graph.invoke({"messages": messages})result['messages'][-1].contentOutput: ‘The current weather in San Francisco is overcast with a temperature of 45.3°F (7.4°C) and a feels-like temperature of 44.2°F (6.8°C). The wind is blowing at 3.1 mph (5.0 kph) from the west, and the humidity is 87%. There is no precipitation, and the visibility is 9.0 miles (16.0 km).’
messages = [HumanMessage(content="Who won the super bowl in 2024? In what state is the winning team headquarters located? What is the GDP of that state? Answer each question.")]result = graph.invoke({"messages": messages})result['messages'][-1].contentOutput: “The Kansas City Chiefs won the Super Bowl in 2024. The winning team’s headquarters is located in the state of Missouri. The GDP of Missouri is $331 billion.”
Next Steps
Now that you have a functional agent, consider expanding its capabilities:
- Add More Tools: Include calculators, weather APIs, or database connectors.Implement Memory: Store session-specific data for follow-up questions.
Create Multi-Agent Systems: Use multiple specialized agents to tackle complex workflows.
Congratulations!
You’ve built an AI agent capable of:
- Making decisions dynamically.Using external tools for real-time information retrieval.Refining its responses through iterative processing.
Experiment with LangGraph to create your own intelligent agents tailored to specific tasks!
Sources:
- (DeepLearning.ai)https://learn.deeplearning.ai/courses/ai-agents-in-langgraph
Also, don’t forget to follow us on Twitter and join our Telegram Channel and LinkedIn Group. Don’t Forget to join our 70k+ ML SubReddit.
 Meet IntellAgent: An Open-Source Multi-Agent Framework to Evaluate Complex Conversational AI System (Promoted)
The post Creating An AI Agent-Based System with LangGraph: A Beginner’s Guide appeared first on MarkTechPost.
