
In this post, we walk you through the process to build an automated mechanism using Amazon SageMaker to process your log data, run training iterations over it to obtain the best-performing anomaly detection model, and register it with the Amazon SageMaker Model Registry for your customers to use it.
Log-based anomaly detection involves identifying anomalous data points in log datasets for discovering execution anomalies, as well as suspicious activities. It usually comprises parsing log data into vectors or machine-understandable tokens, which you can then use to train custom machine learning (ML) algorithms for determining anomalies.
You can adjust the inputs or hyperparameters for an ML algorithm to obtain a combination that yields the best-performing model. This process is called hyperparameter tuning and is an essential part of machine learning. Choosing appropriate hyperparameter values is crucial for success, and it’s usually performed iteratively by experts, which can be time-consuming. Added to this are the general data-related processes such as loading data from appropriate sources, parsing and processing them with custom logic, storing the parsed data back to storage, and loading them again for training custom models. Moreover, these tasks need to be done repetitively for each combination of hyperparameters, which doesn’t scale well with increasing data and new supplementary steps. You can use Amazon SageMaker Pipelines to automate all these steps into a single execution flow. In this post, we demonstrate how to set up this entire workflow.
Solution overview
Contemporary log anomaly detection techniques such as Drain-based detection [1] or DeepLog [2] consist of the following general approach: perform custom processing on logs, train their anomaly detection models using custom models, and obtain the best-performing model with an optimal set of hyperparameters. To build an anomaly detection system using such techniques, you need to write custom scripts for processing as well for training. SageMaker provides support for developing scripts by extending in-built algorithm containers, or by building your own custom containers. Moreover, you can combine these steps as a series of interconnected stages using SageMaker Pipelines. The following figure shows an example architecture:
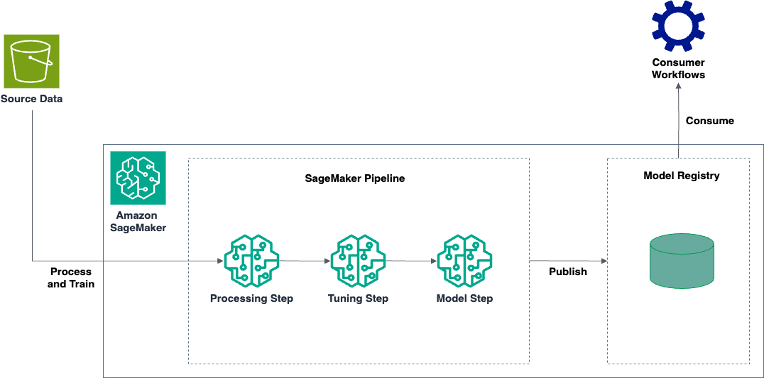
The workflow consists of the following steps:
- The log training data is initially stored in an Amazon Simple Storage Service (Amazon S3) bucket, from where it’s picked up by the SageMaker processing step of the SageMaker pipeline. After the pipeline is started, the processing step loads the Amazon S3 data into SageMaker containers and runs custom processing scripts that parse and process the logs before uploading them to a specified Amazon S3 destination. This processing could be either decentralized with a single script running on one or more instances, or it could be run in parallel over multiple instances using a distributed framework like Apache Spark. We discuss both approaches in this post. After processing, the data is automatically picked up by the SageMaker tuning step, where multiple training iterations with unique hyperparameter combinations are run for the custom training script. Finally, the SageMaker model step creates a SageMaker model using the best-trained model obtained from the tuning step and registers it to the SageMaker Model Registry for consumers to use. These consumers, for example, could be testers, who use models trained on different datasets by different pipelines to compare their effectiveness and generality, before deploying them to a public endpoint.
We walk through implementing the solution with the following high-level steps:
- Perform custom data processing, using either a decentralized or distributed approach. Write custom SageMaker training scripts that automatically tune the resulting models with a range of hyperparameters. Select the best-tuned model, create a custom SageMaker model from it, and register it to the SageMaker Model Registry. Combine all the steps in a SageMaker pipeline and run it.
Prerequisites
You should have the following prerequisites:
- An AWS account A SageMaker notebook instance An S3 bucket to store the input data
Process the data
To start, upload the log dataset to an S3 bucket in your AWS account. You can use the AWS Command Line Interface (AWS CLI) using Amazon S3 commands, or use the AWS Management Console. To process the data, you use a SageMaker processing step as the first stage in your SageMaker pipeline. This step spins up a SageMaker container and runs a script that you provide for custom processing. There are two ways to do this: decentralized or distributed processing. SageMaker provides Processor classes for both approaches. You can choose either approach for your custom processing depending on your use case.
Decentralized processing with ScriptProcessor
In the decentralized approach, a single custom script runs on one or more standalone instances and processes the input data. The SageMaker Python SDK provides the ScriptProcessor class, which you can use to run your custom processing script in a SageMaker processing step. For small datasets, a single instance can usually suffice for performing data processing. Increasing the number of instances is recommended if your dataset is large and can be split into multiple independent components, which can all be processed separately (this can be done using the ShardedByS3Key parameter, which we discuss shortly).
If you have custom dependencies (which can often be the case during R&D processes), you can extend an existing container and customize it with your dependencies before providing it to the ScriptProcessor class. For example, if you’re using the Drain technique, you need the logparser Python library for log parsing, in which case you write a simple Dockerfile that installs it along with the usual Python ML libraries:
You can use a Python SageMaker notebook instance in your AWS account to create such a Dockerfile and save it to an appropriate folder, such as docker. To build a container using this Dockerfile, enter the following code into a main driver program in a Jupyter notebook on your notebook instance:
This code creates an Amazon Elastic Container Registry (Amazon ECR) repository where your custom container image will be stored (the repository will be created if it’s not already present). The container image is then built, tagged with the repository name (and :latest), and pushed to the ECR repository.
The next step is writing your actual processing script. For more information on writing a processing script using ScriptProcessor, refer to Amazon SageMaker Processing – Fully Managed Data Processing and Model Evaluation. The following are a few key points to remember:
- A SageMaker processing step loads the data from an input location (Amazon S3 or local developer workspace) to an input path specified by you under the
/opt/ml/processing directory of your container. It then runs your script in the container and uploads the output data from your specified path under /opt/ml/processing to an Amazon S3 destination you’ve specified. Customer log datasets can sometimes consist of multiple subsets without any inter-dependencies amongst them. For these cases, you can parallelize your processing by making your processing script run over multiple instances in a single processing step, with each instance processing one of these independent subsets. It’s a good practice to keep the script’s logic redundant so that each execution on every instance happens independently of the others. This avoids duplicative work. When your script is ready, you can instantiate the SageMaker ScriptProcessor class for running it on your custom container (created in the previous step) by adding the following code to your driver program:
In the preceding code, a ScriptProcessor class is being instantiated to run the python3 command for running your custom Python script. You provide the following information:
- You provide the ECR URI of your custom container image and give SageMaker
PipelineSession credentials to the class. When you specify the PipelineSession, the ScriptProcessor doesn’t actually begin the execution when you call its run() method—rather, it defers until the SageMaker pipeline as a whole is invoked. In the run() method, you specify the preprocessing script along with the appropriate ProcessingInput and ProcessingOutput These specify where the data will be mounted in your custom container from Amazon S3, and where it will be later uploaded in Amazon S3 from your container’s output folder. The output channel is named training, and the final Amazon output location will be located at s3://<amzn-s3-demo-bucket-pca-detect>/<job-name>/output/<output-name>. You can also specify an additional parameter in run() named distribution, and it can either be ShardedByS3Key or FullyReplicated, depending on whether you’re splitting and sending your S3 dataset to multiple ScriptProcessor instances or not. You can specify the number of instances in the instance_count parameter of your ScriptProcessor class.
Once instantiated, you can pass the ScriptProcessor class as an argument to the SageMaker processing step along with an appropriate name.
Distributed processing with PySparkProcessor
An alternative to the decentralized processing is distributed processing. Distributed processing is particularly effective when you need to process large amounts of log data. Apache Spark is a popular engine for distributed data processing. It uses in-memory caching and optimized query execution for fast analytic queries against datasets of all sizes. SageMaker provides the PySparkProcessor class within the SageMaker Python SDK for running Spark jobs. For an example of performing distributed processing with PySparkProcessor on SageMaker processing, see Distributed Data Processing using Apache Spark and SageMaker Processing. The following are a few key points to note:
- To install custom dependencies in your Spark container, you can either build a custom container image (similar to the decentralized processing example) or use the
subprocess Python module to install them using pip at runtime. For example, to run the anomaly detection technique on Spark, you need an argformat module, which you can install along with other dependencies as follows: - Spark transformations are powerful operations to process your data, and Spark actions are the operations that actually perform the requested transformations on your data. The
collect() method is a Spark action that brings all the data from worker nodes to the main driver node. It’s a good practice to use it in conjunction with filter functions so you don’t run into memory issues when working with large log datasets. You should also try to partition your input data based on the total number of cores you plan to have in your SageMaker cluster. The official Spark recommendation is to have approximately 2–3 times the number of partitions as the total number of cores in your cluster. When your Spark processing script is ready, you can instantiate the SageMaker PySparkProcessor class for running it by adding the following lines to your driver program:
The preceding code instantiates a PySparkProcessor instance with three nodes in the SageMaker cluster with Spark v3.1 installed in them. You submit your Spark processing code to it along with the Amazon S3 location where your event logs would be uploaded. These logs can be useful for debugging.
In the run() method invocation, you don’t need to specify your inputs and outputs, which can be the case if these are fixed Amazon S3 destinations already known to your processing code. Otherwise, you can specify them using the ProcessingInput and ProcessingOutput parameters just like in the decentralized example.
Post-instantiation, the PySparkProcessor class is passed to a SageMaker processing step with an appropriate name. Its execution won’t be triggered until the pipeline is created.
Train and tune the model
Now that your processing steps are complete, you can proceed to the model training step. The training algorithm could either be a classical anomaly detection model like Drain-based detection or a neural-network based model like DeepLog. Every model takes in certain hyperparameters that influence how the model is trained. To obtain the best-performing model, the model is usually executed and validated multiple times over a wide range of hyperparameters. This can be a time-consuming manual process and can instead be automated using SageMaker hyperparameter tuning jobs. Tuning jobs perform hyperparameter optimization by running your training script with a specified range of hyperparameter values and obtaining the best model based on the metrics you specify. You can predefine these metrics if you use built-in SageMaker algorithms or define them for your custom training algorithm.
You first need to write your training script for your anomaly detection model. Keep the following in mind:
- SageMaker makes artifacts available to your container under the
/opt/ml container directory. You should use this when fetching your artifacts. For more details on the SageMaker container structure, see SageMaker AI Toolkits Containers Structure. For using a tuning job, you need to make sure that your code doesn’t hardcode parameter hyperparameter values but instead reads them from the /opt/ml/input/config/hyperparameters.json file in your container where SageMaker places it. When using a custom training script, you also need to add a custom training metric to your script that can be used by the tuning job to find the best model. For this, you should print your desired metrics in your training script using a logger or print function. For example, you could print out custom_metric_value: 91, which indicates that your custom metric’s value is 91. We demonstrate later in this post how SageMaker can be informed about this metric. When your training script is ready, you can use it inside a SageMaker container. SageMaker provides a wide range of built-in algorithm containers that you can use to run your training code. However, there might be cases when you need to build your own training containers. This could be the case when you need custom libraries installed or if you plan to use a new algorithm not built in by SageMaker. In such a case, you can build your own containers in two ways:
- You can extend an existing SageMaker built-in container that’s closest to your requirements and install your training script onto it. For instructions, refer to Step 2: Create and upload the Dockerfile and Python training scripts. You can build your own new SageMaker container using your custom training script and any of your custom dependencies from scratch. For instructions to build your custom container and make it available to SageMaker, see Train and host Scikit-Learn models in Amazon SageMaker by building a Scikit Docker container.
After you create your training container image, you need to define the hyperparameter ranges for your tuning job. For example, if you’re using a custom adaptation of the PCA algorithm (like in Drain-based detection), you add the following lines to your driver program:
The preceding code indicates that your hyperparameter max_components is an integer and it ranges from 1–30. The auto scaling type indicates that SageMaker will choose the best scale for hyperparameter changes. For more details on other scaling options, see Hyperparameter scaling types.
Then you can use the following code to fully configure your training and tuning steps in the driver program:
In the preceding code, a SageMaker Estimator instance is created using your custom training image’s ECR URI. SageMaker Estimators help in training your models and orchestrating their training lifecycles. The Estimator is provided with a suitable role and the PipelineSession is designated as its SageMaker session.
You provide the location where your trained model should be stored to the Estimator and supply it with custom metric definitions that you created. For the example metric custom_metric_value: 91, the definition to the Estimator includes its name along with its regex. The regex informs SageMaker how to pick up the metric’s values from training logs in Amazon CloudWatch. The tuning job uses these values to find the best-performing model. You also specify where the output model should be uploaded in the output_path parameter.
You then use this Estimator to instantiate your HyperparameterTuner. Its parameters include the total and maximum parallel number of training jobs, search strategy (for more details on strategies, see Understand the hyperparameter tuning strategies available in Amazon SageMaker AI), and whether you want to use early stopping. Early stopping can be set to Auto so that SageMaker automatically stops model training when it doesn’t see improvements in your custom logged metric.
After the HyperparameterTuner is instantiated, you can call its fit() method. In its input parameter, you specify the output Amazon S3 URI from the processing step as the input location for obtaining training data in your tuning step. This way, you don’t need to specify the Amazon S3 URI yourself and it’s passed between steps implicitly. You can then specify your s3prefix and distribution depending on whether you’re using multiple instances or not.
Once instantiated, the HyperparameterTuner is passed to the tuning step, where it becomes part of your SageMaker pipeline. The training configuration is now complete!
Register the model
You can now choose the best model from the tuning step to create a SageMaker model and publish it to the SageMaker Model Registry. You can use the following driver program code:
The code instantiates a SageMaker model using the Amazon S3 URI of the best model obtained from the tuning step. The top_k attribute of the get_top_model_s3_uri() method indicates that you’re interested in only obtaining the best-trained model.
After the model is instantiated, you can use it to create a SageMaker PipelineModel so that your pipeline can work directly with your model. You then call the register() method of PipelineModel to register your model to the SageMaker Model Registry. In the register() call, you specify the name of the new model package group where your model will be registered and specify its input and output request and response prediction types.
Finally, a SageMaker ModelStep is invoked with the instantiated PipelineModel to carry out the model registration process.
Create and run a pipeline
You’ve now reached the final step where all your steps will be tied together in a SageMaker pipeline. Add the following code to your driver program to complete your pipeline creation steps:
This code instantiates the SageMaker Pipeline construct and provides it with all the steps defined until now—processing, tuning, and registering the model. It’s provided with a role and then invoked with the start() method.
The pipeline invocation could be on-demand using code (using pipeline.start() as shown earlier) or it could be event-driven using Amazon EventBridge rules. For example, you can create an EventBridge rule that triggers when new training data is uploaded to your S3 buckets and specify your SageMaker pipeline as the target for this rule. This makes sure that when new data is uploaded to your training bucket, your SageMaker pipeline is automatically invoked. For more details on SageMaker and EventBridge integration, refer to Schedule Pipeline Runs.
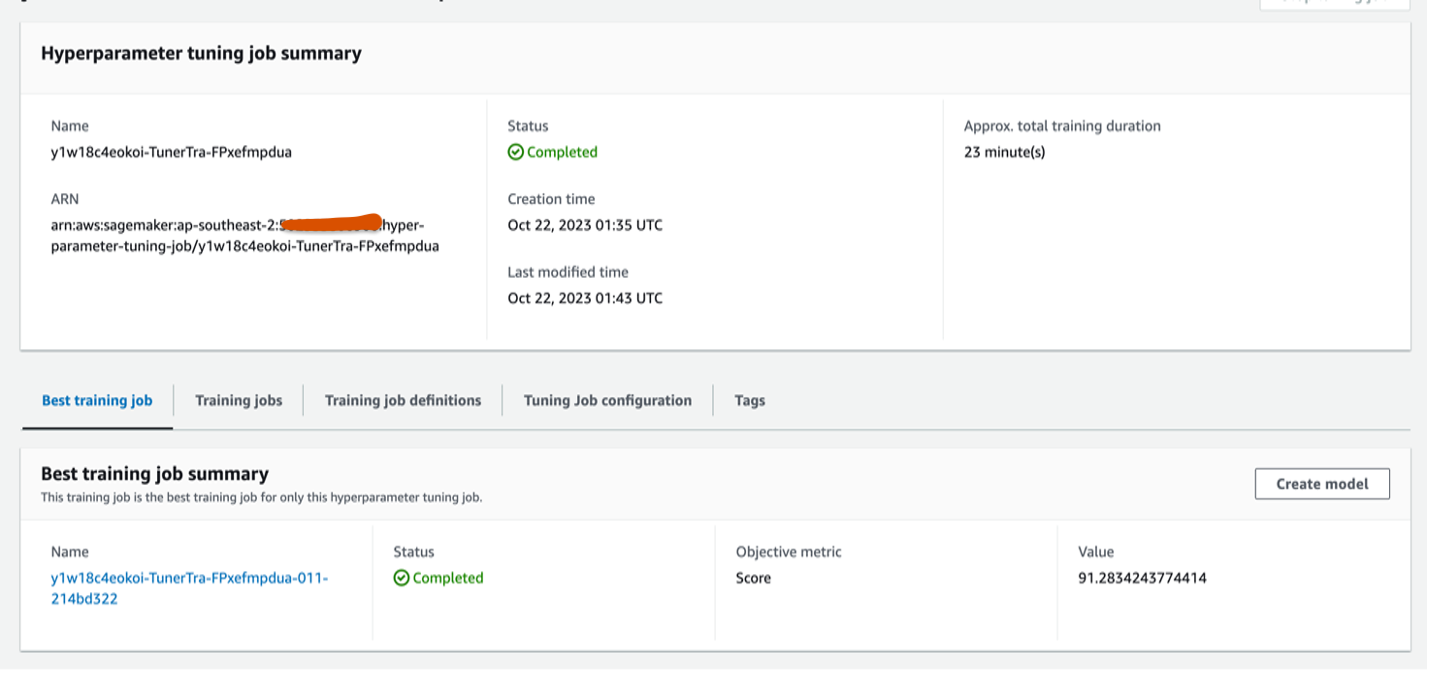
On invocation, your SageMaker pipeline runs your custom processing script in the processing step and uploads the processed data to your specified Amazon S3 destination. It then starts a tuning job with your custom training code and iteratively trains multiple models with your supplied hyperparameters and selects the best model based on your custom provided metric. The following screenshot shows that it selected the best model when tuning was complete:
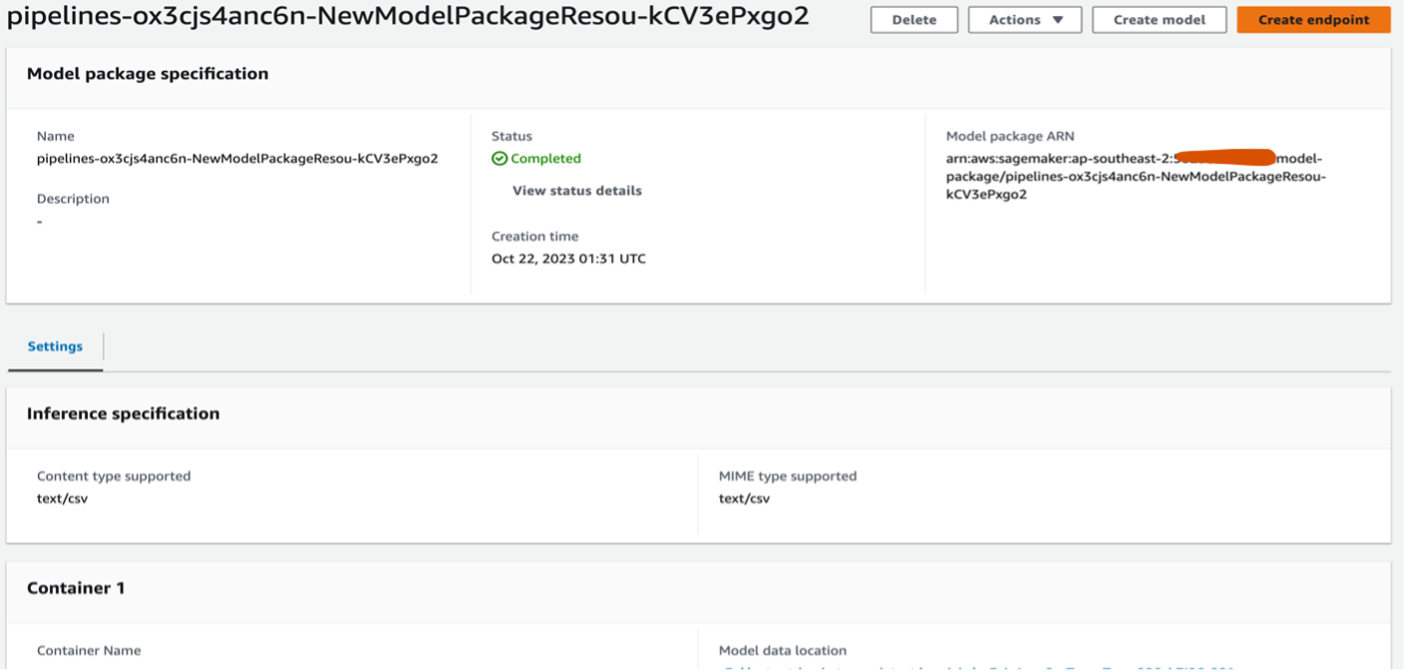
Finally, the best model is selected and a model package resource is created with it in your model registry. Your customers can use it to deploy your model:
You have now completed all the steps in processing, training, tuning, and registering your custom anomaly detection model automatically with the aid of a SageMaker pipeline that was initiated using your driver program.
Clean up
To avoid incurring future charges, complete the following steps:
- Delete the SageMaker notebook instance used for this post. Delete the model package resource that was created using the best-tuned model. Delete any Amazon S3 data that was used for this post.
Conclusion
In this post, we demonstrated the building, training, tuning, and registering of an anomaly detection system with custom processing code, custom training code, and custom training metrics. We ran these steps automatically with the aid of a SageMaker pipeline, which was run by invoking a single main driver program. We also discussed the different ways of processing our data, and how it could be done using the various constructs and tools that SageMaker provides in a user-friendly and straightforward manner.
Try this approach for building your own custom anomaly detection model, and share your feedback in the comments.
References
[1] https://ieeexplore.ieee.org/document/8029742
[2] https://dl.acm.org/doi/pdf/10.1145/3133956.3134015
About the Author
 Nitesh Sehwani is an SDE with the EC2 Threat Detection team where he’s involved in building large-scale systems that provide security to our customers. In his free time, he reads about art history and enjoys listening to mystery thrillers.
