
Training large language models (LLMs) models has become a significant expense for businesses. For many use cases, companies are looking to use LLM foundation models (FM) with their domain-specific data. However, companies are discovering that performing full fine tuning for these models with their data isn’t cost effective. To reduce costs while continuing to use the power of AI, many companies have shifted to fine tuning LLMs on their domain-specific data using Parameter-Efficient Fine Tuning (PEFT). PEFT is a set of techniques designed to adapt pre-trained LLMs to specific tasks while minimizing the number of parameters that need to be updated. Techniques such as Low-Rank Adaptation (LoRA) and Weighted-Decomposed Low Rank Adaptation (DoRA), significantly reducing the number of trainable parameters and resulting in lower costs for fine tuning.
In addition to cost, performing fine tuning for LLMs at scale presents significant technical challenges. The process of setting up and configuring a distributed training environment can be complex, requiring expertise in server management, cluster configuration, networking and distributed computing. Manually managing such complexity can often be counter-productive and take away valuable resources from your businesses AI development. To simplify infrastructure setup and accelerate distributed training, AWS introduced Amazon SageMaker HyperPod in late 2023.
In this blog post, we showcase how you can perform efficient supervised fine tuning for a Meta Llama 3 model using PEFT on AWS Trainium with SageMaker HyperPod. We use HuggingFace’s Optimum-Neuron software development kit (SDK) to apply LoRA to fine-tuning jobs, and use SageMaker HyperPod as the primary compute cluster to perform distributed training on Trainium. Using LoRA supervised fine-tuning for Meta Llama 3 models, you can further reduce your cost to fine tune models by up to 50% and reduce the training time by 70%.
Solution overview
SageMaker HyperPod is designed to help reduce the time required to train generative AI FMs by providing a purpose-built infrastructure for distributed training at scale. When using SageMaker HyperPod for training, SageMaker will actively monitor the cluster’s health, automatically replacing faulty nodes and resuming model training from checkpoints. The clusters come pre-configured with SageMaker distributed training libraries that enable you to split your training data and model across thousands of compute nodes, allowing data to be processed in parallel while fully utilizing the cluster’s compute and network infrastructure. You can also customize your distributed training. The architecture diagram that follows provides a high level overview of these various components:
- Compute cluster: This contains a head node that orchestrates computation across a cluster of worker nodes. Because the head node is only facilitating the training, it’s typically a much smaller instance. In this post, we use Amazon Elastic Compute Cloud (Amazon EC2) Trn1 instances for the worker nodes and a single Amazon EC2 C5 instance for the head node. Shared Volume: FSx for Lustre is used as the shared storage volume across nodes to maximize data throughput. It’s mounted at
/fsx on the head and compute nodes. External storage: Amazon Simple Storage Service (Amazon S3) is used to store the cluster’s lifecycle scripts, configuration files, datasets, and checkpoints. Scheduler: SLURM is used as the job scheduler for the cluster. 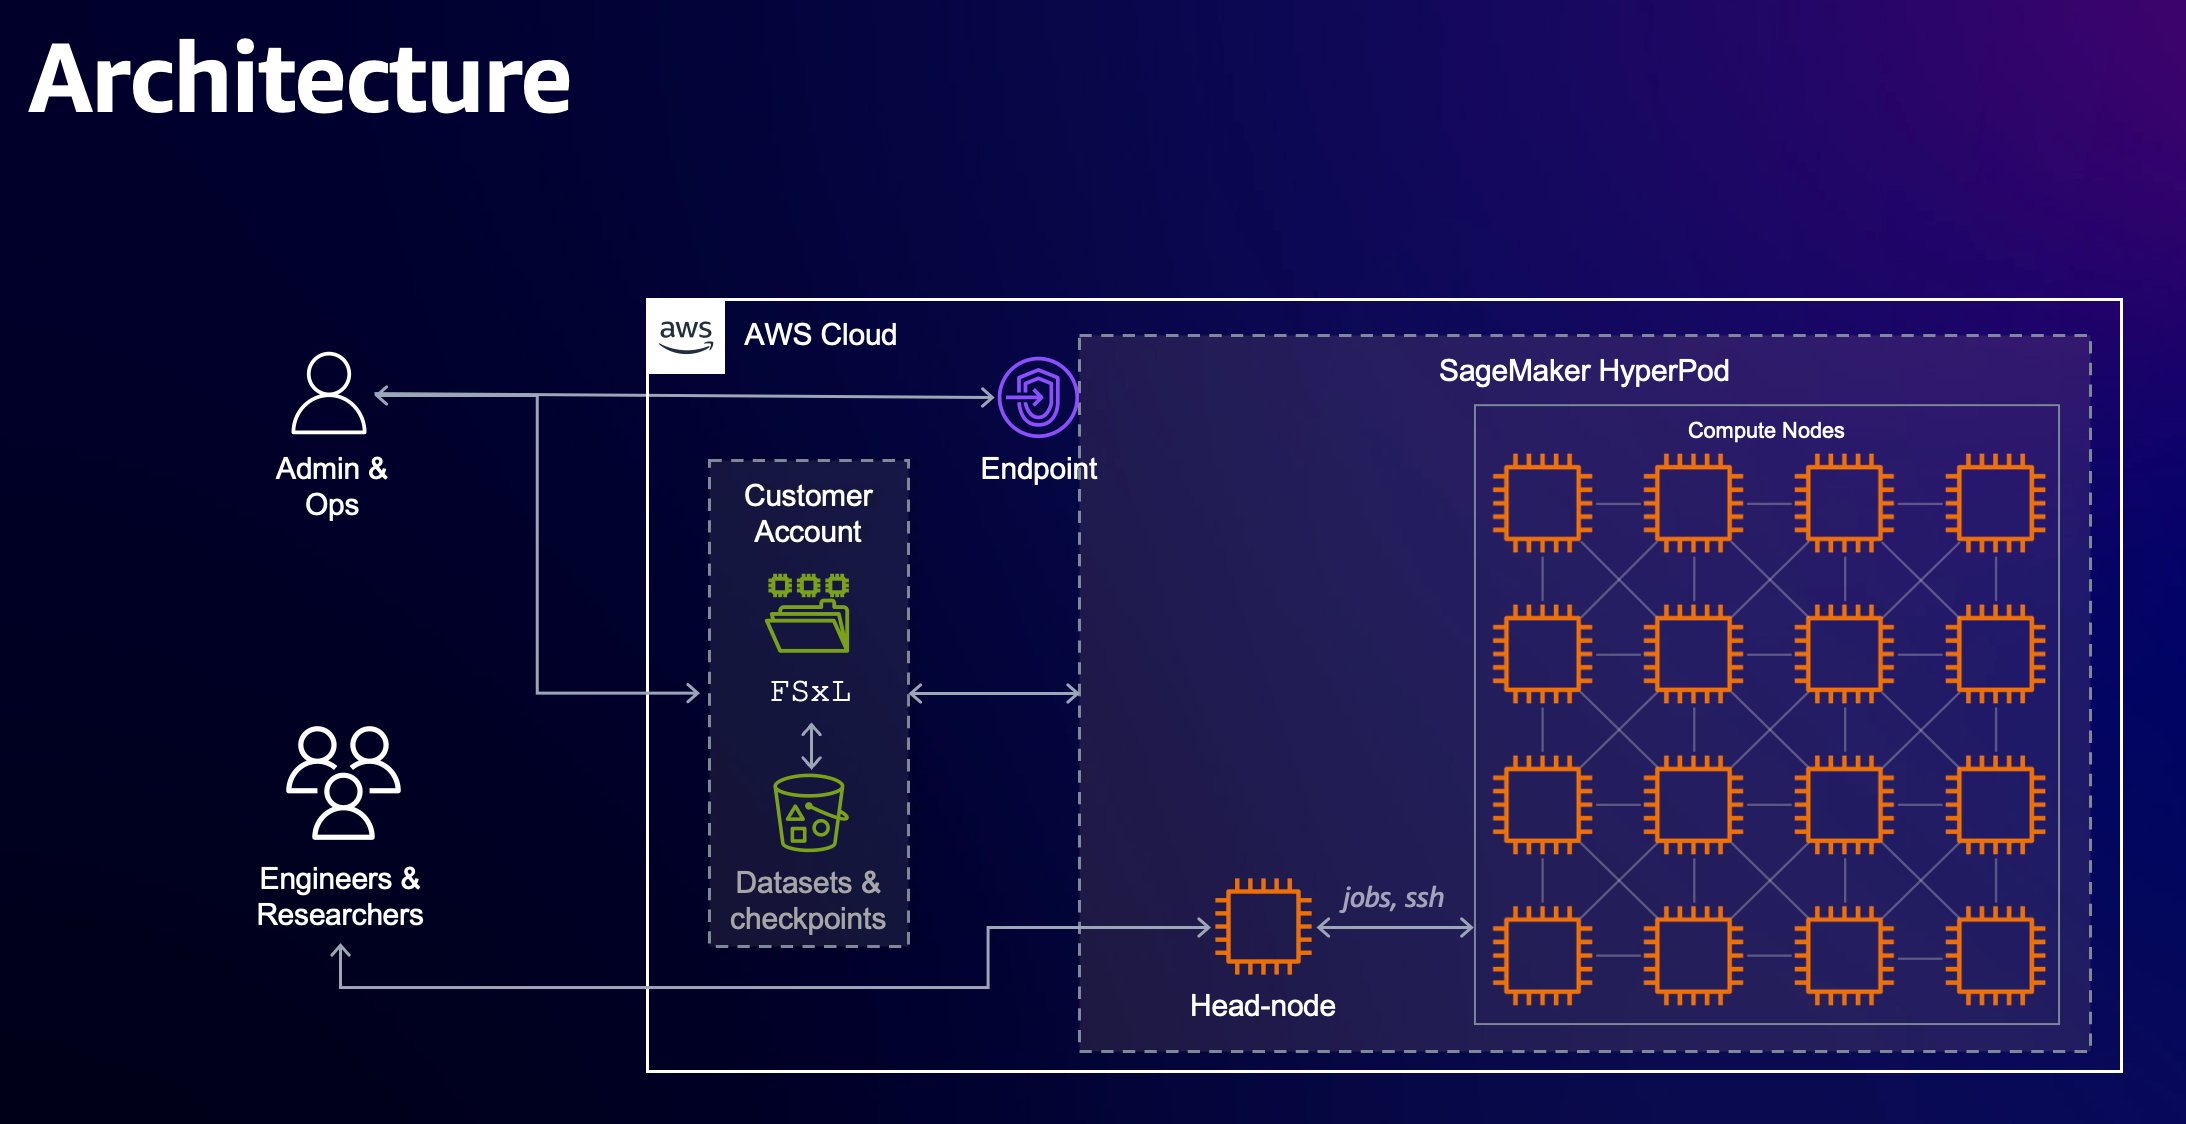
Trainium chips are purpose-built for deep learning training of 100 billion and larger parameter models. Model training on Trainium is supported by the AWS Neuron SDK, which provides compiler, runtime, and profiling tools that unlock high-performance and cost-effective deep learning acceleration. To learn more about Trainium chips and the Neuron SDK, see Welcome to AWS Neuron.
To integrate Trainium chips with existing models and tools provided through the transformers package, Hugging Face’s Optimum-Neuron package functions as an interface with Neuron. With Optimum-Neuron, users can apply techniques such as LoRA to their fine-tuning jobs, streamlining the process of adapting LLMs for specific tasks while capitalizing on the performance gains provided by the AWS infrastructure.
Traditional fine tuning involves modifying all the parameters of a model, which can be computationally expensive and memory intensive. PEFT approaches such as LoRA focus on introducing a smaller set of trainable parameters, often in the form of low-rank matrices that adjust the model’s behavior while keeping most of its parameters frozen. The advantage of LoRA lies in its ability to maintain the performance of the base model while significantly lowering the computational burden and resource requirements. The Neuron 2.20 release supports model training with LoRA on Trainium.
In the next section, we’ll walk through the code in three steps for PEFT on Trainium with HyperPod:
- Setting up and deploying a HyperPod cluster for distributed training. Fine tuning a Meta Llama 3-8B model on Trainium instance with the dolly 15k dataset. Model weights consolidation and inference.
Amazon SageMaker HyperPod cluster setup
In this first section, you will begin setting up your Amazon SageMaker HyperPod compute environment for fine tuning.
Prerequisites
The following are the prerequisites for configuring and deploying a SageMaker HyperPod cluster for fine tuning:
- Submit a service quota increase request to get access to Trainium instances in the
us-west-2 AWS Region. For the purposes of this post, you will request an increase for Amazon EC2 Trn1 instances, ml.trn1.32xlarge. Install the AWS Command Line Interface (AWS CLI); the required minimum version needed is 2.14.3. Install the AWS Systems Manager Session Manager Plugin in order to SSH into your cluster. Step 1: Infrastructure setup
After completing the prerequisites, deploy an AWS CloudFormation stack that contains the necessary infrastructure components for distributed training through SageMaker HyperPod. The default Region specified in the template is us-west-2, but you can modify that. You will also need to specify the Availability Zone where your subnets will be deployed. The template configures your environment with an Amazon Virtual Private Cloud (Amazon VPC) and corresponding public and private subnets for network isolation. It establishes additional components inside your VPC including an S3 bucket for lifecycle scripts and FSx for Lustre, a file system shared across the head and compute nodes of the HyperPod cluster.
Step 2: Cluster configuration
Configure and deploy the HyperPod cluster. Begin by defining your infrastructure’s environment variables through the create_config script. This script uses the AWS CLI to extract infrastructure component variables from your CloudFormation stack including Region, resource IDs, and Amazon Resource Name (ARN).
After setting your environment variables, download the lifecycle scripts required for bootstrapping the compute nodes on your SageMaker HyperPod cluster and define its configuration settings before uploading the scripts to your S3 bucket.
After uploading the Lifecycle scripts to Amazon S3, create your cluster and file system configurations. See the Create Cluster section of the SageMaker HyperPod workshop to create these files. After generating the cluster-config.json and provisioning_parameters.json configuration files, validate them and upload the FSx for Lustre configuration file to Amazon S3.
Step 3: Cluster deployment
Now that the cluster’s configuration is defined, you can create the cluster.
You should be able to see your cluster by navigating to SageMaker Hyperpod in the AWS Management Console and see a cluster named ml-cluster listed. After a few minutes, its status should change from Creating to InService.
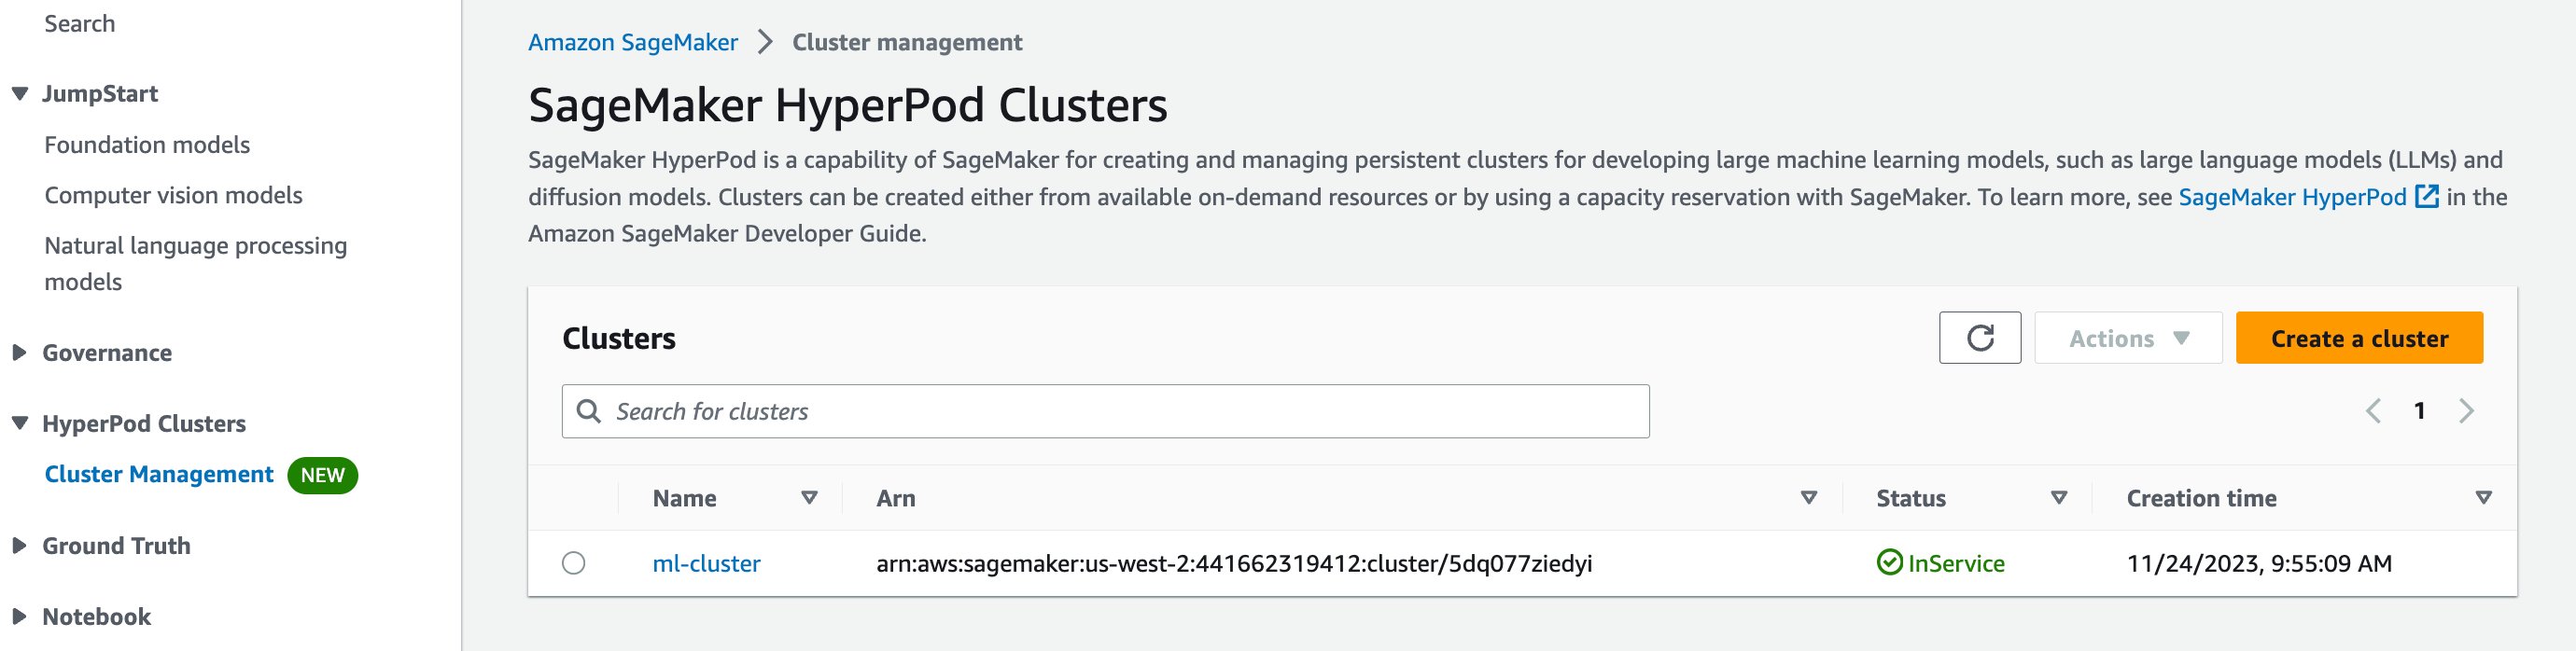
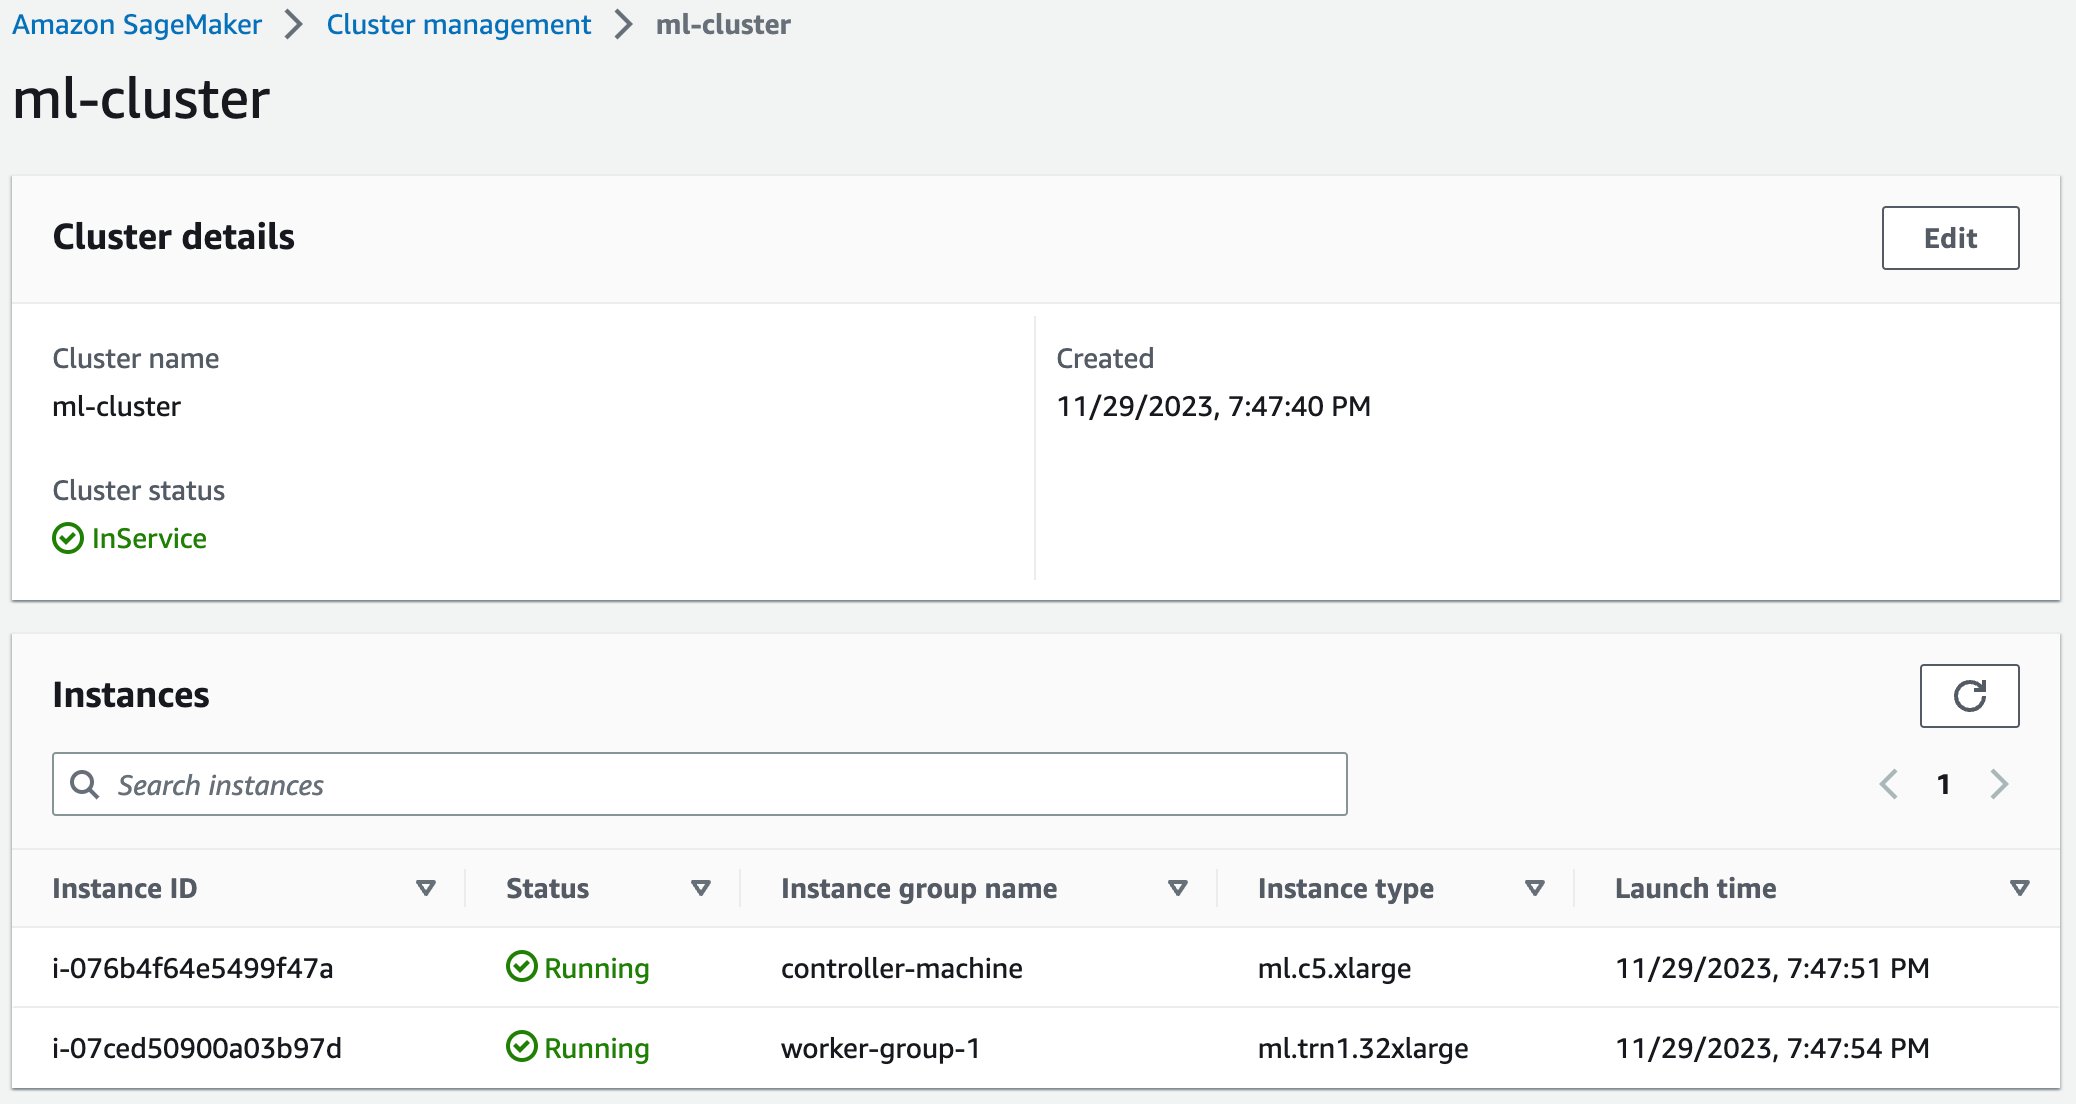
If you select your cluster, you will be able to see the details of your compute cluster including the head and worker nodes.
After installing the Systems Manager Session Manager plugin, you can ssh into your cluster’s head node using the easy-ssh script to begin training.
Now that your cluster is running and accessible through ssh, you can begin uploading the model training scripts to the shared file system through either curl or the AWS CLI. For more instructions on setting up your cluster, see the SageMaker HyperPod workshop.
Fine tuning
Now that your SageMaker HyperPod cluster is deployed, you can start preparing to execute your fine tuning job.
Data preparation
The foundation of successful language model fine tuning lies in properly structured and prepared training data. This implementation focuses on instruction-tuned datasets, which form the backbone of modern language model adaptation. These datasets work together to create meaningful training examples through three essential components:
- Instructions that guide the model’s task. Optional context that provides background information. Responses that represent the desired output.
Training begins by loading your dataset and formatting your dataset examples with this structure. Loading your dataset can be accomplished through the Hugging Face datasets library, which provides a straightforward interface for accessing and managing training data. Hugging Face also provides this format function for the databricks-dolly-15k dataset. Note that the format function needs to be embedded in your train.py file (as shown in the following sample). It’s referenced by the NeuronSFTTrainer to format your dataset during fine tuning.
The formatting function employs delimiter tokens ("###") to create clear boundaries between different components of each training example. This separation is important because it helps the model distinguish between different parts of the input during training. The function handles cases where context might be missing, making sure that the final format remains consistent regardless of whether all components are present. Double newlines between sections provide additional structural clarity that helps the model recognize the natural breaks in the input.
Tokenization
After formatting your dataset, the next step is tokenization—the process of converting your text data into a numerical format that your model can understand. Tokenization serves as the bridge between your human-readable text and the mathematical operations that drive your model’s understanding of language. To begin, you use Hugging Face’s AutoTokenizer to load your model’s tokenizer.
The AutoTokenizer class automatically selects the appropriate tokenizer for your model, loading not just the vocabulary, but also the rules and special tokens that match your training configuration. The assignment of the padding token to match the end-of-sequence token is particularly important for causal language modeling, because it verifies the consistent handling of your variable-length sequences.
The tokenization process itself operates in several stages. First, it breaks down your input text into tokens based on its vocabulary. These tokens are then converted to numerical IDs that your model can process. During this process, your tokenizer also handles special tokens that mark the beginning and end of sequences, in addition to padding tokens that make sure that the sequences in your batch have the same length.
When working with tokenizers, your sequence length management becomes a critical consideration. Your maximum sequence length must balance between preserving enough information for your model to understand the context and staying within your model’s architectural limitations. Too short, and you risk losing important context; too long, and you might exceed memory constraints or introduce unnecessary computational overhead.
Model compilation and fine tuning
For this solution, you created a SageMaker HyperPod cluster with the controller node and one worker node. The worker node contains one ml.trn1.32xlarge instance which has 32 Neuron cores. You can conduct distributed fine tuning using all 32 Neuron cores within the worker node.
Step 1: Environment setup
You first need to install the required Python packages for fine tuning. The following is the bash script for the Python environment setup. Note that the solution uses the most recently released Neuron SDK. From the HOME directory, create a file touch environment.sh with the following code and run it with sbatch ./environment.sh. You might need to modify the permissions of the shell scripts throughout this post before running them with the command chmod +x environment.sh.
With your environment created, switch to your fine-tuning directory before proceeding to the next step: cd $HOME/peft_ft.
Step 1: Download the base Llama 3 8B model and tokenizer from Hugging Face
Download the base Meta Llama 3 8B model and the corresponding tokenizer from Hugging Face. You will need to first request access for the model from Meta on Hugging Face and then use your Hugging Face access token to download the model. The following is the Python code for the get_model.py script to download the model and tokenizer. Create this file with touch get_model.py and copy the following code to this file before moving on to the next step.
Next, create the bash script touch get_model.sh with the code that follows and run it with the command sbatch ./get_model.sh. This will trigger the get_model.py script to download the model and tokenizer using Slurm. Because you’re using the Llama 3 8B model, Hugging Face requires you to authenticate with an access token prior to download. Be sure to add your access token to get_model.sh before running the script.
Step 2: Pre-compile model
Training deep learning models on Trainium requires model compilation. To do that, use the neuron_parallel_compile CLI utility, which will extract graphs from a trial run of your script, and perform parallel pre-compilation of the computation graphs. Note that the scripts for model pre-compilation are identical to those for the actual training, except for max_steps. This is because pre-compilation doesn’t require the completion of the entire training cycle; rather, it necessitates approximately 10 training steps to extract the graphs. Before compiling the model, you need to create the training script, touch train.py which is used for both pre-compilation and model fine tuning steps. Add the following code after creating the file, along with the format function previously mentioned.
After creating the training file, use the following code to create the compile.sh script, which will trigger finetune-llama3-8B.sh to compile the Llama 3 8B model using the neuron_parallel_compile command. You can run this with the sbatch compile.sh command.
The following is the finetune-llama3-8B.sh script, which lists the hyper-parameters for your model fine tuning. The script uses tensor parallelism for the training with degree of 8. With 32 NeuronCores in the ml.trn1.32xlarge instance, you get data parallel of degree 4. Note that the script also sets XLA_USE_BF16=1 to map both torch.float and torch.double tensors to bfloat16 tensors. This can both reduce memory footprint and improve performance. The script then sets gradient_accumulation_steps to be 3 to get a larger effective batch size for gradient update.
Step 3: Model fine tuning
After the model compiling is complete, you can then start the model fine tuning by reusing the compile.sh script. To do this, prevent the neuron_parallel_compile utility from being used by setting export NEURON_EXTRACT_GRAPHS_ONLY=-1 in compile.sh, and then re-run the script to start fine tuning your model. You might need to delete the model_consolidation directory created during the previous model compilation step before you start your fine-tuning job.
Model consolidation
When working with distributed machine learning workflows, you’ll often need to manage and merge model weights efficiently. Let’s explore two essential processes that you’ll frequently encounter: checkpoint consolidation and weight merging when performing LoRA fine tuning.
Checkpoint consolidation
During distributed training, your model checkpoints are typically split across multiple devices according to the model parallelism configuration that you provide. To bring these pieces back together, you’ll use a consolidation process. Your consolidation function handles three primary tasks. First, it combines distributed checkpoints into a unified model. Then, it manages memory efficiently by processing tensors in chunks. Finally, it creates sharded outputs with an index file for quick access.
LoRA weight merging
When you’re working with LoRA, you need to merge these adapters with your base model. The merging process is straightforward but requires careful attention to detail. Start by loading your base model and LoRA configuration. Then transform the LoRA weight names to match your base model’s structure. The process concludes by merging the adapters and saving the final model in a sharded format.
To put these tools into practice, you can use the following scripts after your fine-tuning job has finished. First, create the Python file, touch consolidation.py and shell file, touch consolidation.sh using the following code.
This code will consolidate the sharded checkpoint files generated during training into a consolidated LoRA adaptersafetensor format. After saving the file, you can invoke this script to trigger the model checkpoint consolidation job. The input directory that you provide points to your fine-tuned model’s sharded checkpoints and the output directory for the consolidated LoRA adapter safetensor file. You trigger this with sbatch consolidation.sh.
After consolidation is complete, you need to merge the LoRA adapter weights from the consolidated files with the base model’s weights. Begin by creating a new Python file touch merge_lora.py and shell file merge_lora.sh using the following code.
Trigger the run with sbatch merge_lora.sh to merge the model weights. Here the base_model_path parameter is the local directory where you previously downloaded the model from Hugging Face in step 1 of “Model compilation and fine tuning.” Similarly, the adapter_config_path parameter will be the model’s configuration file previously downloaded and the lora_safetensors_path parameter will be the path to the model.safetensor file output by the LoRA consolidation in the previous step.
Inference
After consolidation and merging, the safetensors files will be saved to your final_model_path output directory containing the updated model weights after fine tuning. Using these updated weights, you can load and generate a prediction for your trained model in the context of the dolly dataset. To check that the fine-tuned model understands the databricks-dolly-15k dataset it was fine tuned on, select a question from the dataset for validation, as shown in the following figure.
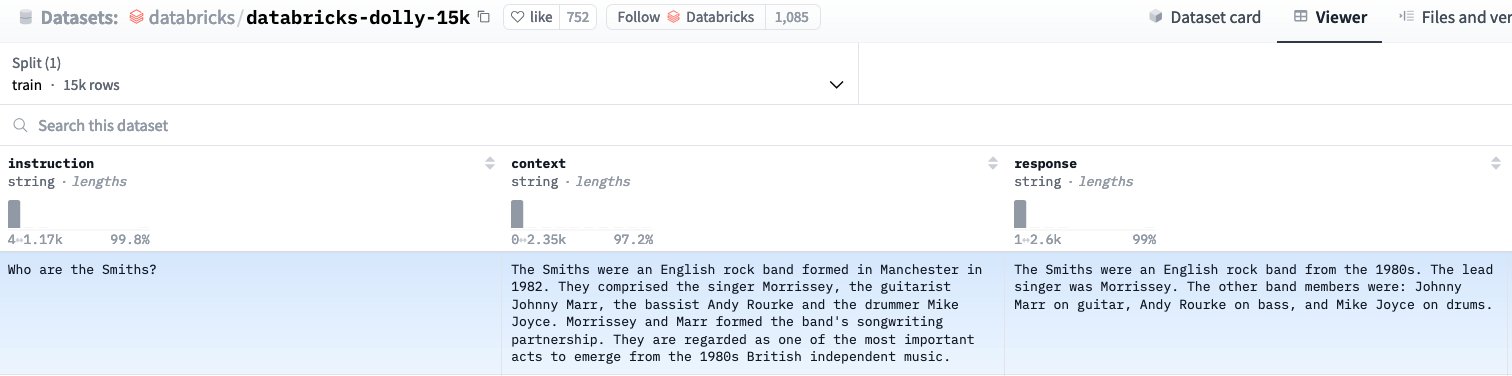
Using Hugging Face’s LlamaForCausalLM class you can load your newly fine-tuned model, and generate a prediction for the question, “Who are the Smiths?” (shown in the following figure):

Comparing the generated answer to the ground truth context and response from the training dataset, it’s clear that the fine-tuned Meta Llama 3 model now understands this data and can give coherent responses to posed questions.
Results
| Technique | Trainable parameters | Samples processed per second | Training time (minutes) |
| FPFT | 7,570,591,744 | 2.083 | 90 |
| PEFT | 6,815,744 | 3.554 | 53 |
To benchmark the fine-tuned model’s performance with LoRA on a single ml.trn1.32xlarge, we compared it to full parameter fine tuning (FPFT) for the model over three training epochs. Measuring training samples processed per second showed a 70% increase in throughput and reduction in training time for the LoRA fine-tuned model. Subsequently, on-demand hours required to fine tune the model on the dolly 15k dataset for three epochs was halved compared to FPFT, resulting in a 50% reduction of training costs.
Clean up
To clean up the resources provisioned for this post, first delete the SageMaker HyperPod cluster. This can be done either through the AWS CLI or in the SageMaker console.
After the cluster is deleted, delete the CloudFormation template to delete the remaining provisioned resources.
Conclusion
In this post, we showed you how to set up a SageMaker HyperPod compute cluster for training. Then we showed you how to perform multi-node distributed fine tuning with Trainium for a Meta Llama 3 model using LoRA. Finally, we showed you how to consolidate model weights across a distributed training environment to generate coherent predictions for the newly fine-tuned model.
About the Authors
 Georgios Ioannides is a Deep Learning Architect with the AWS Generative AI Innovation Center. Before AWS, Georgios worked in startups, where he specialized in signal processing, deep learning, and multi-modal and cross-modal machine learning systems for speech, vision, and text applications. He holds Master’s degrees from Imperial College London and Carnegie Mellon University.
 Bingchen Liu is a Machine Learning Engineer with the AWS Generative AI Innovation Center. Before AWS, he worked as a lead MLE in ADP focusing on RAG applications, vector database, model development, and serving. He holds a Master’s degree in Computer Science from Columbia University and a PhD in Statistics from Southern Methodist University.
 Hannah Marlowe is a Senior Manager of Model Customization at the AWS Generative AI Innovation Center. Her team specializes in helping customers develop differentiating generative AI solutions using their unique and proprietary data to achieve key business outcomes. She holds a PhD in Physics from the University of Iowa, with a focus on astronomical X-ray analysis and instrumentation development. Outside of work, she can be found hiking, mountain biking, and skiing around the mountains in Colorado.
 Jeremy Roghair is a Machine Learning Engineer with the AWS Generative AI Innovation Center, where he focuses on developing generative AI solutions for distributed training workloads and model hosting for customers. Prior to joining AWS, Jeremy worked as a Data Scientist in the finance/insurance industry and earned a Master’s degree in Computer Science with research in reinforcement learning from Iowa State University.
