
This post serves as a step-by-step guide on how to set up lifecycle configurations for your Amazon SageMaker Studio domains. With lifecycle configurations, system administrators can apply automated controls to their SageMaker Studio domains and their users. We cover core concepts of SageMaker Studio and provide code examples of how to apply lifecycle configuration to your SageMaker Studio domain to automate behaviors such as preinstallation of libraries and automated shutdown of idle kernels.
Amazon SageMaker Studio is the first integrated development environment (IDE) purposefully designed to accelerate end-to-end machine learning (ML) development. Amazon SageMaker Studio provides a single web-based visual interface where data scientists create dedicated workspaces to perform all ML development steps required to prepare data and build, train, and deploy models. You can create multiple Amazon SageMaker domains, which define environments with dedicated data storage, security policies, and networking configurations. With your domains in place, you can then create domain user profiles, which serve as an access point for data scientists to enter the workspace with user-defined least-privilege permissions. Data scientists use their domain user profiles to launch private or shared Amazon SageMaker Studio spaces to manage the storage and resource needs of the IDEs they use to tackle different ML projects.
To effectively manage and govern both user profiles and domains with SageMaker Studio, you can use Amazon SageMaker Studio lifecycle configurations. This feature allows you for instance to install custom packages, configure notebook extensions, preload datasets, set up code repositories, or shut down idle notebook kernels automatically. Amazon SageMaker Studio now also supports configuration of idle kernel shutdown directly on the user interface for JupyterLab and Code Editor applications that use Amazon SageMaker Distribution image version 2.0 or newer.
These automations can greatly decrease overhead related to ML project setup, facilitate technical consistency, and save costs related to running idle instances. SageMaker Studio lifecycle configurations can be deployed on two different levels: on the domain level (all users in a domain are affected) or on the user level (only specific users are affected).
In this post, we demonstrate how you can configure custom lifecycle configurations for SageMaker Studio to manage your own ML environments efficiently at scale.
Solution overview
The solution constitutes a best-practice Amazon SageMaker domain setup with a configurable list of domain user profiles and a shared SageMaker Studio space using the AWS Cloud Development Kit (AWS CDK). The AWS CDK is a framework for defining cloud infrastructure as code.
In addition, we demonstrate how to implement two different use cases of SageMaker Studio lifecycle configurations: 1) automatic installation of python packages and 2) automatic shutdown of idle kernels. Both are deployed and managed with AWS CDK custom resources. These are powerful, low-abstracted and highly customizable AWS CDK constructs that can be used to manage the behavior of resources at creation, update, and deletion events. We use Python as the main language for our AWS CDK application, but the code can be easily translated to other AWS CDK supported languages. For more information, refer to Work with the AWS CDK library.
The following architecture diagram captures the main infrastructure that is deployed by the AWS CDK, typically carried out by a DevOps engineer. The domain administrator defines the configuration of the Studio domain environment, which also includes the selection of Studio lifecycle configurations to include in the deployment of the infrastructure. After the infrastructure is provisioned, data scientists can access the SageMaker Studio IDE through their domain user profiles in the SageMaker console.
After the data scientists access the IDE, they can select from a variety of available applications, including JupyterLab and Code Editor, and run the provisioned space. In this solution, a JupyterLab space has been included in the infrastructure stack. Upon opening JupyterLab, data scientists can immediately start tackling their development work, which includes retrieving or dumping data on Amazon Simple Storage Service (Amazon S3), developing ML models, and pushing changes to their code repository. If multiple data scientists are working on the same project, they can access the shared Studio spaces using their domain user profiles to foster collaboration. The main Python libraries are already installed by the Studio lifecycle configuration, saving time for value-generating tasks. As the data scientists complete their daily work, their spaces will be automatically shut down by the Studio lifecycle configuration.
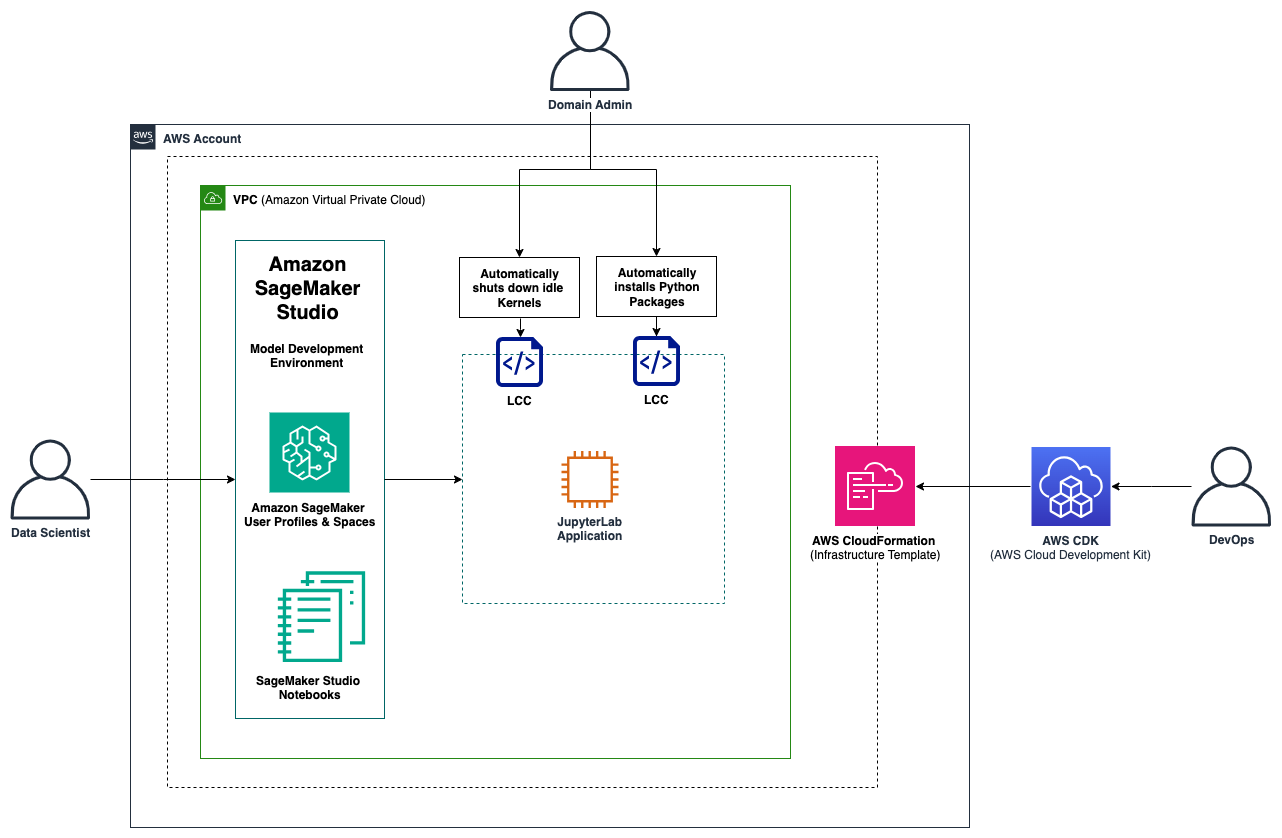
High-level architecture diagram of this solution, which includes a SageMaker Studio domain, user profiles, and two Studio lifecycle configurations.
Prerequisites
To get started, make sure you fulfill the following prerequisites:
- The AWS Command Line Interface (AWS CLI) installed. The AWS CDK installed. For more information, refer to Getting started with the AWS CDK and Working with the AWS CDK in Python. Python 3.9 or higher installed.
Clone the GitHub repository
First, clone this GitHub repository.
Upon cloning the repository, you can observe a classic AWS CDK project setup, where app.py is the CDK entry point script that deploys two stacks in sequence. The first stack (NetworkingStack) deploys the networking infrastructure and the second stack (SageMakerStudioStack) deploys the domain, user profiles and spaces. The application logic is covered by AWS Lambda functions which are found under the source directory.
The AWS CDK stacks
In the following subsections we elaborate on the provisioned resources for each of the two CDK stacks.
Virtual private cloud (VPC) setup for the NetworkingStack
The NetworkingStack deploys all the necessary networking resources and builds the foundation of the application. This includes a VPC with a public and a private subnet and a NAT gateway to enable connection from instances in the private subnet to AWS services (for example, to Amazon SageMaker). The SageMaker Studio domain is deployed into the VPC’s private subnet, shielded from direct internet access for enhanced security. The stack also includes security groups to control traffic within the VPC and a custom resource to delete security groups when destroying the infrastructure via CDK. We elaborate on custom resources in the subsection CustomResource class.
SageMaker Studio domain and user profiles for SageMakerStudioStack
The SageMakerStudioStack is deployed on top of the NetworkingStack and captures project-specific resources. This includes the domain user profiles and the name of the workspace. By default, it creates one workspace called “project1” with three users called “user1”, “user2”, and “user3”. The SageMakerStudioStack is instantiated, as shown in the following code example.
You can adjust the names according to your own requirements and even deploy multiple SageMaker Studio domains by instantiating multiple objects of the SageMakerStudioStack class in your CDK app.py script.
Apply the lifecycle configurations
The application of lifecycle configurations in this solution relies on CDK custom resources which are powerful constructs that allow you to deploy and manage highly bespoke infrastructure components to fit your specific needs. To facilitate the usage of these components, this solution comprises a general CustomResource class that is inherited by the following five CustomResource subclasses:
InstallPackagesCustomresource subclass: Installs the required packages automatically when launching JupyterLab within SageMaker Studio using lifecycle configurations. ShutdownIdleKernelsCustomResource subclass: Shuts down idle kernels after the user-specified time window (default 1 hour) using lifecycle configurations. EFSCustomResource subclass: Deletes the Elastic File System (EFS) of SageMaker Studio when destroying the infrastructure. StudioAppCustomResource subclass: Deletes the JupyterLab application for each user profile when destroying the infrastructure. VPCCustomResource subclass: Deletes the security groups when destroying the infrastructure. Note that only the first two subclasses in the list are used for lifecycle configurations, the other subclasses are not related to lifecycle configurations but serve other purposes. This code structure allows you to easily define your own custom resources following the same pattern. In the following subsections we dive deeper on how custom resources work and elaborate on a specific example.
The CustomResource class
The CDK CustomResource class is composed of three key elements including a Lambda function that contains the logic for Create, Update, and Delete cycles, a Provider that manages the creation of the Lambda function as well as its IAM role, and the custom resource itself which references the Provider and entails some properties that are passed to the Lambda function. The class definition is illustrated below and can be found in the repository under stacks/sagemaker/constructs/custom_resources/CustomResource.py.
from aws_cdk import ( aws_iam as iam, aws_lambda as lambda_, aws_logs as logs,)import aws_cdk as cdkfrom aws_cdk.custom_resources import Providerfrom constructs import Constructimport osfrom typing import Dictclass CustomResource(Construct): def __init__( self, scope: Construct, construct_id: str, properties: Dict, lambda_file_name: str, iam_policy: iam.PolicyStatement, **kwargs, ) -> None: super().__init__(scope, construct_id, **kwargs) on_event_lambda_fn = lambda_.Function( self, "EventLambda", runtime=lambda_.Runtime.PYTHON_3_12, handler="index.on_event_handler", code=lambda_.Code.from_asset( os.path.join(os.getcwd(), "src", "lambda", lambda_file_name) ), initial_policy=[iam_policy], timeout=cdk.Duration.minutes(3), ) is_complete_lambda_fn = lambda_.Function( self, "CompleteLambda", runtime=lambda_.Runtime.PYTHON_3_12, handler="index.is_complete_handler", code=lambda_.Code.from_asset( os.path.join(os.getcwd(), "src", "lambda", lambda_file_name) ), initial_policy=[iam_policy], timeout=cdk.Duration.minutes(3), ) provider = Provider( self, "Provider", on_event_handler=on_event_lambda_fn, is_complete_handler=is_complete_lambda_fn, total_timeout=cdk.Duration.minutes(10), log_retention=logs.RetentionDays.ONE_DAY, ) cdk.CustomResource( self, "CustomResource", service_token=provider.service_token, properties={ **properties, "on_event_lambda_version": on_event_lambda_fn.current_version.version, "is_complete_lambda_version": is_complete_lambda_fn.current_version.version, }, )The InstallPackagesCustomResource subclass
This subclass inherits from the CustomResource to deploy the lifecycle configurations for SageMaker Studio to automatically install Python packages within JupyterLab environments. The lifecycle configuration is defined on the domain level to cover all users at once. The subclass definition is illustrated below and can be found in the repository under stacks/sagemaker/constructs/custom_resources/InstallPackagesCustomResource.py.
from aws_cdk import ( aws_iam as iam,)from constructs import Constructfrom stacks.sagemaker.constructs.custom_resources import CustomResourceclass InstallPackagesCustomResource(CustomResource): def __init__( self, scope: Construct, construct_id: str, domain_id: str, ) -> None: super().__init__( scope, construct_id, properties={ "domain_id": domain_id, "package_lifecycle_config": f"{domain_id}-package-lifecycle-config", }, lambda_file_name="lcc_install_packages_lambda", iam_policy=iam.PolicyStatement( effect=iam.Effect.ALLOW, actions=[ "sagemaker:CreateStudioLifecycleConfig", "sagemaker:DeleteStudioLifecycleConfig", "sagemaker:Describe*", "sagemaker:List*", "sagemaker:UpdateDomain", ], resources=["*"], ), )The code for the AWS Lambda function used for the custom resources is stored in the repository under src/lambda/lcc_install_packages_lambda/index.py. During the Create event, the Lambda function uses the Boto3 client method create_studio_lifecycle_config to create the lifecycle configuration. In a consecutive step, it uses the update_domain method to update the configuration of the domain to attach the created lifecycle configuration. During the Update event, the lifecycle configuration is deleted and recreated as they can’t be modified in-place after they’re provisioned. During the Delete event, the delete_studio_lifecycle_config method is called to remove the lifecycle configuration. The lifecycle configuration itself is a shell script that is executed once deployed into the domain. As an example, the content of the install packages script is displayed below.
#!/bin/bashset -eux# Packages to installpip install --upgrade darts pip-install-testIn this example, two packages are automatically installed for every new kernel instance provisioned by a Studio user: darts and pip-install-test. You can modify and extend this list of packages to fit your own requirements.
The source code for the idle kernel shutdown lifecycle configuration follows the same design principle and is stored in the repository under src/lambda/lcc_shutdown_idle_kernels_lambda/index.py. The main difference between the two Studio lifecycle configurations is the content of the bash scripts, which in this case was referenced from sagemaker-studio-lifecycle-config-examples.
Deploy the AWS CDK stacks
To deploy the AWS CDK stacks, run the following commands in the location where you cloned the repository. Depending on your path configurations, the command may be python instead of python3.
- Create a virtual environment:
- For macOS/Linux, use
python3 -m venv .cdk-venv For Windows, use python3 -m venv .cdk-venv - For macOS/Linux, use
source .cdk-venv\bin\activate For Windows, use .cdk-venv/Scripts/activate.bat For PowerShell, use .cdk-venv/Scripts/activate.ps1 pip install -r requirements.txt pip install -r requirements-dev.txt cdk synth Deploy the solution with the following commands: aws configure cdk bootstrap cdk deploy --all alternatively, you can deploy the two stacks individually using cdk deploy <StackName> When the stacks are successfully deployed, you’ll be able to view the deployed stacks in the AWS CloudFormation console, as shown below.

You’ll also be able to view the Studio domain and the Studio lifecycle configurations on the SageMaker console, as shown in the following screenshots.


Choose one of the lifecycle configurations to view the shell code and its configuration details, as follows.

To make sure your lifecycle configuration is included in your space, launch SageMaker Studio from your user profile, navigate to JupyterLab, and choose the provisioned space. You can then select a lifecycle configuration that is associated with your domain or user profile and activate it, as shown below.

After you run the space and open JupyterLab, you can validate the functionality. In the example shown in the following screenshot, the preinstalled package can be imported directly.

Optional: How to attach Studio lifecycle configurations manually
If you want to manually attach a lifecycle configuration to an already existing domain, perform the following steps:
- On the SageMaker console, choose Domains in the navigation pane. Choose the domain name you’re using and the current user profile, then choose Edit. Select the lifecycle configuration you want to use and choose Attach, as shown in the following screenshot.
From here, you can also set it as default.

Clean up
Complete the steps in this section to remove all your provisioned resources from your environment.
Delete the AWS CDK stacks
When you’re done with the resources you created, you can destroy your AWS CDK stack by running the following command in the location where you cloned the repository:
cdk destroy --all
When asked to confirm the deletion of the stack, enter yes.
You can also delete the stack on the AWS CloudFormation console with the following steps:
- On the AWS CloudFormation console, choose Stacks in the navigation pane. Choose the stack that you want to delete. In the stack details pane, choose Delete. Choose Delete stack when prompted.
User profile applications can sometimes take several minutes to delete, which can interfere with the deletion of the stack. If you run into any errors during stack deletion, you may have to manually delete the user profile apps and retry.
Conclusion
In this post, we described how customers can deploy a SageMaker Studio domain with automated lifecycle configurations to control their SageMaker resources. Lifecycle configurations are based on custom shell scripts to perform automated tasks and can be deployed with AWS CDK Custom Resources.
Whether you are already using SageMaker domains in your organization or starting out on your SageMaker adoption, effectively managing lifecycles on your SageMaker Studio domains will greatly improve the productivity of your data science team and alleviate administrative work. By implementing the described steps, you can streamline your workflows, reduce operational overhead, and empower your team to focus on driving insights and innovation.
About the Authors
 Gabriel Rodriguez Garcia is a Machine Learning Engineer at AWS Professional Services in Zurich. In his current role, he has helped customers achieve their business goals on a variety of ML use cases, ranging from setting up MLOps inference pipelines to developing generative AI applications.
 Gabriel Zylka is a Machine Learning Engineer within AWS Professional Services. He works closely with customers to accelerate their cloud adoption journey. Specializing in the MLOps domain, he focuses on productionizing ML workloads by automating end-to-end ML lifecycles and helping to achieve desired business outcomes.
 Krithi Balasubramaniyan is a Principal Consultant at AWS. He enables global enterprise customers in their digital transformation journeys and helps architect cloud native solutions.
 Cory Hairston is a Software Engineer with AWS Bedrock. He currently works on providing reusable software solutions.
 Gouri Pandeshwar is an Engineering Manager with AWS Bedrock. He and his team of engineers are working to build reusable solutions and frameworks that help accelerate adoption of AWS AI/ML services for customers’ business use cases.
