
Before we dive into the details, let’s clarify who this guide is for. If you’re focused on a project with numerous stored charts, you’ve tested a couple of metrics, or you’ve been working iteratively on an algorithm — well, we have the resource for you.
This article will show you how to:
- Setup and deploy MLflow on the Google Cloud Platform
- Introduce fresh, simple methods for tracking ML experiments
- Stop storing 100s of charts, files, and metrics locally
- Help your teammates optimize workflows
- Take your teamwork to the next level
Why MLflow?
But why focus on MLflow? Because the open-source platform is useful across the entire machine learning lifecycle, with four components you can use for experimentation, reproducibility, deployment, or as a central model registry.
AI/ML conferences worldwide are also giving it more focus. And it’s one of the projects of Databricks: a well-known company founded by the creators of Apache Spark . Given its foundations, the solution is growing rapidly. And this guide will make your life infinitely easier, whether you’re working alone or as part of a team.
In short, MLflow is specifically designed for:
- Optimizing machine learning experiments; and,
- Testing and storing the development process history.
You could even call it a ‘Git repository for ML models’ — with all metrics and timelines stored in one place, alongside an interactive interface (it actually stores Git commit ID, used for the execution of a certain run!).
Core Features:
- Track ML models, metrics, and parameters (and compare them with ease)
- Store models and see versioning in one place
- Enables integration with other Google Cloud components
Now to what you’ll actually learn. This detailed guide walks you through how to set up MLflow on the Google Cloud Platform (GCP), covering everything from the prerequisites to getting started — right through to how to log in to MLflow itself.
And if you’re wondering, “but why bother using the cloud instead of a local server?”. It’s a fair question, and here’s our response:
- GCP handles security and authentication layers for you, so you don’t need to worry about them;
- You can easily expand your solution (storage, computing power, etc.) if your team grows, so you’re not limited by your current machine.
Enough of the preamble, let’s get into MLflow.
[ Read also: Deploying MLflow in GCP Using Terraform: A Step-by-Step Guide ]
Resources
You’ll need the following resources to set up an MLflow instance:
- Cloud SQL Database
- Cloud Storage: artifacts storage (charts, pickles, metrics, etc.)
- Secret Manager: obtaining secrets at runtime
- Container Registry: for Docker image storage
- Cloud Run: managed serverless runtime environment
Prerequisites
GitHub Repository
To complete this tutorial, you’ll need some additional code, but we’ve got you covered. We have a template that needs just a few brushes before deployment to GCP.
Follow this link and clone the repository from GitHub to your local machine. If you’re not familiar with GitHub, here’s a step-by-step guide on how to clone a repository (we’ll explain the rest of the steps later on).
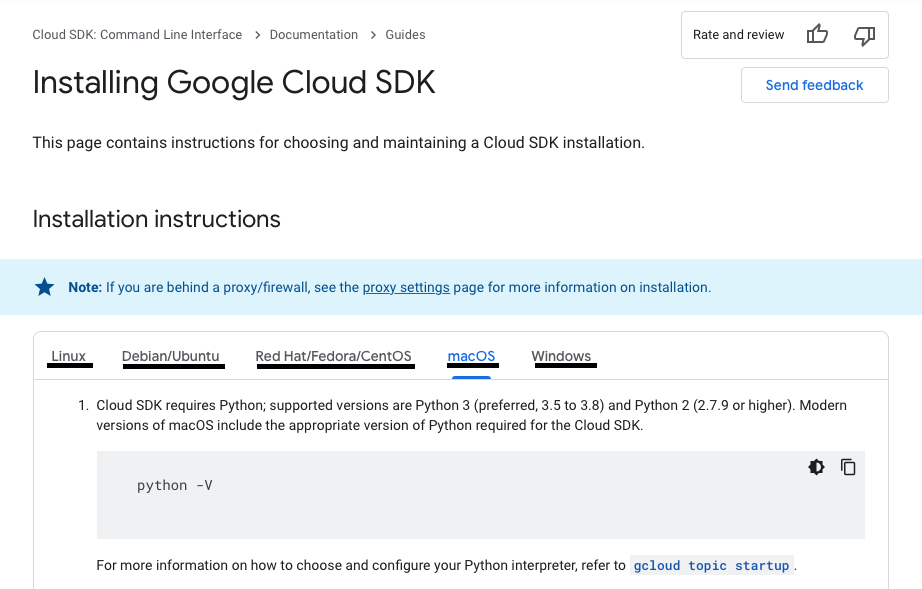
GCP CLI
To push Docker images to the Google Container Registry (GCR), you need the Google Cloud SDK: Command Line Interface (CLI). You can see the complete installation process by clicking here.
If you need to set up the SDK, follow these instructions and install required components.
Note: you can switch tabs (named Operating Systems) to get the configuration you need for your environment.
You should now have everything you need to complete this tutorial.
So, let’s jump in!
Creating a Service Account
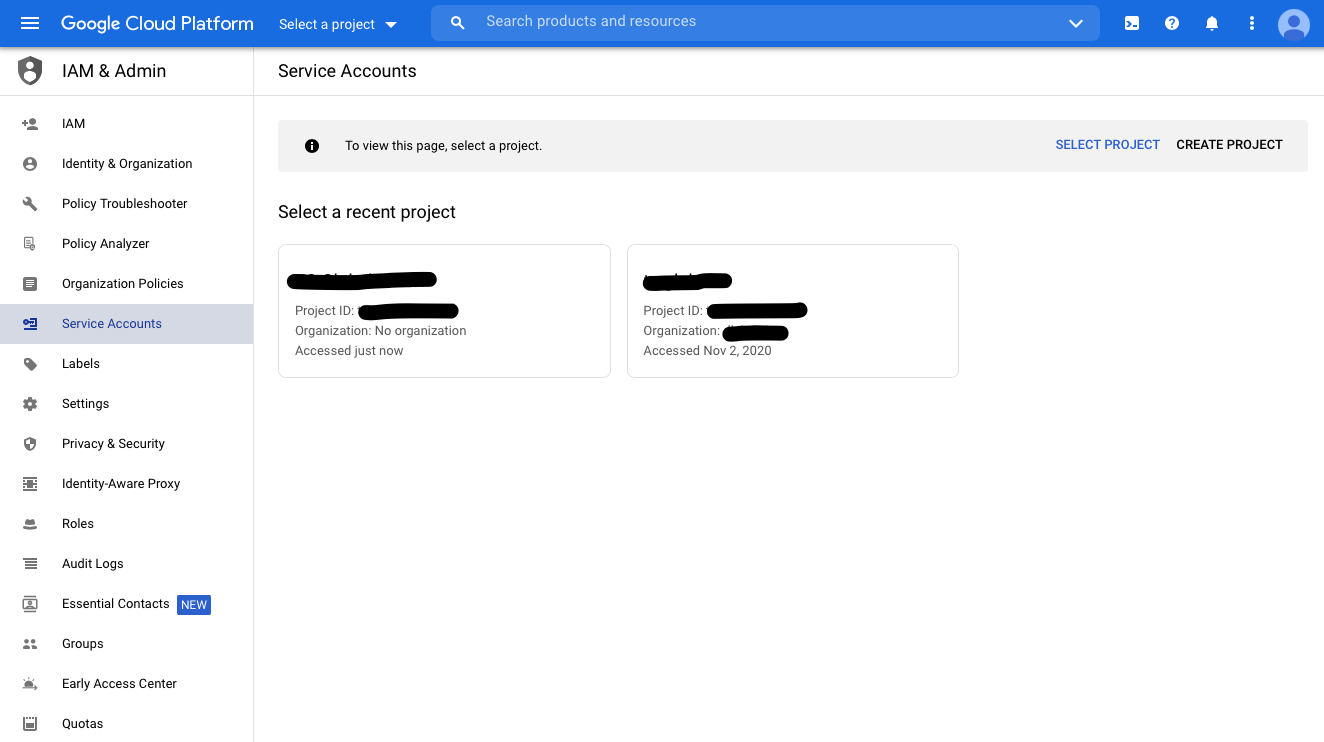
Next up, you need to create a Google Cloud Service Account. You can find the complete setup process by clicking here — or you can follow these steps:
- Go to the ‘Service Accounts’ page
- Choose the relevant project (if required)
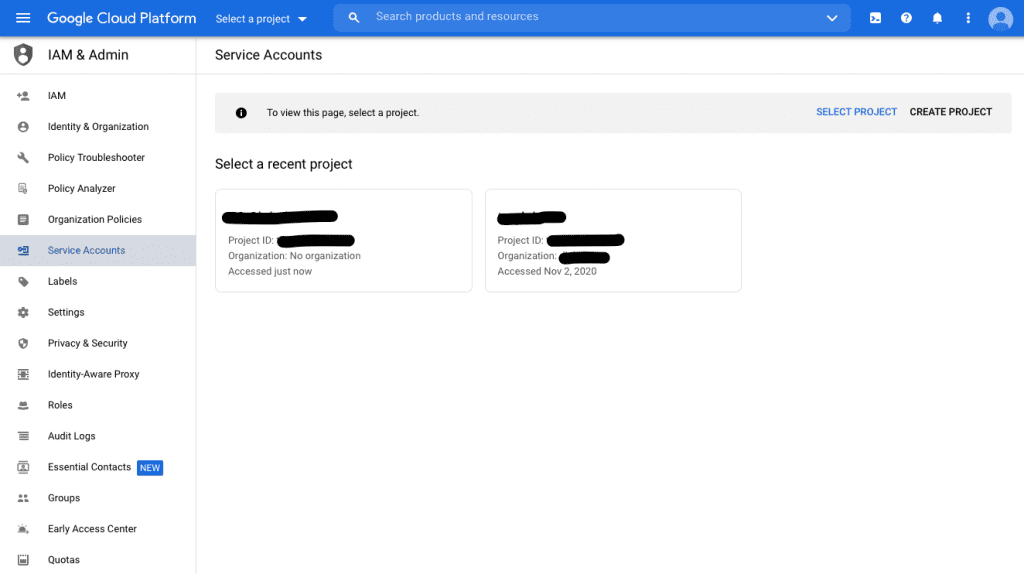
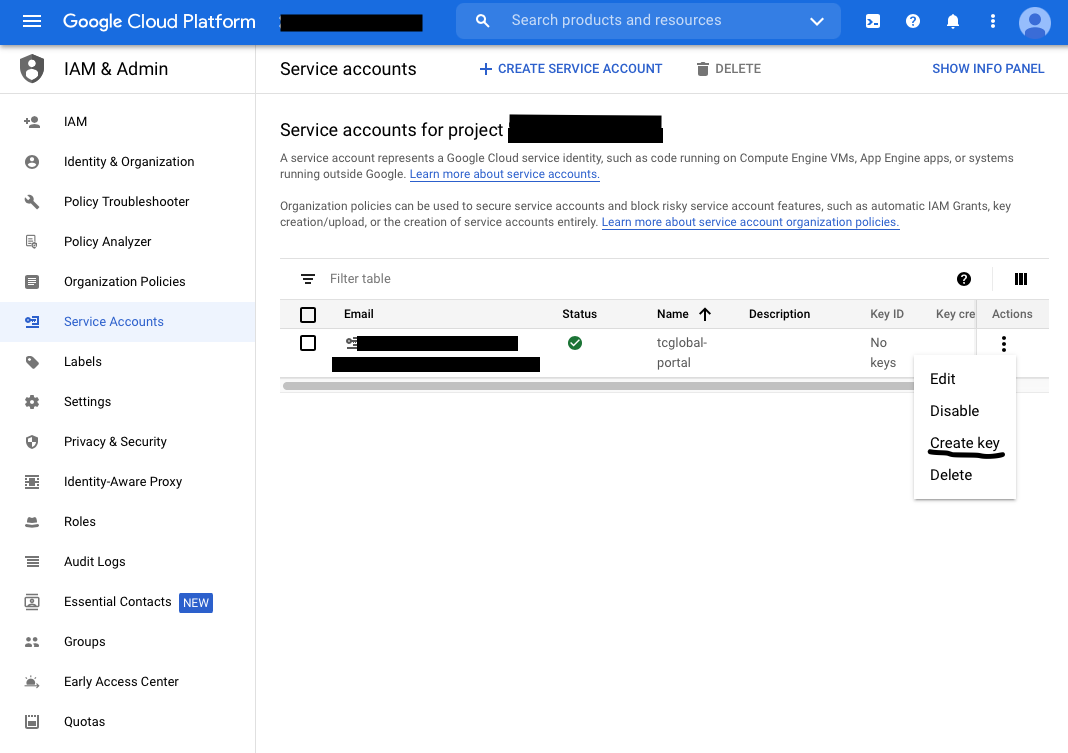
- Click ‘Create Service Account’
- Set the name of the account
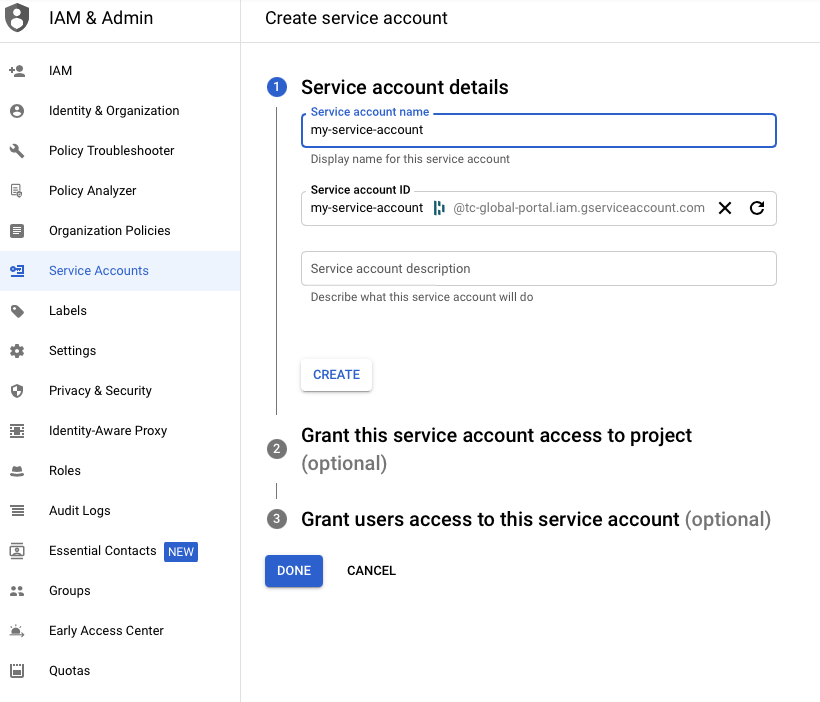
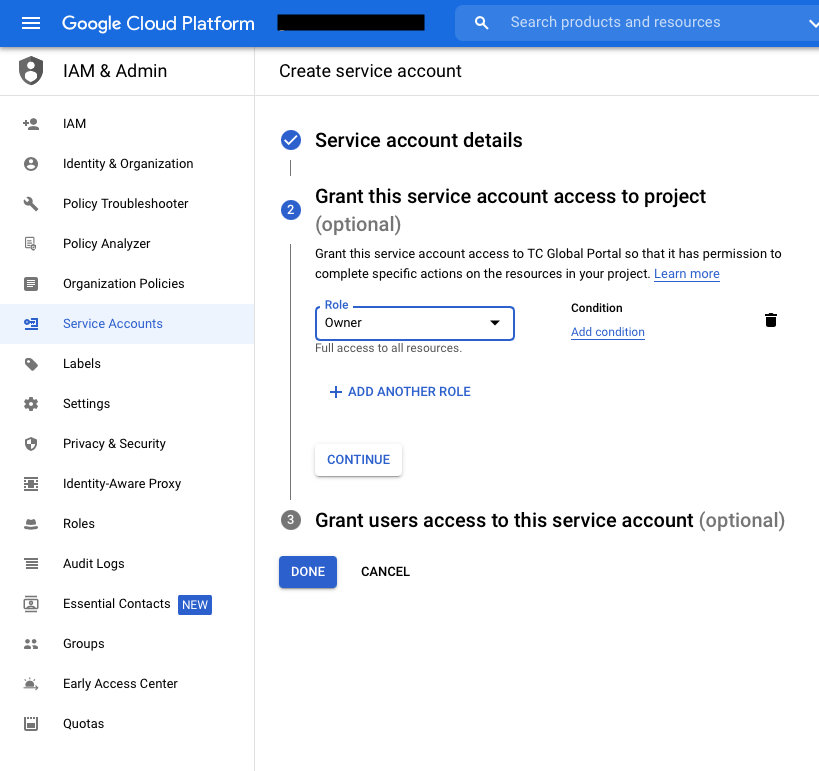
- Set your role (you can choose “Owner” for now, but remember to get familiar with the permissions scheme on GCP, then you can adjust them to your needs).
- Optional: add additional users who might need to access the account.
- Optional: add additional users who might need to access the account.
- Generate Key-pair for the Service Account:
- Click ‘Create Key’ -> Choose format {JSON (recommended) or P12} -> Key should download to your device

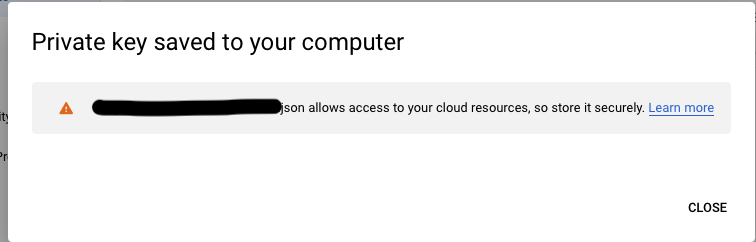
- Click ‘Create Key’ -> Choose format {JSON (recommended) or P12} -> Key should download to your device
- Important: you can only download a single key-pair once, so keep it safe
- Consider storing it in your google-cloud-sdk directory to keep everything in one place;
- One service account can store up to 10 key-pairs.
- Now activate your Google Cloud Service Account — run:
`gcloud auth activate-service-account –key-file=<your_credentials_file_path>`
Note: <your_credentials_file_path> is the path to the JSON or P12 file you’ve just downloaded.
- You should now be able to connect to the Google Cloud Platform and create resources using your device
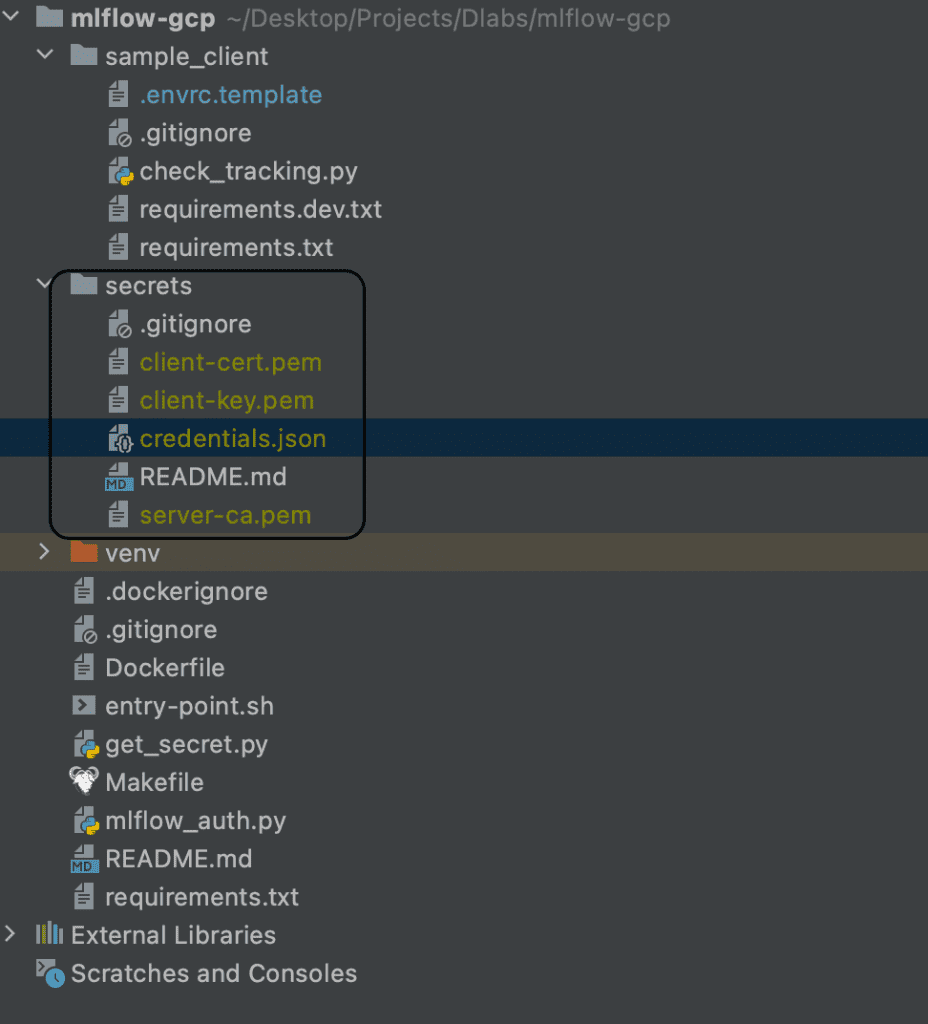
- Copy this credentials.json file to the secrets directory in your local version of the repository
Creating GCP Resources
SQL Database
Using the GCP, follow these steps:
- Choose ‘Console’
- From the dropdown menu in the left panel, choose ‘SQL’
- In the instance type, choose ‘Postgres’
- Note: it could take a while as ‘Compute Engine’ initializes the resource
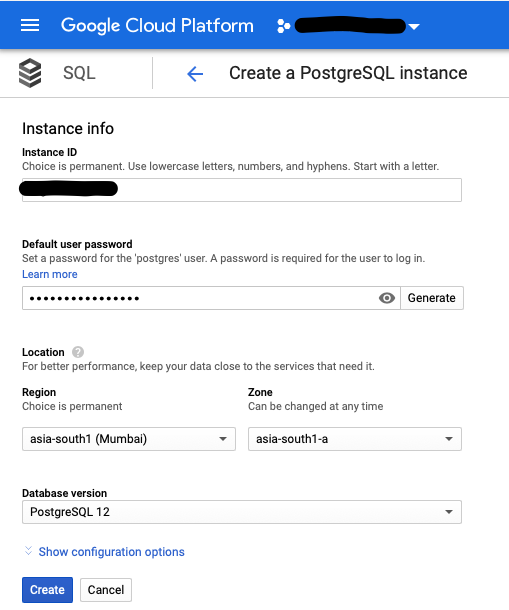
- After a couple of minutes, a questionnaire (like the one you see below) should appear
- Name your database, and set the default user password and location preferences
- Note: the recommended Postgres version is 12
- Note: the recommended Postgres version is 12
- At the end of the form, you’ll see ‘Show configuration options’ — use this to specify more advanced setup and flags
- You can check if the Public IP box is set in the Connectivity segment
- You can also specify backups, labels, storage type, storage auto increment, etc.
- When you’re done, click ‘Create’ and wait until the instance creates and configures automatically (at which point you’ll be redirected to the SQL DB Overview pane)
- Note: this can take a couple of minutes, after which you’ll receive a notification of successful completion.
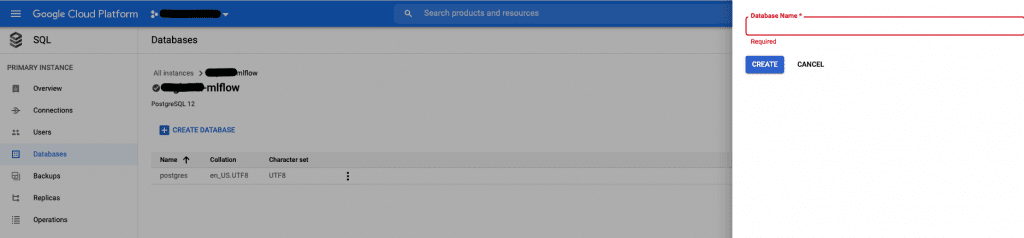
- You can now create a new database for your MLflow artifacts and data
- Note: you might notice a default database created by the GCP with the name “Postgres,” but we recommend you create a new database with a more explanatory name
- Go to the SQL component -> Databases -> Create Database
- Choose a name for your database and click Create
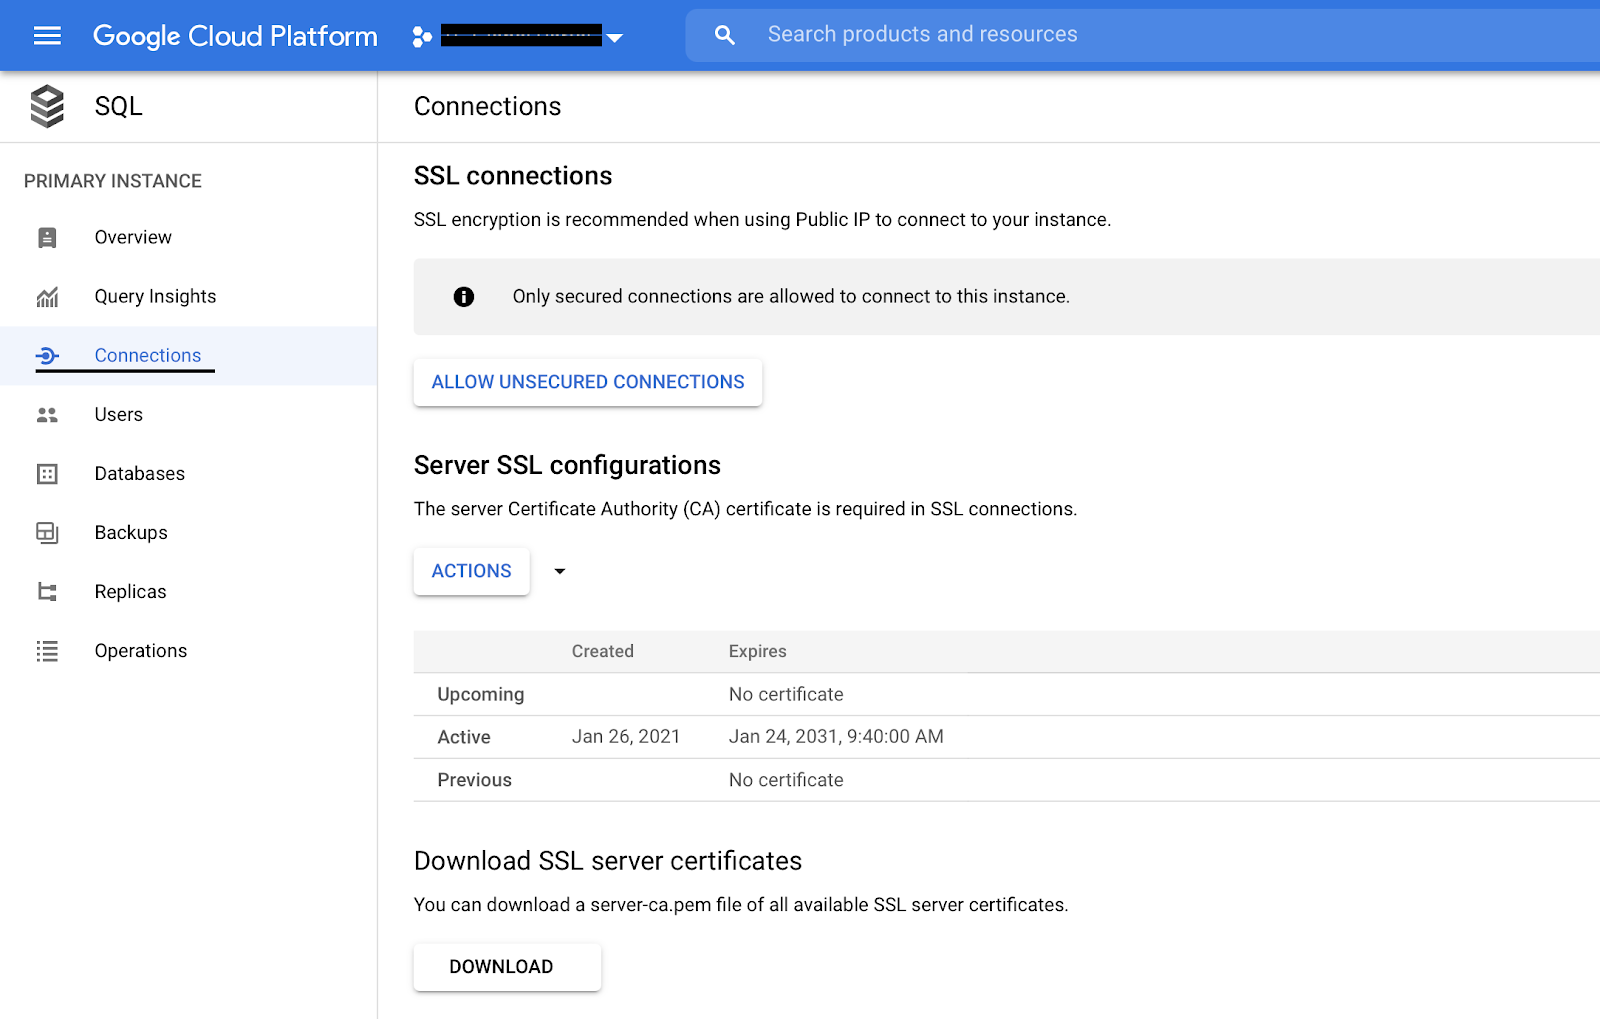
- Next, set up an SSL certificate
- Go to SQL instance details -> Connections -> Click ‘Allow only SSL connections’
- Last of all, you need to create a new user for your database
- Go to SQL instance details -> Users -> Add User Account
- Set PostgreSQL authentication, username, and password
- Click ‘ADD’


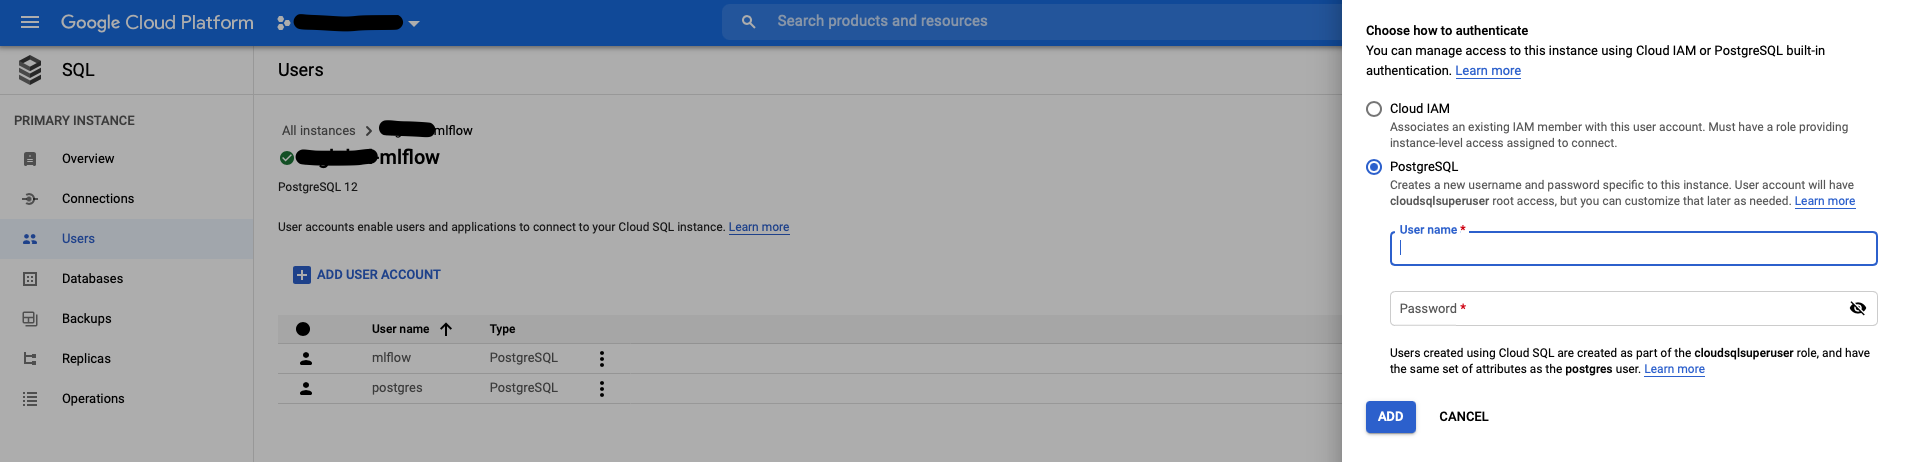
Important: this user will have superuser privileges, but you can grant and restrict permissions later on (there’s plenty of documentation on GCP regarding access roles)
Your database is all set — great job!
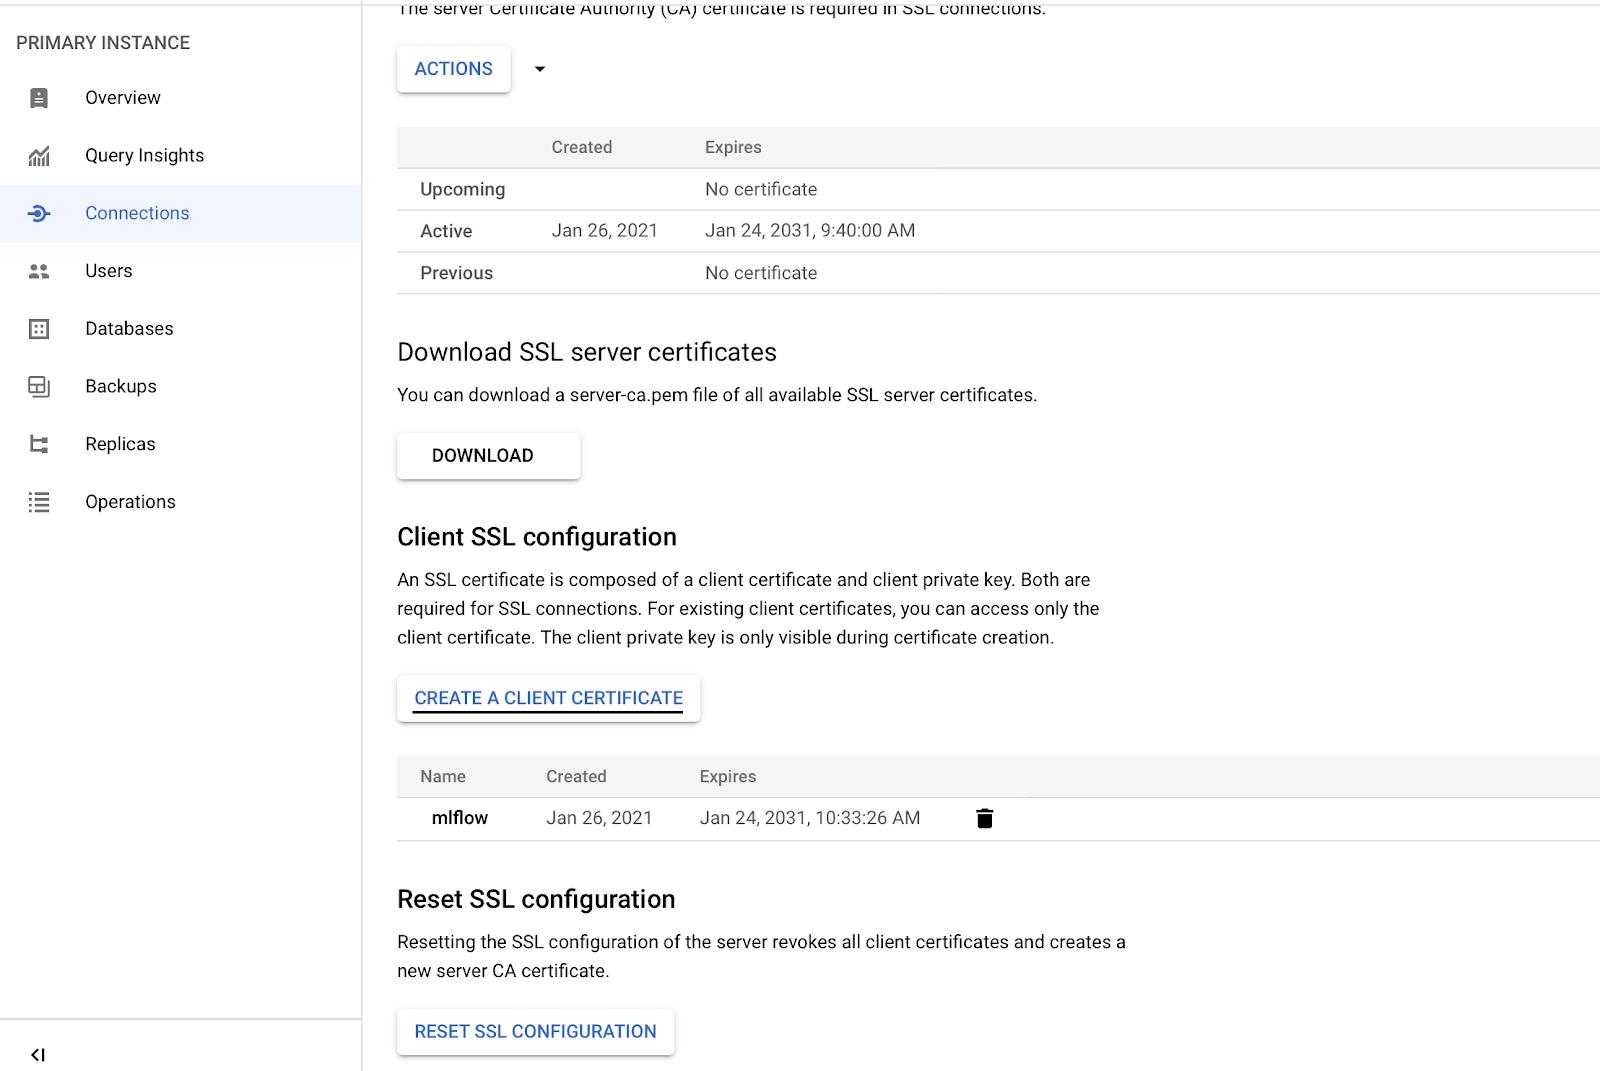
SSL Connection
To allow MLflow to connect to your SQL instance, you need to set up an SSL connection. To do this, go to the Connections section of your SQL instance panel.
Then, follow the steps below:
- Click ‘CREATE A CLIENT CERTIFICATE’ and download the files client-cert.pem, client-key.pem and server-ca.pem

- Now move them to the secrets directory in your local copy of the mlflow-gcp repository
Storage Bucket
To store MLflow artifacts, you’ll need a ‘Storage Bucket’. Here’s how to set one up:
- Choose ‘Storage’ from the left-hand GCP panel
- Click ‘Create Bucket’
- Set name and preferred location; you can leave the rest of the parameters as ‘Default’ (if you need to adjust their settings, there are thorough guidelines to help you do that)

- Click ‘Create’
…and that’s your second component complete — you’re on a roll!!
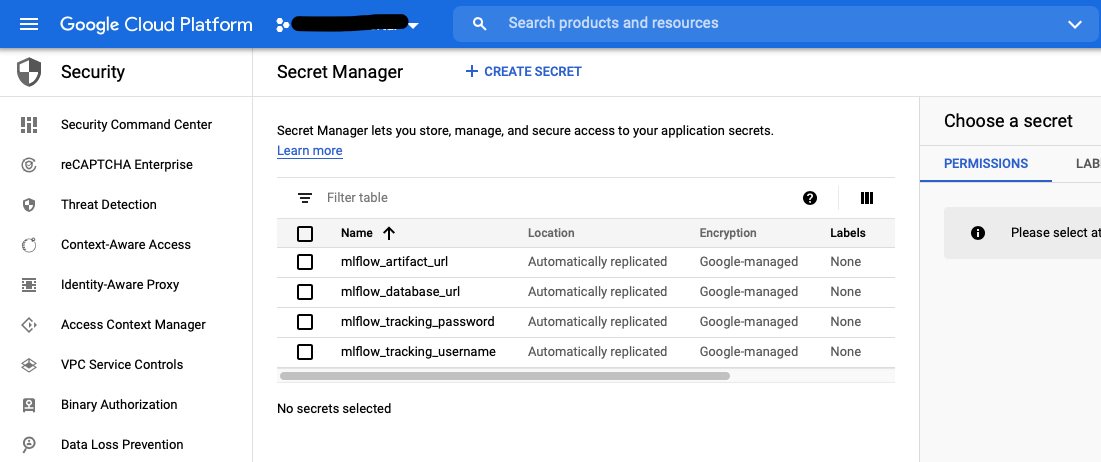
Secret Manager
To handle authentication in MLflow, you’ll need some assistance, but Google has you covered — you can use ‘Secret Manager’:
- On the left GCP panel, click ‘Security’ -> Select ‘Secret Manager’
- Enable Secret Manager
- Create Secret:
- mlflow_artifact_url: this is the address of the Storage Bucket where you’ll store MLflow artifacts
- When creating Secret Manager, you have to set the Secret Value
- If you set the secret name as mlflow, then the default secret value should be gs://mlflow
- Note: you can also check this in Storage -> Bucket details -> Configuration (link for gsutil)
- mlflow_database_url: SQLAlchemy-format Cloud SQL connection string (over internal GCP interfaces, not through IP), sample value postgresql+pg8000://<dbuser>:<dbpass>@/<dbname>?unix_sock=/cloudsql/tc-global-dlabs:europe-west3:mlfow/.s.PGSQL.5432 — the Cloud SQLinstance name can be copied from Cloud SQL instance overview page
- mlflow_tracking_username: the basic HTTP auth username for MLflow (your choice)
- mlflow_tracking_password: your choice
- mlflow_artifact_url: this is the address of the Storage Bucket where you’ll store MLflow artifacts
- Here’s what you should now see:

If you reached this point, great job — that’s another component ready!!!
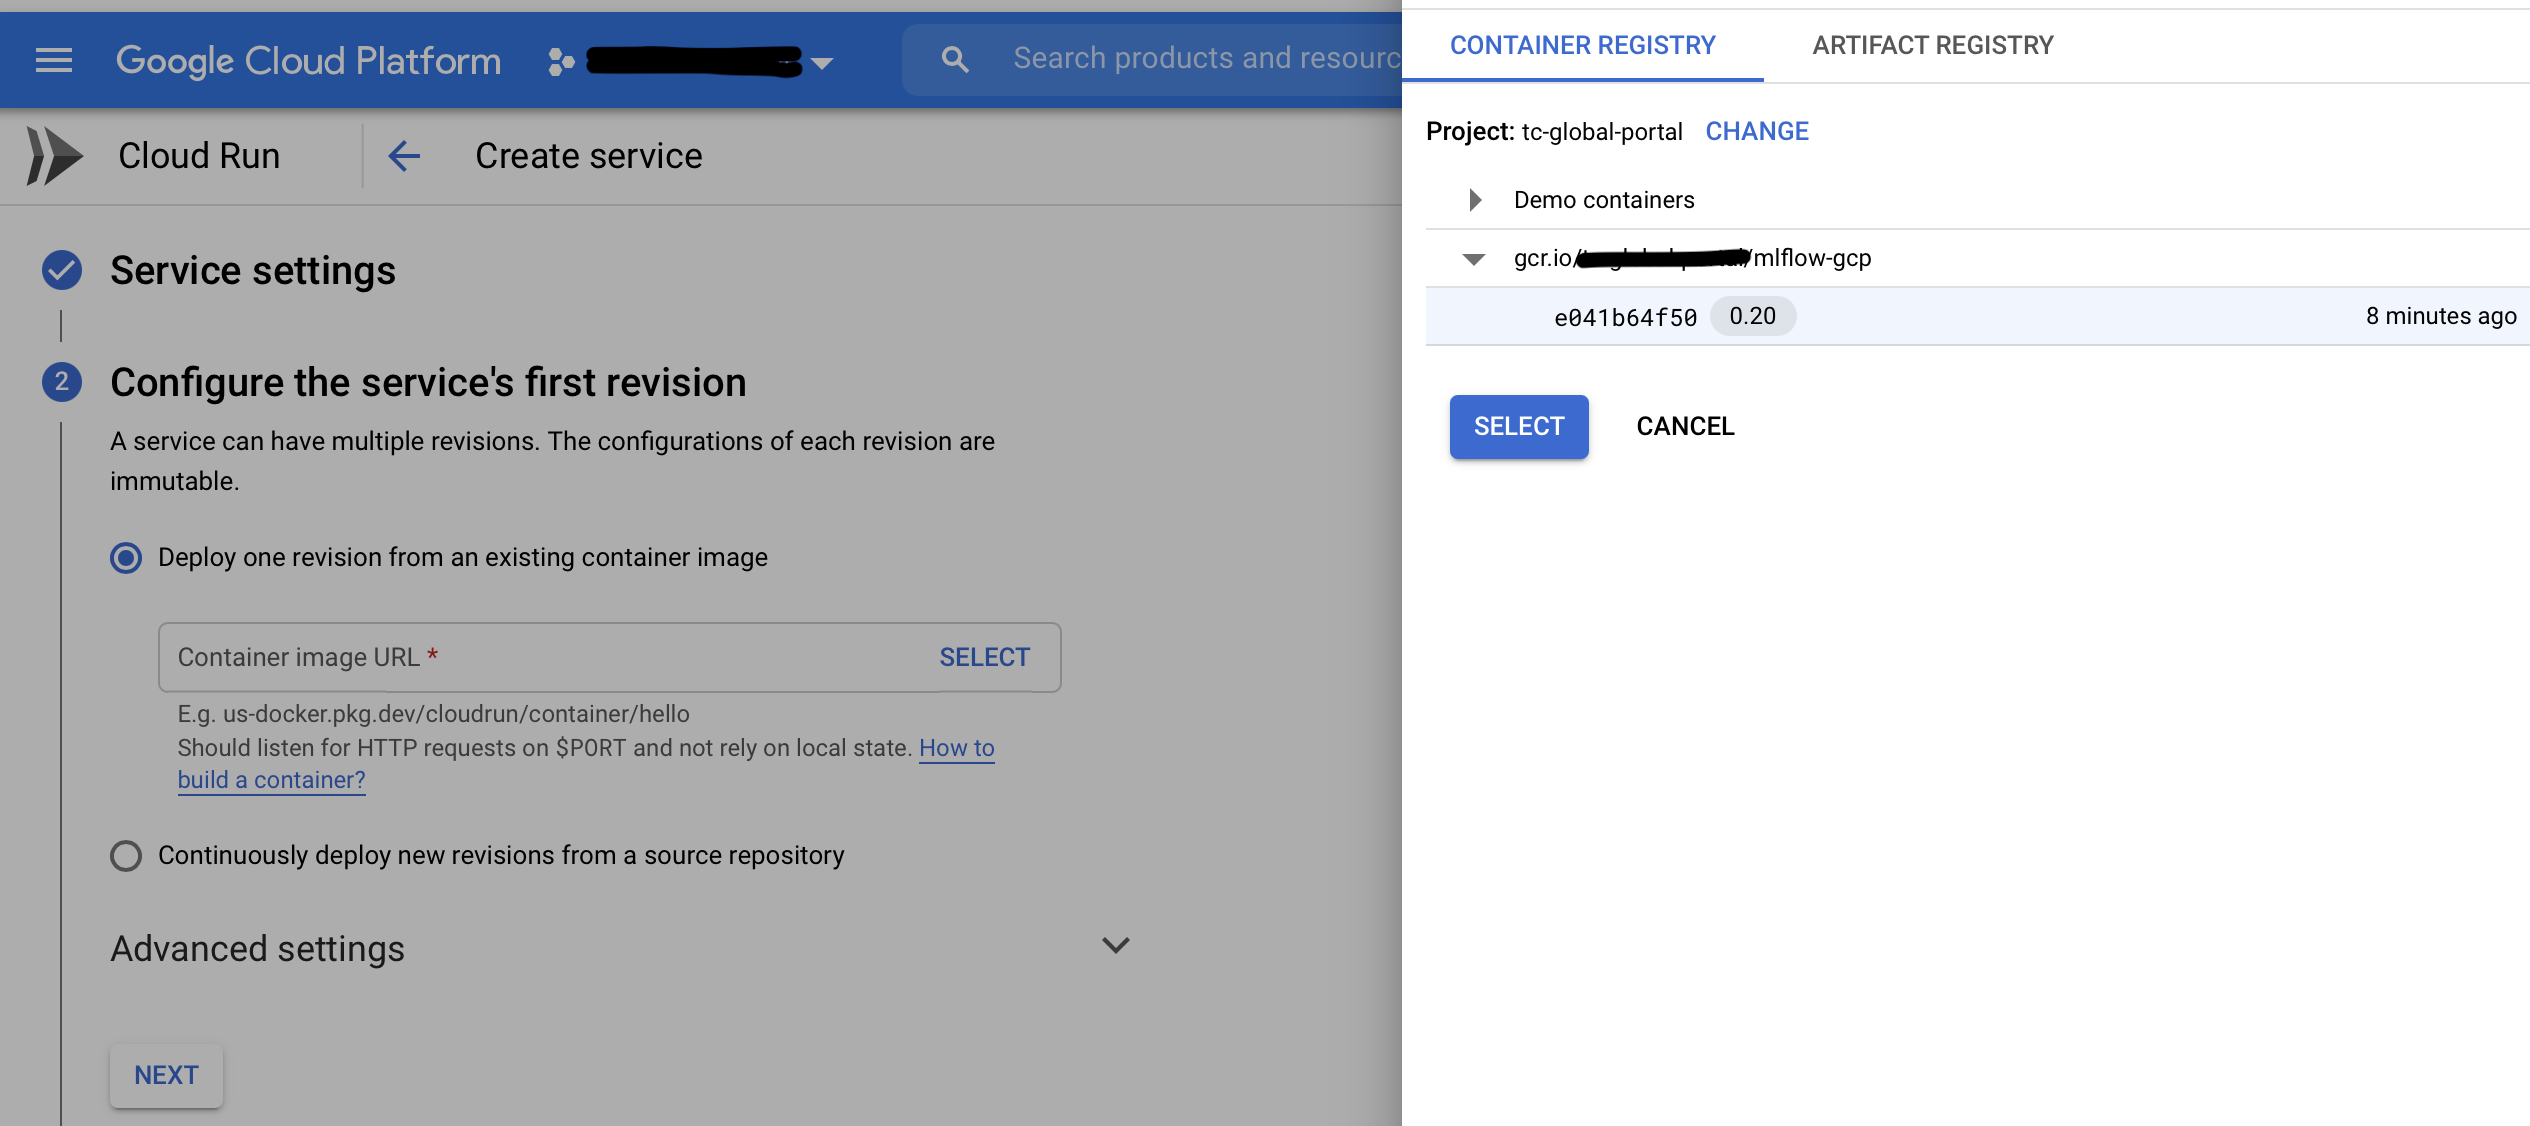
Container Registry
For this step, you’ll need Docker Engine: find the installation guide here. If you’re an Ubuntu user, change to any suitable distribution that fits your needs. You can also use the Docker Desktop app, which contains Docker Engine.
Once you’ve installed Docker, you should push the image from the linked repository to the Google Cloud Platform Container Registry component.
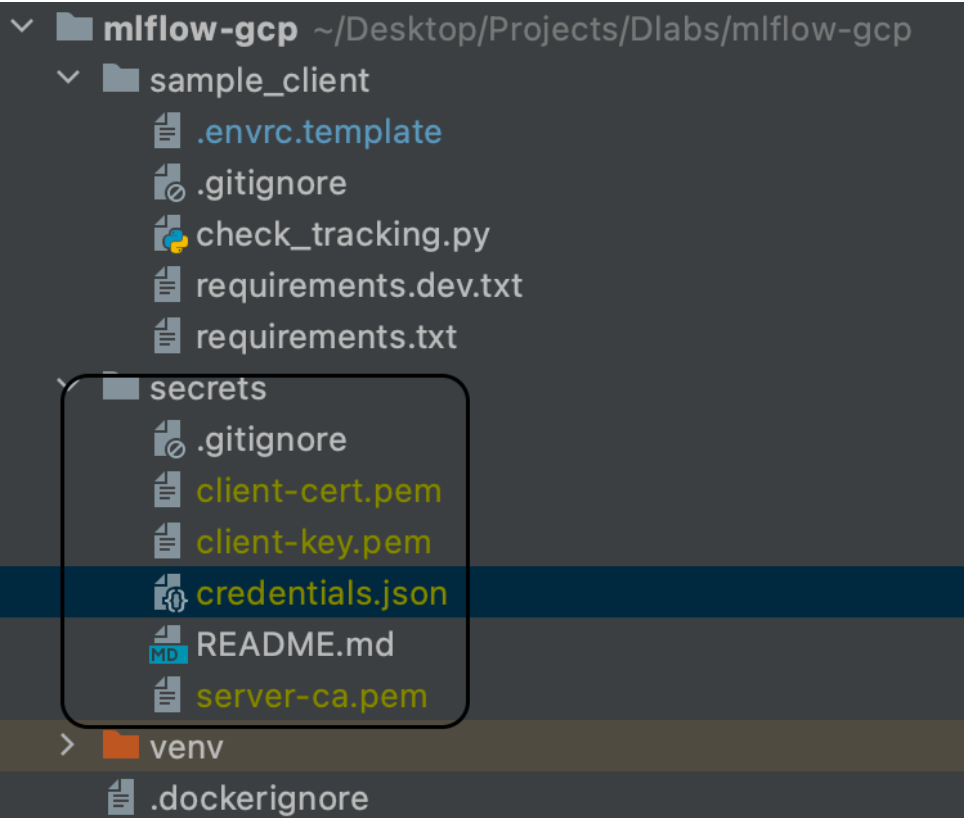
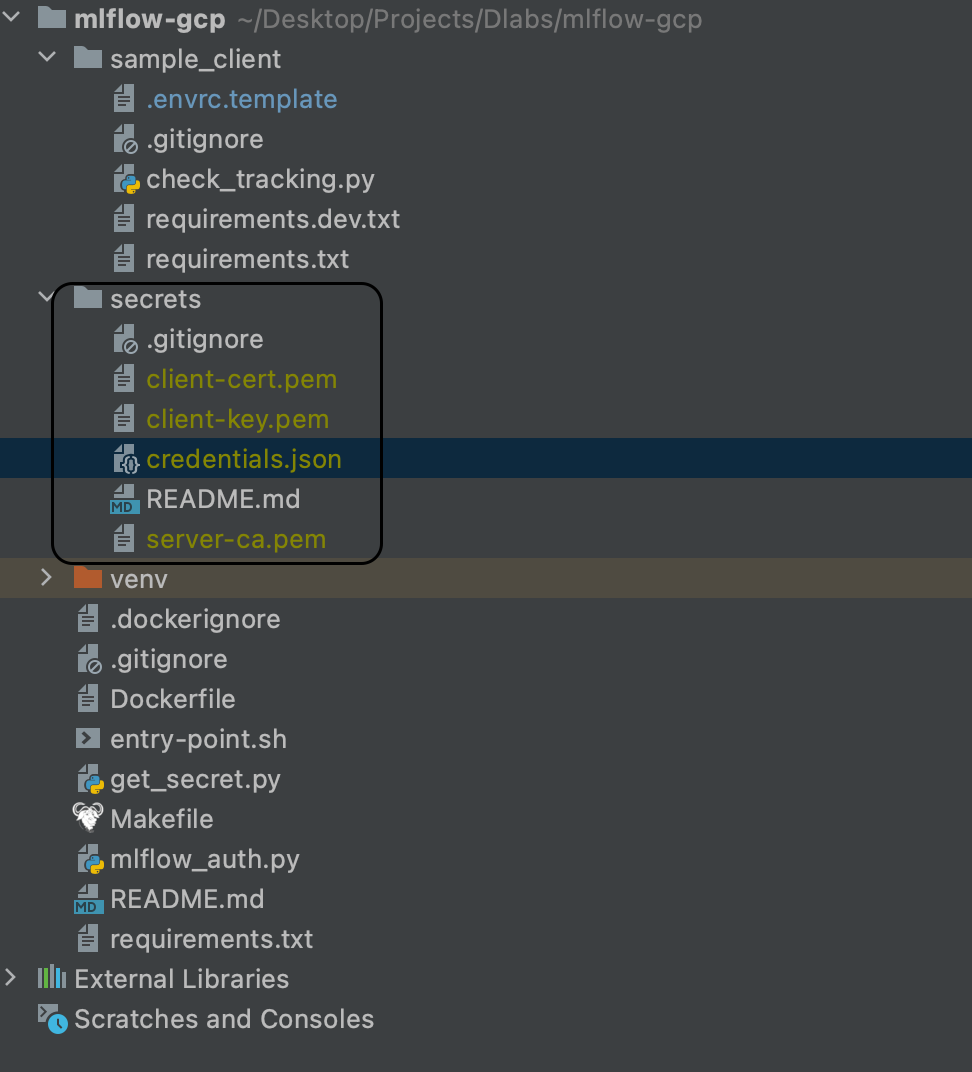
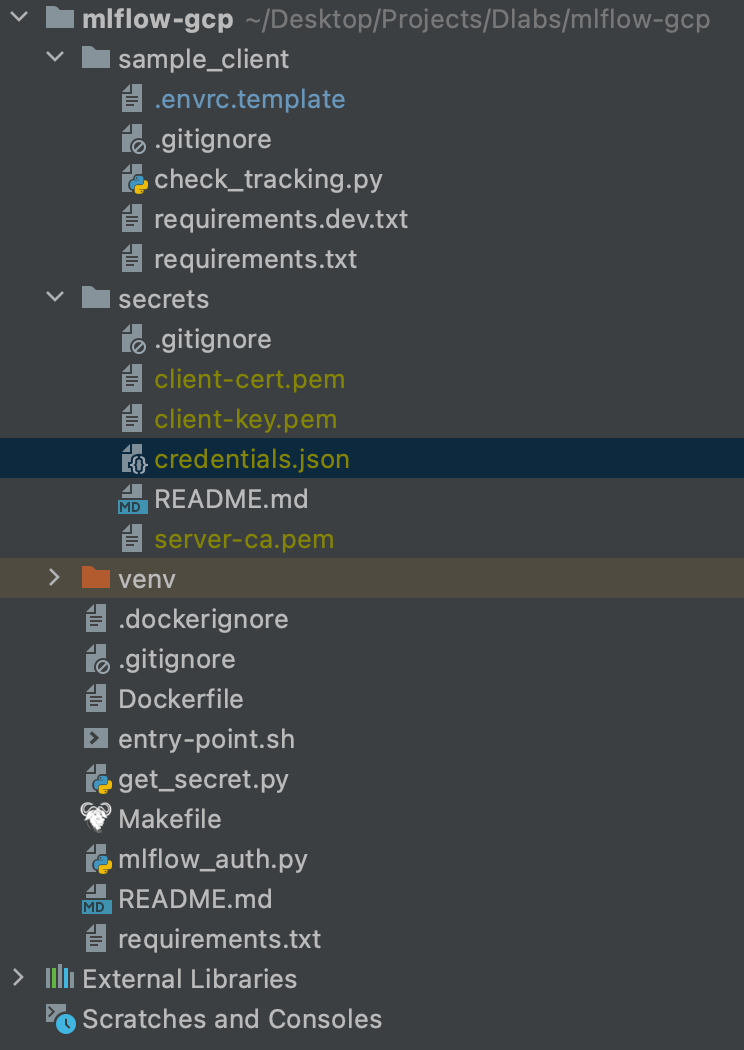
At this point, make sure you have all the required components in your repository so that your image works properly.
The following image shows how your repository should look:
To push the image, follow these steps:
- Run in shell on local machine:
`export GCP_PROJECT=name_of_your_project`- Where the name of the project is the project id from GCP (copy it from the URL https://console.cloud.google.com/home/dashboard?organizationId=XXX&project=YYY where the YYY is the project id)
`make docker-auth`
Then run:
`make build && make tag && make push`If successful, you should see the following:
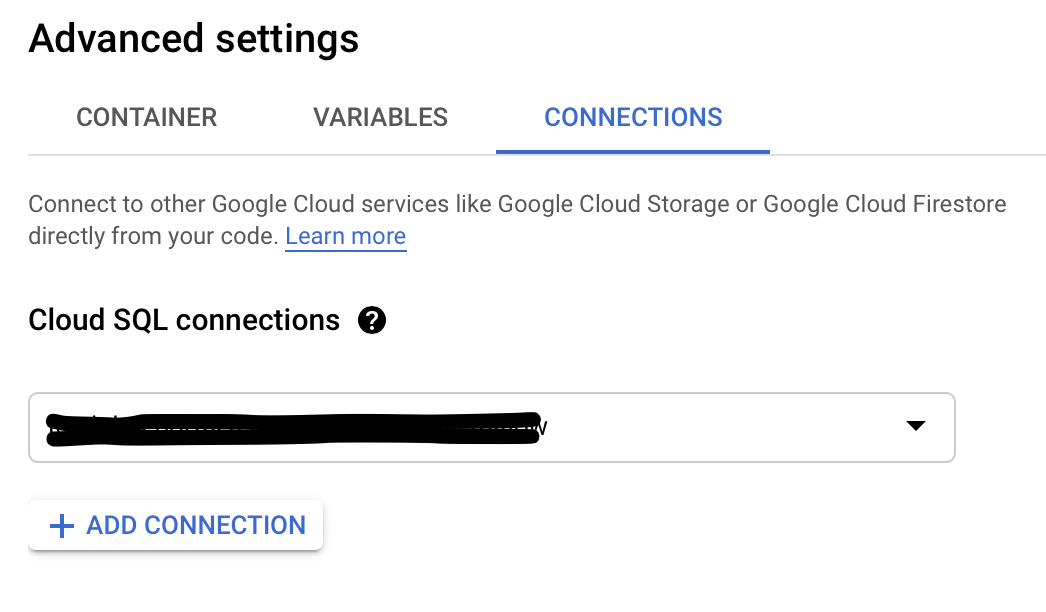
Cloud Run
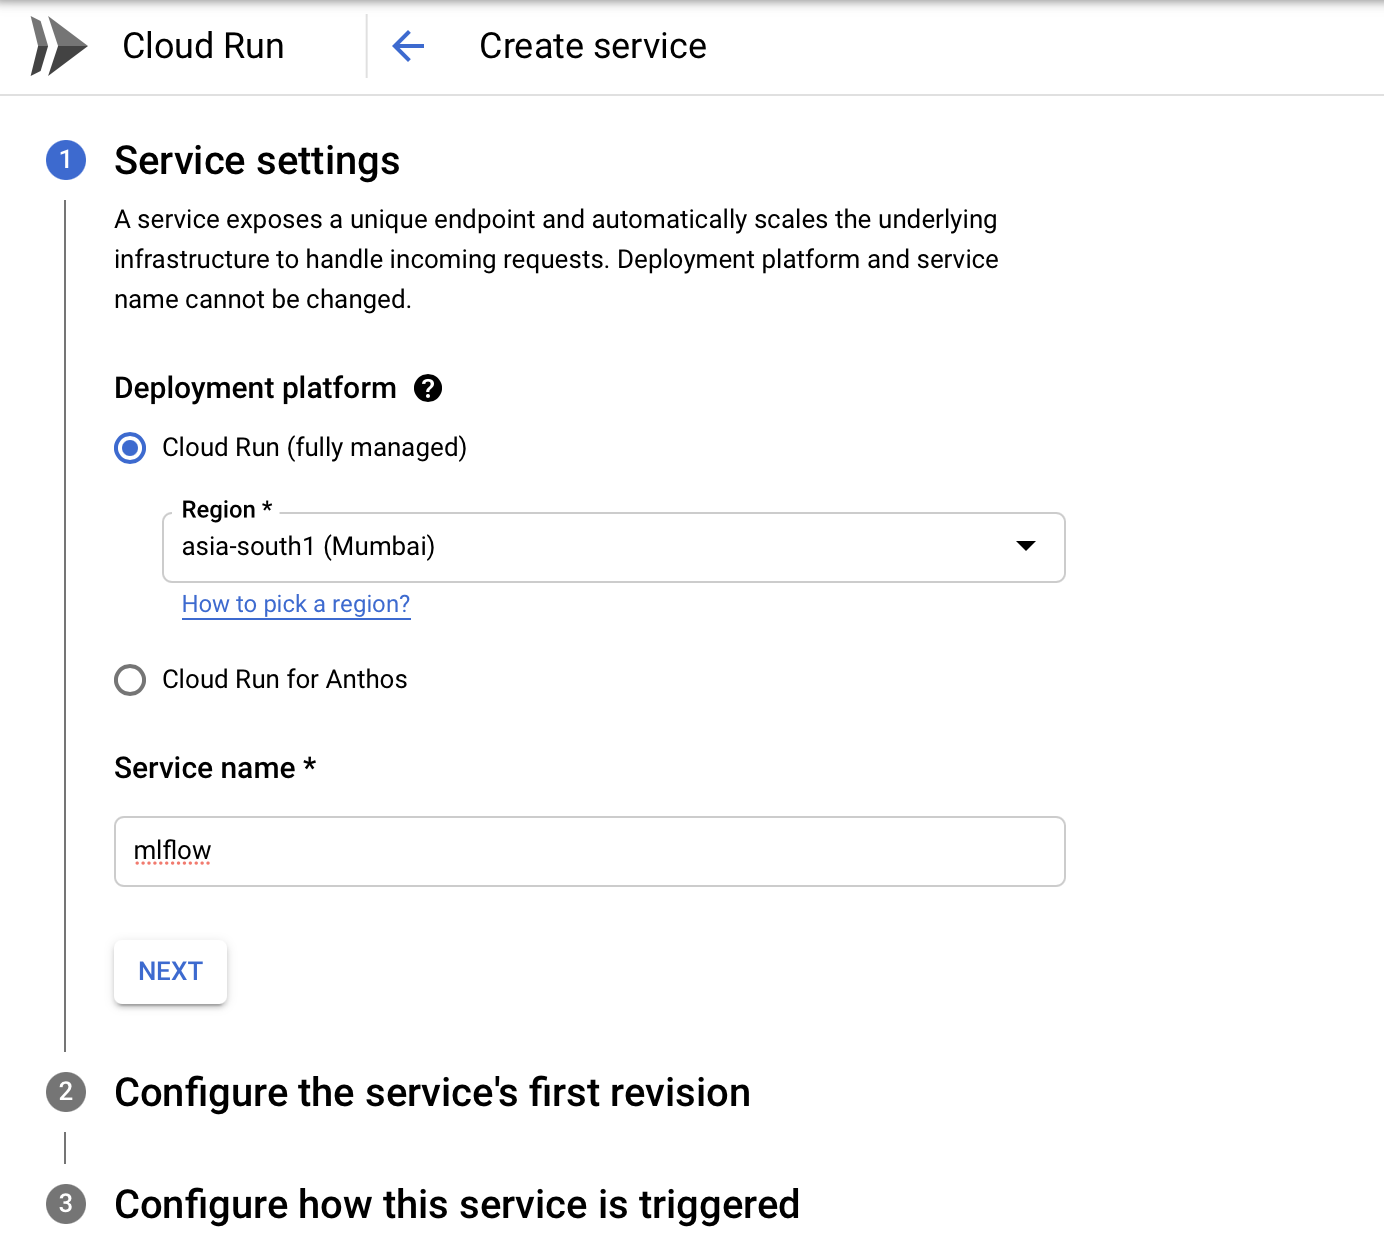
The last task to complete before you can access MLFlow is to run the docker image in GCP. To do that, use the Cloud Run component.
- Create a new ‘Cloud Run’ deployment using the image you just pushed to the Container Registry


- Select “Allow unauthenticated invocations” to enable incoming web traffic (MLflow will be protected by HTTP basic auth at a later step)
- Give the machine 1GB of RAM (use the service account you created earlier; you can decrease the maximum number of instances)
- Use the previously created service account so that your Cloud Run can retrieve credentials
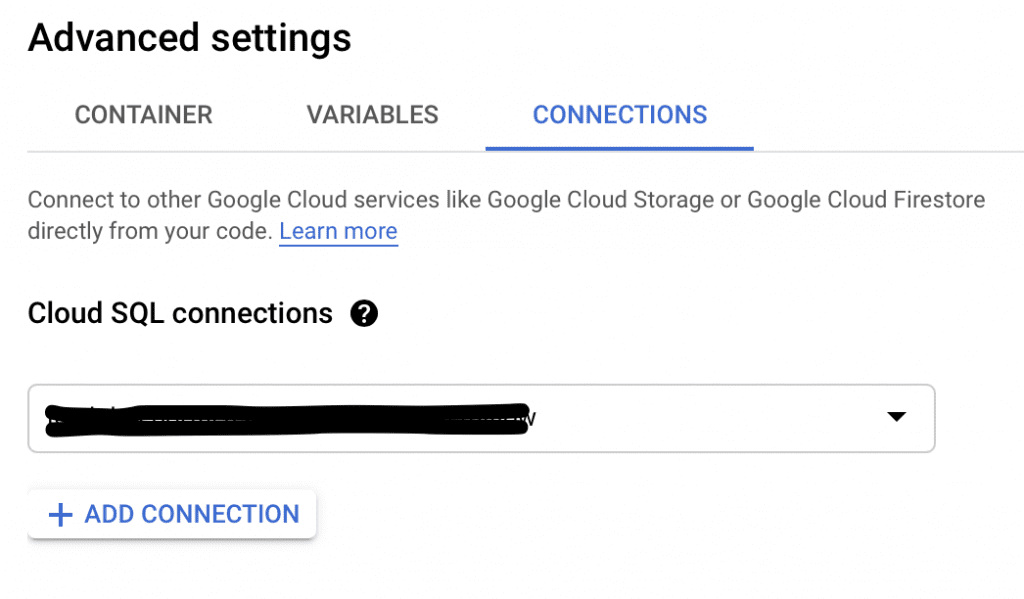
- In the ‘Connections’ tab, add a connection to your Cloud SQL instance
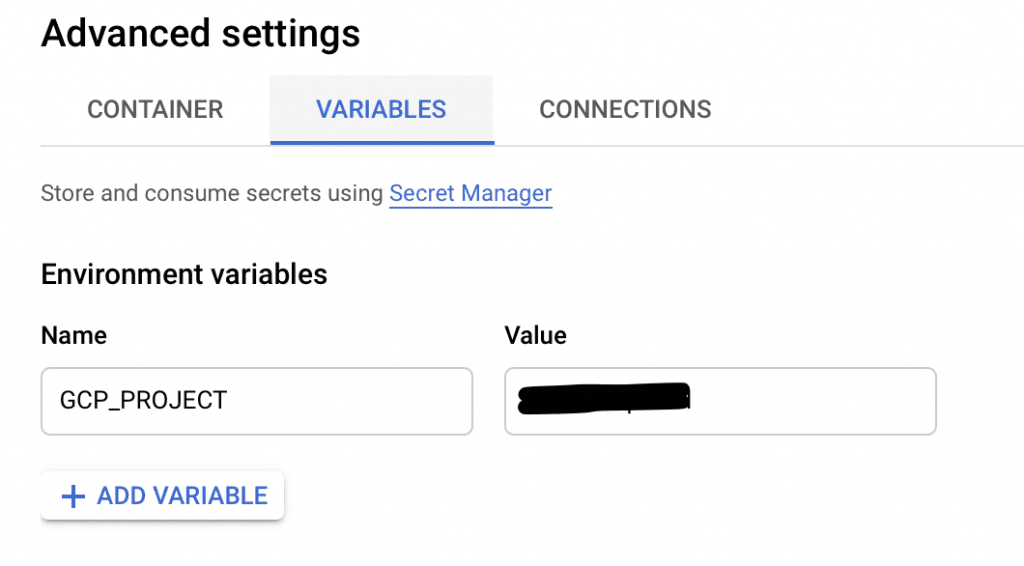
- In the Variables tab, add the following variable:
- GCP_PROJECT — the name of your GCP project
- This lets the containerized app know from where to retrieve the secrets
- With all the necessary fields complete, hit ‘CREATE’

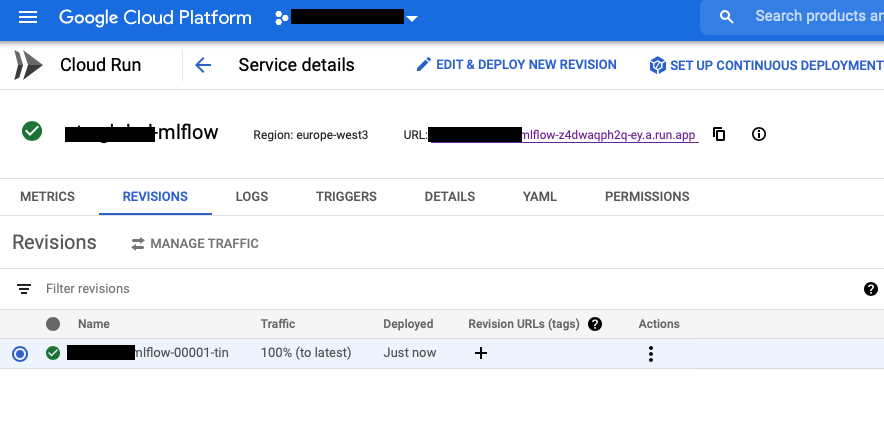
After a while, the deployment should complete.
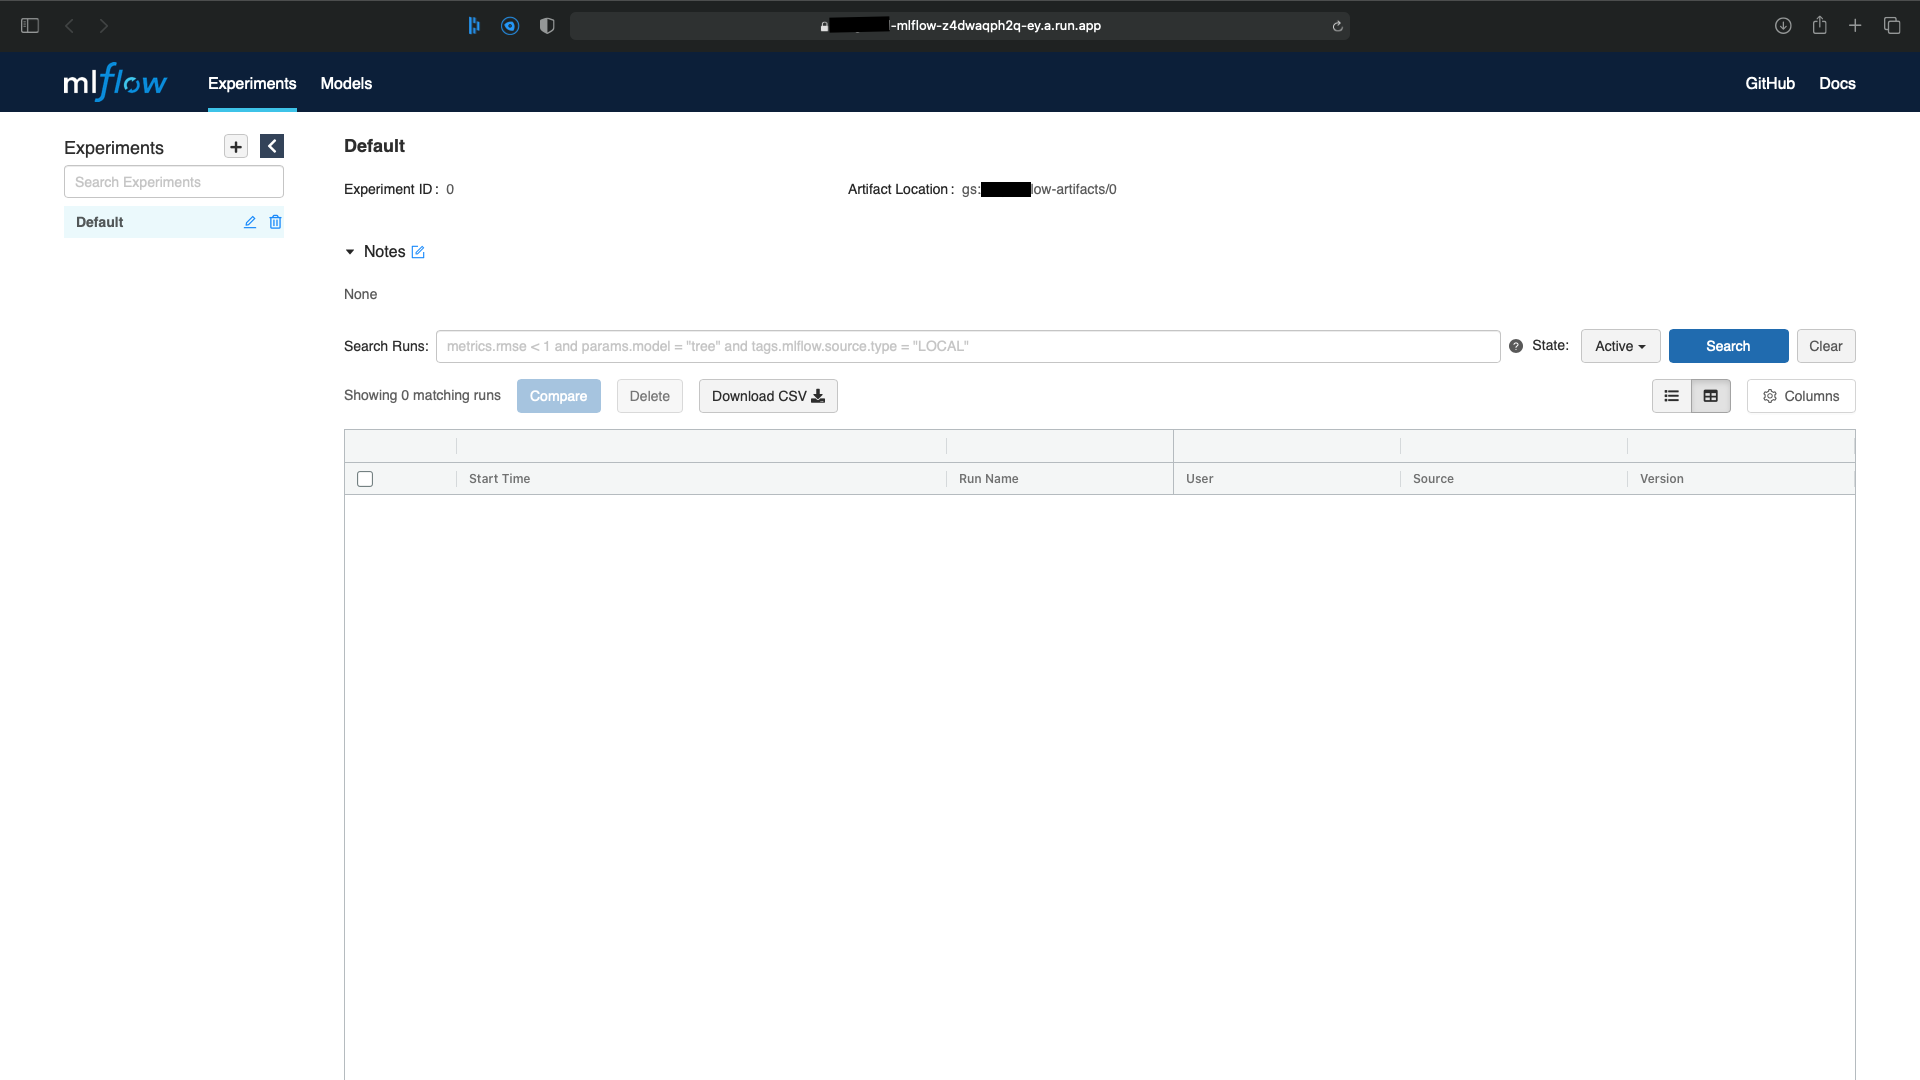
Now, you can use MLflow to run experiments! To do this, follow the URL displayed on the front page of your ‘Cloud Run’ component, as shown in the image below.
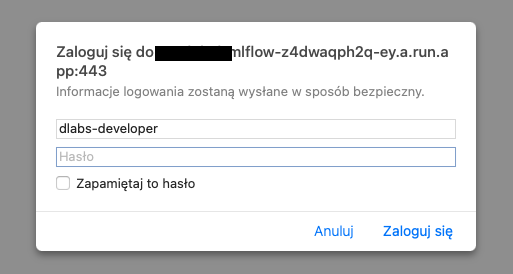
MLflow login
Now you should see an access page where you have to specify your credentials. These are the same as those stored in Secrets – mlflow_tracking_username and mlflow_tracking_password.
Add them, click ‘Login’ — and you’re set!
Your fully functional MLflow awaits.
Usage Test
At this point, you should have access to the remote MLflow GUI as described in the previous paragraph. Now, it’s time to learn how to upload some metrics (which is very simple!).
First, you should set the environment variables so that your local machine knows how to connect with the remote MLflow app. To do that, see the ‘Usage’ section of the README.md file in the repository.
Now, it’s time to test. There are two examples in the linked repository inside the sample_client folder:
- mlflow_example.ipynb – simple example showing how to use MLflow in Jupyter Notebooks with comments (recommended)
- check_tracking.py – simple example on how to use MLflow inside the Python code: as you can, see MLflow supports context manager, and I encourage you to use it whenever possible
Both of them should result in a new experiment in the remote MLflow. If not, carefully check you’ve covered all the earlier steps.
What’s Next?
MLflow is a powerful platform.
Now you’ve set it up, it’s time to explore the entire Machine Learning lifecycle. What’s the best way to do that? Here’s an idea…
Why not build your next model using this great tool? Then you’ll have all your charts, learning curves, ROC, metrics, and more stored in one safe place, leaving you free to access them whenever you like.
Crucially, you’ll also be able to share everything with your teammates so that no matter who’s working on the model, you’ll be able to progress it in tandem. What’s more, a versioning system is perfect for experimentation, with iterations saved with the date and author, so you can compare results as you move forward.
Last but not least, you can upload and store your models in the Models section of MLflow. The convenience of it all will undoubtedly make your life easier from day one.
Now over to you: get your next idea rolling — and good luck!
Looking to introduce machine learning to your company? Set up a free consultation with DLabs.AI for guidance on the best path forward.
Artykuł A Step-by-step Guide To Setting Up MLflow On The Google Cloud Platform pochodzi z serwisu DLabs.AI.
