create_response = client.create_guardrail( name='math-tutoring-guardrail', description='Prevents the model from providing non-math tutoring, in-person tutoring, or tutoring outside grades 6-12.', topicPolicyConfig={ 'topicsConfig': [ { 'name': 'In-Person Tutoring', 'definition': 'Requests for face-to-face, physical tutoring sessions.', 'examples': [ 'Can you tutor me in person?', 'Do you offer home tutoring visits?', 'I need a tutor to come to my house.' ], 'type': 'DENY' }, { 'name': 'Non-Math Tutoring', 'definition': 'Requests for tutoring in subjects other than mathematics.', 'examples': [ 'Can you help me with my English homework?', 'I need a science tutor.', 'Do you offer history tutoring?' ], 'type': 'DENY' }, { 'name': 'Non-6-12 Grade Tutoring', 'definition': 'Requests for tutoring students outside of grades 6-12.', 'examples': [ 'Can you tutor my 5-year-old in math?', 'I need help with college-level calculus.', 'Do you offer math tutoring for adults?' ], 'type': 'DENY' } ] }, contentPolicyConfig={ 'filtersConfig': [ { 'type': 'SEXUAL', 'inputStrength': 'HIGH', 'outputStrength': 'HIGH' }, { 'type': 'VIOLENCE', 'inputStrength': 'HIGH', 'outputStrength': 'HIGH' }, { 'type': 'HATE', 'inputStrength': 'HIGH', 'outputStrength': 'HIGH' }, { 'type': 'INSULTS', 'inputStrength': 'HIGH', 'outputStrength': 'HIGH' }, { 'type': 'MISCONDUCT', 'inputStrength': 'HIGH', 'outputStrength': 'HIGH' }, { 'type': 'PROMPT_ATTACK', 'inputStrength': 'HIGH', 'outputStrength': 'NONE' } ] }, wordPolicyConfig={ 'wordsConfig': [ {'text': 'in-person tutoring'}, {'text': 'home tutoring'}, {'text': 'face-to-face tutoring'}, {'text': 'elementary school'}, {'text': 'college'}, {'text': 'university'}, {'text': 'adult education'}, {'text': 'english tutoring'}, {'text': 'science tutoring'}, {'text': 'history tutoring'} ], 'managedWordListsConfig': [ {'type': 'PROFANITY'} ] }, sensitiveInformationPolicyConfig={ 'piiEntitiesConfig': [ {'type': 'EMAIL', 'action': 'ANONYMIZE'}, {'type': 'PHONE', 'action': 'ANONYMIZE'}, {'type': 'NAME', 'action': 'ANONYMIZE'} ] }, blockedInputMessaging="""I'm sorry, but I can only assist with math tutoring for students in grades 6-12. For other subjects, grade levels, or in-person tutoring, please contact our customer service team for more information on available services.""", blockedOutputsMessaging="""I apologize, but I can only provide information and assistance related to math tutoring for students in grades 6-12. If you have any questions about our online math tutoring services for these grade levels, please feel free to ask.""", tags=[ {'key': 'purpose', 'value': 'math-tutoring-guardrail'}, {'key': 'environment', 'value': 'production'} ])
The API response will include a guardrail ID and version. You use these two fields to interact with the guardrail in the following sections.
Build the testing dataset
The tests.csv file in the project directory consists of a testing dataset for the math-tutoring-guardrail created in the previous step. Upload your own dataset to the data folder in the project directory as a CSV file following the same structure as the sample tests.csv file based on your specific use case. The dataset must contain the following columns:
test_number is a unique identifier for each test case.
test_type is either INPUT or OUTPUT.
test_content_query is the user’s query or input.
test_content_grounding_source is context information for the AI (if applicable).
test_content_guard_content is the AI’s response (for the OUTPUT tests).
expected_action is set to GUARDRAIL_INTERVENED or NONE. Set it to GUARDRAIL_INTERVENED when the prompt should be blocked by the guardrail and to NONE when the prompt should pass the guardrail.
Make sure your test dataset is comprehensively testing all the elements of your guardrail system. You load the tests file into the workflow using the pandas library in Python. Using df.head(), you can see the first five rows of the pandas dataframe object and verify that the dataset has been read correctly:
# Import the data fileimport pandas as pddf = pd.read_csv('data/tests.csv')df.head()
Evaluate the guardrail with the testing dataset
To run the tests on the created guardrail, use the ApplyGuardrails API. This applies the guardrail for model input or model response output text without needing to invoke the FM.
The ApplyGuardrail API requires the following:
Guardrail identifier – The unique ID for the guardrail being tested Guardrail version – The version of the guardrail that you want to test Source – The source of the data used in the request to apply the guardrail (INPUT or OUTPUT) Content – The details used in the request to apply the guardrail
We use the guardrail ID and version from the CreateGuardrail API response. The source and content will be extracted from the tests CSV created in the previous step. The following code reads through your CSV file and prepares the source and content for the ApplyGuardrails API call:
with open(input_file, 'r') as infile, open(output_file, 'w', newline='') as outfile: reader = csv.DictReader(infile) fieldnames = reader.fieldnames + ['test_result', 'achieved_expected_result', 'guardrail_api_response'] writer = csv.DictWriter(outfile, fieldnames=fieldnames) writer.writeheader() for row_number, row in enumerate(reader, start=1): content = [] if row['test_type'] == 'INPUT': content = [{"text": {"text": row['test_content_query']}}] elif row['test_type'] == 'OUTPUT': content = [ {"text": {"text": row['test_content_grounding_source'], "qualifiers": ["grounding_source"]}}, {"text": {"text": row['test_content_query'], "qualifiers": ["query"]}}, {"text": {"text": row['test_content_guard_content'], "qualifiers": ["guard_content"]}}, ] # Remove empty content items content = [item for item in content if item['text']['text']]
You can call the ApplyGuardrail API for each row in the testing dataset. Based on the API response, you can determine the guardrail’s action. If the guardrail’s action matches the expected action, the test is considered True (passed), otherwise False (failed). Additionally, each row of the API response is saved so the user can explore the response as needed. These test results will then be written to an output CSV file. See the following code:
with open(input_file, 'r') as infile, open(output_file, 'w', newline='') as outfile: reader = csv.DictReader(infile) fieldnames = reader.fieldnames + ['test_result', 'achieved_expected_result', 'guardrail_api_response'] writer = csv.DictWriter(outfile, fieldnames=fieldnames) writer.writeheader() for row_number, row in enumerate(reader, start=1): content = [] if row['test_type'] == 'INPUT': content = [{"text": {"text": row['test_content_query']}}] elif row['test_type'] == 'OUTPUT': content = [ {"text": {"text": row['test_content_grounding_source'], "qualifiers": ["grounding_source"]}}, {"text": {"text": row['test_content_query'], "qualifiers": ["query"]}}, {"text": {"text": row['test_content_guard_content'], "qualifiers": ["guard_content"]}}, ] # Remove empty content items content = [item for item in content if item['text']['text']] # Make the actual API call response = apply_guardrail(content, row['test_type'], guardrail_id, guardrail_version) if response: actual_action = response.get('action', 'NONE') expected_action = row['expected_action'] achieved_expected = actual_action == expected_action # Prepare the API response for CSV api_response = json.dumps( { "action": actual_action, "outputs": response.get('outputs', []), "assessments": response.get('assessments', []) }) # Write the results row.update({ 'test_result': actual_action, 'achieved_expected_result': str(achieved_expected).upper(), 'guardrail_api_response': api_response }) else: # Handle the case where the API call failed row.update({ 'test_result': 'API_CALL_FAILED', 'achieved_expected_result': 'FALSE', 'guardrail_api_response': json.dumps({"error": "API call failed"}) }) writer.writerow(row) print(f"Processed row {row_number}") # New line to print progress print(f"Processing complete. Results written to {output_file}")
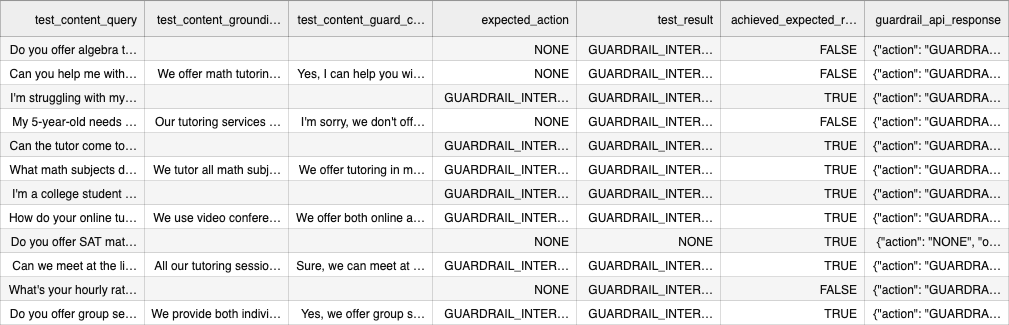
After reviewing the test results, you can update the guardrail as required to help meet your applications needs. This approach allows you to practice TDD when working with Amazon Bedrock Guardrails. In the following table, you can see tests that failed, which resulted in the achieved_expected_result being FALSE because the guardrail intervened when it shouldn’t have. Therefore, we can modify the denied topics and additional filters on our guardrail to make sure we pass this test.
Using the TDD approach, you can improve your guardrail over time by improving the guardrail’s success in stopping bad actors from misusing the application, identifying edge cases or gaps you might not have previously considered, and adhering to responsible AI policies.
Optional: Automate the workflow and iteratively improve the guardrail
We recommend reviewing your test results after each iteration. This step doesn’t guarantee the guardrail will pass all tests. You should use this step to help understand how to modify your existing guardrail configuration.
When practicing the TDD approach, we recommend improving the guardrail over time through multiple iterations. This optional step allows you to prompt the user for details, which are then used to build a guardrail and test cases from scratch. Then, you allow the user to input n number of iterations, where in each iteration you rerun all the tests and adjust the guardrail’s denied topics based on the test results.
To create the guardrail, prompt the user for the guardrail name and description. With the given description, you use the InvokeModel API with the guardrail_prompt.txt system prompt to generate the denied topics of your guardrail. Using this configuration, you invoke the CreateGuardrail API to build the guardrail. You can validate that a new guardrail has been created by refreshing your Amazon Bedrock Guardrails dashboard. In the following screenshot, you can see that a new guardrail for a photography application has been created.

Using the same parameters, you can use the InvokeModel API to generate test cases for your newly created guardrail. The tests_prompt.txt file provides a system prompt that makes sure that the FM creates 30 test cases with 20 input tests and 10 output tests. To practice TDD, use these test cases and iteratively modify the existing guardrail n times as requested by the user based on the test results of each iteration.
The process of iteratively modifying the existing guardrail consists of four steps:
Use the GetGuardrail API to fetch the most recent configuration of your guardrail:
current_guardrail_details = client.get_guardrail( guardrailIdentifier=guardrail_id, guardrailVersion=version) current_denied_topics = current_guardrail_details[‘topicPolicy’][‘topics’]current_name = current_guardrail_details[‘name’]current_description = guardrail_descriptioncurrent_id = current_guardrail_details[‘guardrailId’]current_version = current_guardrail_details[‘version’]
Use the CreateGuardrailVersion API to create a new version of your guardrail for each iteration. This allows you to keep track of every modified guardrail through each iteration. This API works asynchronously, so your code will continue to run even if the guardrail hasn’t completed versioning. Use the guardrail_ready_check function to validate that the guardrail is in the ‘READY’ state before continuing to run code.
response = client.create_guardrail_version( guardrailIdentifier=current_id description=”Iteration “+str(i)+” – “+current_description clientRequestToken=f”GuardrailUpdate-{int(time.time())}-{uuid.uuid4().hex}”)guardrail_ready_check(guardrail_id,15,10)
The guardrail_ready_check function uses the GetGuardrail API to get the current status of your guardrail. If the guardrail is not in the ‘READY’ state, this function implements wait logic until it is, or results in a timeout error.
def guardrail_ready_check(guardrail_id, max_attempts, delay): #Poll for ready state for attempt in range(max_attempts): try: guardrail_status = client.get_guardrail(guardrailIdentifier=guardrail_id)[‘status’] if guardrail_status == ‘READY’: print(f”Guardrail {guardrail_id} is now in READY state.”) return response elif guardrail_status == ‘FAILED’: raise Exception(f”Guardrail {guardrail_id} update failed.”) else: print(f”Guardrail {guardrail_id} is in {guardrail_status} state. Waiting...”) time.sleep(delay) except Exception as e: print(f”Error checking guardrail status: {str(e)}”) time.sleep(delay) raise TimeoutError(f”Guardrail {guardrail_id} did not reach READY state within the expected time.”)
Evaluate the guardrail against the auto_generated_tests.csv file using the process_tests function created in the earlier steps:
process_tests(input_file, output_file, current_id, current_version)test_results = pd.read_csv(output_file)
The input_file will be your auto_generated_tests.csv file. However, the output_file is dynamically named based on the iteration. For example, for iteration 3, it will name the results file test_results_3.csv.
Based on the test results from each iteration, use the InvokeModel API to generate modified denied topics. The get_denied_topics function uses the guardrail_prompt.txt when invoking the API, which engineers the model to consider the test results and guardrail description when modifying the denied topics.
updated_topics = get_denied_topics(guardrail_description, current_denied_topics, test_results)
Using the newly generated denied topics, invoke the UpdateGuardrail API through the update_guardrail function. This provides an updated configuration to your existing guardrail and updates it accordingly.
update_guardrail(current_id, current_name, current_description, current_version, updated_topics)
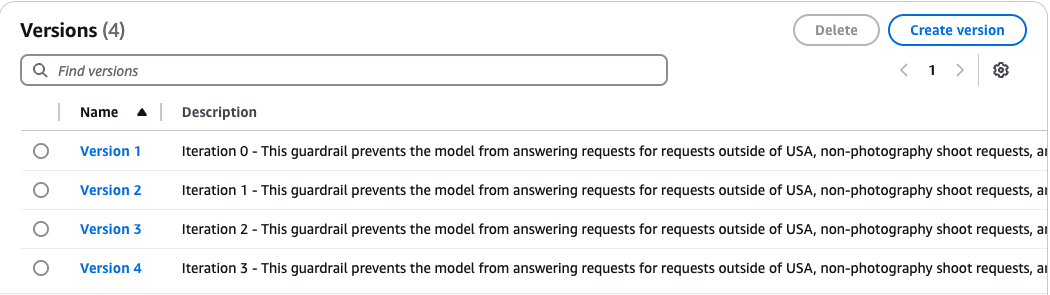
After completing n iterations, you will have n versions of the guardrail created as well as n test results, as shown in the following screenshot. This allows you to review each iteration and update your guardrail’s configuration to help meet your application’s requirements. When using TDD, it’s important to validate your test results and verify that you’re making improvements over time for the best results.
Clean up
In this solution, you created a guardrail, built a dataset, evaluated the guardrail against the dataset, and iteratively modified the guardrail based on the test results. To clean up, use the DeleteGuardrail API, which deletes the guardrail using the guardrail ID and guardrail version.
Pricing
This solution uses Amazon Bedrock, which bills based on FM invocation and guardrail usage:
FM invocation – You are billed based on the number of input and output tokens; one token equals one word or sub-word depending on the model used. For this solution, we used Anthropic’s Claude 3 Sonnet and Claude 3 Haiku models. The size of the input and output tokens is based on the size of the test prompt and size of the response. Guardrails – You are billed based on the configuration of your guardrail policies. Each policy is billed per 1,000 text units, where each text unit can contain up to 1,000 characters.
See Amazon Bedrock pricing for more details.
Conclusion
When developing generative AI applications, it’s crucial to implement robust safeguards and governance measures to maintain responsible AI use. Amazon Bedrock Guardrails provides a framework to achieve this. However, guardrails aren’t static entities—they require continuous refinement and adaptation to keep pace with evolving use cases, malicious threats, and responsible AI policies. TDD is a software development methodology that encourages improving software through iterative development cycles.
As shown in this post, you can adopt TDD when building safeguards for your generative AI applications. By systematically testing and refining guardrails, companies can not only reduce potential risks and operational inefficiencies, but also foster a culture of shared knowledge among technical teams, driving continuous improvement and strategic decision-making in AI development.
We recommend integrating the TDD approach in your software development practices to make sure that you’re improving your safeguards over time as new edge cases arise and your use cases evolve. Leave a comment on this post or open an issue on GitHub if you have any questions.
About the Author
 Harsh Patel is an AWS Solutions Architect supporting 200+ SMB customers across the United States to drive digital transformation through cloud-native solutions. As an AI&ML Specialist, he focuses on Generative AI, Computer Vision, Reinforcement Learning and Anomaly Detection. Outside the tech world, he recharges by hitting the golf course and embarking on scenic hikes with his dog.
 Aditi Rajnish is a Second-year software engineering student at University of Waterloo. Her interests include computer vision, natural language processing, and edge computing. She is also passionate about community-based STEM outreach and advocacy. In her spare time, she can be found rock climbing, playing the piano, or learning how to bake the perfect scone.
 Raj Pathak is a Principal Solutions Architect and Technical advisor to Fortune 50 and Mid-Sized FSI (Banking, Insurance, Capital Markets) customers across Canada and the United States. Raj specializes in Machine Learning with applications in Generative AI, Natural Language Processing, Intelligent Document Processing, and MLOps.


